
All Hell Breaks Loose
It was a lovely sunny Sunday morning, completely peaceful, except for the occasional chatter of a machinegun in the distance – Lt. General Brian Horrocks
We can hold the Arnhem bridge for four days. But…I think we might be going a bridge too far – Lt. General “Boy” Browning
In the Garden plan, British XXX Corps was to break out of the frontline, and race along the Belgian-Dutch border towards Arnhem. However, the British were reliant on a single road, Highway 69, to support their advance. The British Army’s VIII and XII Corps had orders to attack on the right and left flanks respectively.

In his orders, Horrocks warned that “tough opposition was expected” and that the terrain could be a hindrance. Horrocks, however, could not have anticipated the scale of German resistance. Driven by the realization that the Allied push posed a direct threat to the Fatherland, the Germans would exact astounding stopgap performances from their eclectic forces.
Horrocks’ orders also stressed that “speed was vital” to reach the 1st Airborne Division at Arnhem – “if possible in 48 hours”. (Horrocks, pg. 133). But for the British troops on the ground, the war seemed almost over. The weather had the pleasant suggestion of early autumn (herfst as the Dutch called it), with languid evenings and a vague orange appearing at the tips of leaves. But the idyllic impression was shattered.
Not soon after Operation Garden kicked off from its launch point on the Belgian-Dutch border at 1435 hrs on 17 September 1944, its armored vanguard met a hail of fire.
According to the war diary of the lead unit, the 2nd (Armoured) Battalion, Irish Guards (under Lt. Colonel Giles Vandeleur), the advance came to a halt just 10 minutes after it began — brought to standstill by the destruction of nine Sherman tanks in two minutes by small groups of Germans with anti-tank weapons.

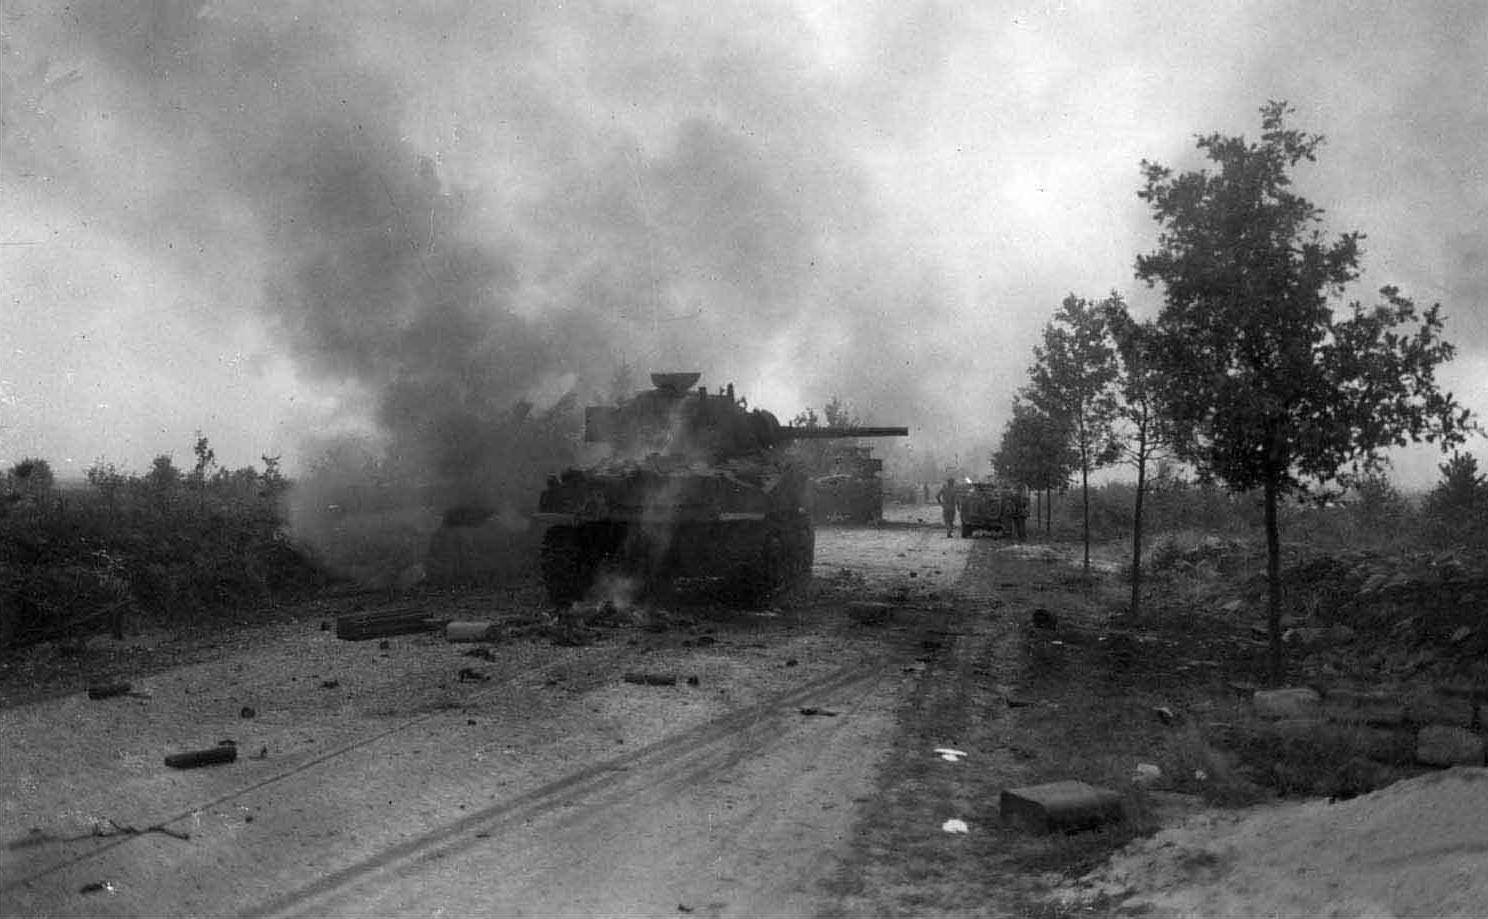
British airpower was summoned to clear the way and a mass of British Hawker Typhoon fighter-bombers assailed the German positions for the next hour, across 230 sorties. But hours passed before the local enemy resistance was nullified and the British armored column set off again.
Horrocks’ decision to wait to launch Garden at midday, until after the airborne forces arrived in the Netherlands, was problematic. The delay appears to have been prompted by the absence of adequate numbers of air reconnaissance units to support the breakout.
Due delays in informing Air Marshal “Mary” Coningham of the 2nd TAF about Market-Garden, some fighter-bomber units were also not in place near the frontline to support XXX Corps’ breakout.
No 83 Group had 12 squadrons of Typhoon fighter-bombers available to support Operation Garden, out of which eight squadrons were deployed at airfields within 80 km (49 miles) of the frontline by dawn on D-Day, the 17th. Two other Typhoon squadrons moved to forward airbases (at Brussels and Antwerp) on the 17th itself. The two remaining Hawker Typhoon squadrons would transfer to a forward airfield at Antwerp only the 18th. (See Christopher Shores & Chris Thomas, 2nd Tactical Air Force, Volume 2 (Classic, 2005), pg. 239)
Considering the magnitude of Operation Market-Garden, efforts should have been made to ensure that all supporting air units were in place by the 16th. In any case, Horrocks’ mid-day start added yet another delay to the timetable that the British could not afford. Ideally, Garden should have kicked off at dawn on 17 September.
The airborne began taking off from England at 1030 hrs. The flight from England to the drop zones (DZs) took two hours. The men of the Allied pathfinders began landing first – at the various DZs from 1240 hrs.
The choice of having the British Guards Armoured Division lead the Garden forces was also questionable, as the division’s performance had been middling despite its massive reputation as a manifestation of British esprit d’corps. Montgomery was no fan of the Guards as they hoarded a large pool of high-quality, physically fit, intelligent manpower, amid a glaring manpower shortage in the British Army in 1944. (See Buckley & Preston-Hough, ch. 3)
The influence of the Guards pervaded the upper echelons of government. Among their admirers was the British Prime Minister, Winston Churchill. This insulated the divisional commander, Major General Alan Adair, from being sacked by Montgomery. (ibid.)
The division, known for its nonchalance and style, would show little creativity and initiative during Market-Garden.
The Statistical Data of Operation Market
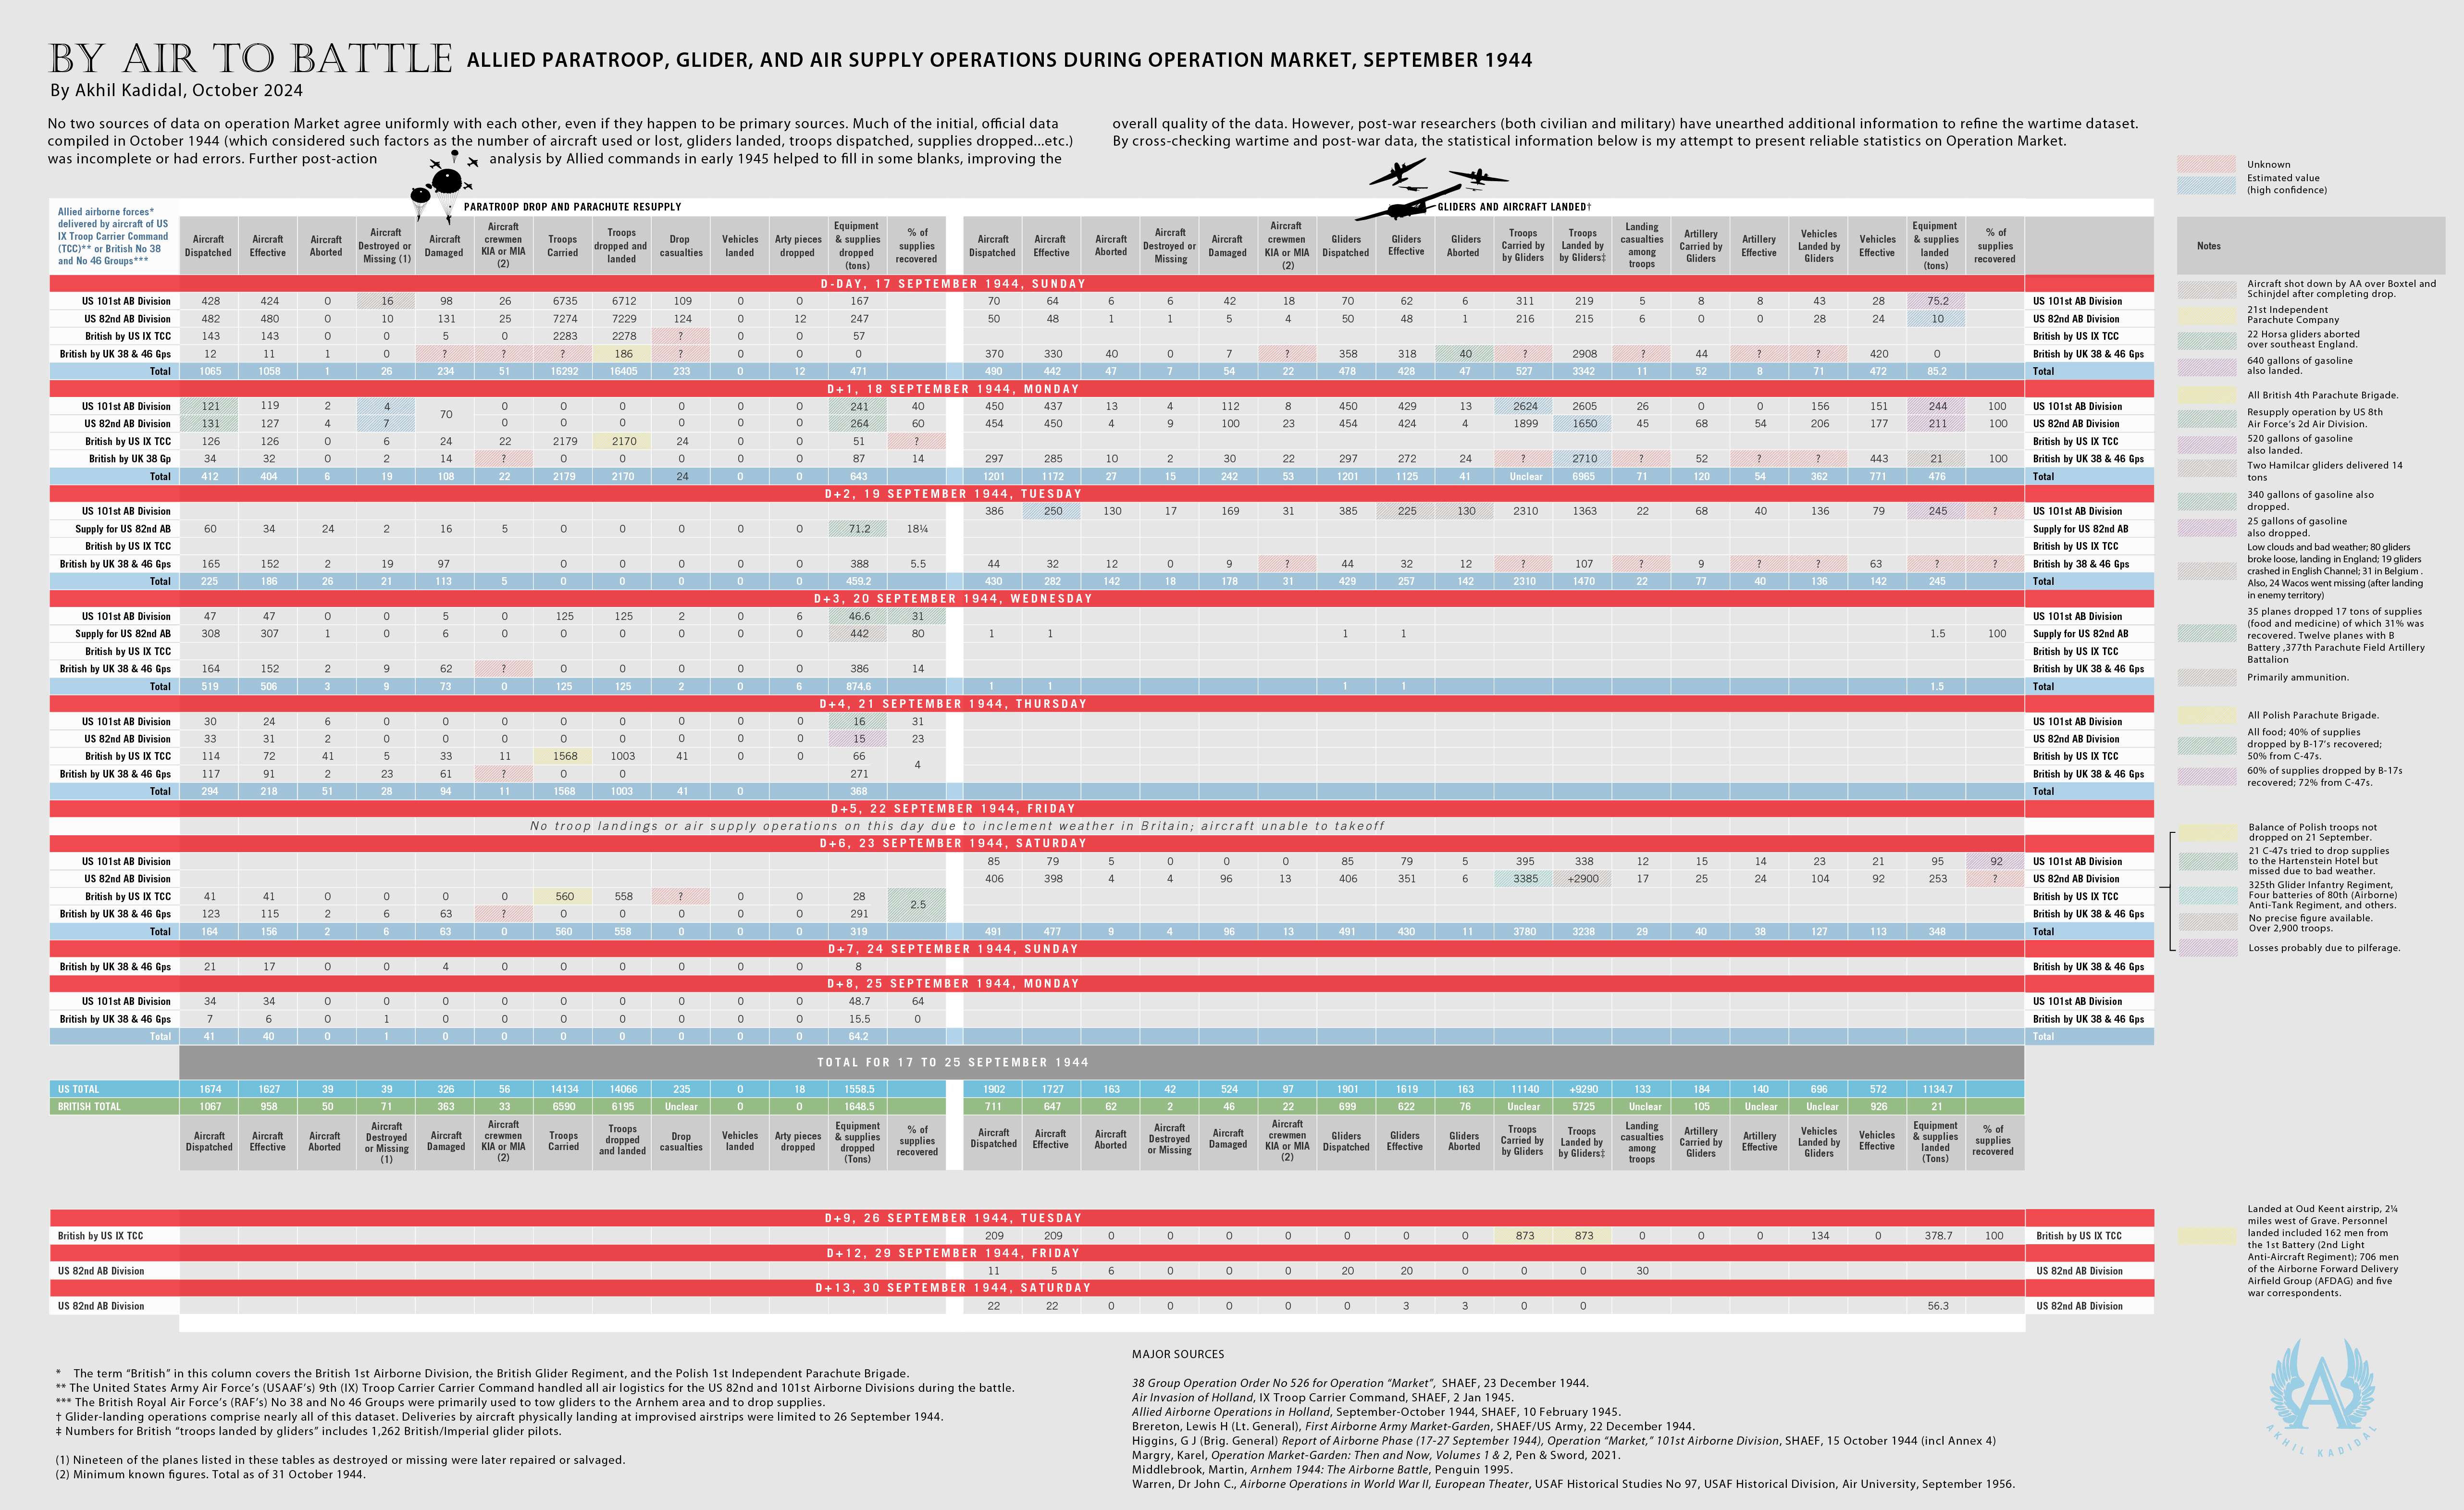
The initial, official data compiled in October 1944 (which considered such factors as the number of aircraft used or lost, gliders landed, troops dispatched, supplies dropped…etc.) was incomplete or had errors. Further post-action analysis by Allied commands in early 1945 helped to fill in some blanks, improving the overall quality of the data. However, post-war researchers (both civilian and military) have unearthed additional information to refine the wartime dataset. By cross-checking wartime and post-war data, the statistical information above is my attempt to present reliable statistics on Operation Market.
As it would take some effort to convert the data above into a HTML friendly datasheet, I present a pdf version of the above graphic. I am happy to discuss these statistics if anyone has additional or differing information on-hand.
Market-Garden Air Support
| Unit | Type of support | Dispatched | Aircraft Types | Targets | Bomb (tons) | Enemy aircraft | Enemy A/C claimed destroyed | |||
| Bomber | Fighter | Lost | ||||||||
| 16/17 September 1944 | ||||||||||
| RAF Bomber Command | Bomber | 282 | 2 | Lancaster,Mosquito | Airbases and flak | 1180 | 0 | 0 | ||
| RAF | Night-fighter | 6 | 0 | Mosquito | N/A | 0 | 0 | |||
| 8th AF | Night-fighter | 5 | 0 | P-61? | N/A | 0 | 0 | |||
| 17 September 1944, D-Day | ||||||||||
| Prelim Support, Morning | RAF BC | Feint | 85 | 0 | Lancasters | Walchern Island | ? | 0 | 0 | |
| ADGB | Escort for above | 71 | 0 | 15 Mosquitos, 53 Spitfires | 0 | 0 | 0 | |||
| 8th AF | Bomber | 872 | 2 | B-17s | 117 installations (mostly AA batteries along TC routes) | 2888 Frag, 29 HE | 0 | 0 | ||
| 8th AF | Escort | 550 | 16 | 147 x P-47 (8 lost), 90 x P-38, 313 x P-51 (8 lost) | The P-47s escorted B-17s; the rest escorted the serials | N/A | 30 | 8 | ||
| 2nd TAF | Precision Strike | 122 | 3 | 50 x Mosquito, 48 x Mitchell, 24 x Boston | German barracks at Nijmegen, Arnhem, Ede | 94 | 0 | 0 | ||
| Guards Div Support | 2nd TAF | CAS | 100 | Typhoons (121, 124 Wings) | N/A | 0 | 0 | |||
| Arnhem & Nijmegen Sectors | 2nd TAF | CAP | ? | Mustangs (122 Wing) | N/A | 0 | 0 | |||
| Nijmegen Sector | ADGB | Transport Escort | 300 | Spits (18 sqs) | From England to the IP | N/A | 0 | 0 | ||
| 8th AF | Transport Escort | 100 | P-51 (2 gps) | From IP to sector | N/A | 0 | 0 | |||
| ADGB | Flak Strike | 195 | 1 | Tempest (8 sqs), Mustang (3 sqs, 1 a/c lost), Spitfire (2 sqs) | Flak from coast to IP | N/A | 0 | 0 | ||
| 8th AF | Flak Strike | 50 | P-47 (78th FG) | Flak from IP to sector | N/A | 0 | 0 | |||
| Eindhoven Sector | 8th AF | Escort | 300 | P-51 (6 gps) | From Belgian coast to sector | N/A | 0 | 0 | ||
| 9th AF | Strike | 142 | 2 | P-47 (2 gps), P-38 (2 gps, 2 a/c lost) | Flak between IP and DZs | N/A | 0 | 0 | ||
| 9th AF | Escort | 166 | 1 | P-51 | Air support for serials | N/A | 0 | 0 | ||
| Aux Support | RAF BC | Feint | 20 | 10 planes dropped dummies near Utrecht; 10 near Emmerich | 0 | 0 | 0 | |||
| 18 September, D+1 | ||||||||||
| 8th AF | Supplies | 252 | 16 | B-24 | Escorted by 192 fighters from below table | 10.5 | 0 | 0 | ||
| 8th AF | Escort for above | 415 | 28 | 316 x P-51 and 99 x P-47s (3 gps) | Also bombed and strafed ground targets | 8.9 | 90 | 29 | ||
| 9th AF | Flak Strike | 95 | 3 | P-47 | N/A | 0 | 0 | |||
| Nijmegen Sector | 2nd TAF | CAP | 130 | ? | 97 x Spits, ? x Mustang (125, 126 Wings) | N/A | 0 | 0 | ||
| ADGB | Escort | 277 | 6 | 165 x Spitfire (19 sqs), 48 x Tempest (5 sqs), 36 x Mustang (3 sqs), Mosquito | Flak positions from Schouwen island to the IP | N/A | 0 | 0 | ||
| 19 September, D+2 | ||||||||||
| 8th AF | CAP, Flak Strike | 182 | 9 | P-51s (7 gps) | Between England and the southern IP near Gheel | ? | 425 | 23 | ||
| ADGB | CAP | 127 | 1 | Spitfires (15 sqs; but bad weather interrupted full ops) | N/A | 0 | 2 | |||
| 20 September, D+3 | ||||||||||
| ADGB | Escort | 248 | 3 | Initial escort for 67 Stirlings. Spits (3 sqs), Mustang (3 sqs): 65 planes; Later: Spits (17 sqs) 173 sorties | N/A | 0 | 0 | |||
| 8th AF | Escort, CAP | 526 | 5 | 470 x P-51, 26 x P-38 | N/A | 0 | 0 | |||
| 8th AF | Flak Strike | 183 | ? | P-47 (4 gps) | Flak suppression beyond IP | ? | 0 | 0 | ||
| 9th AF | Ground Support | 43 | 0 | P-47 | Broad Market-Garden area | N/A | 0 | 0 | ||
| Nijmegen Sector | RAF | Ground Support | 52 | 36 x Mustang, 16 x Spitfire | N/A | 0 | 0 | |||
| 21 September, D+4 | ||||||||||
| ADGB | Escort, Area Support | 137 | 0 | Spitfires, Mosquitoes, 21 x Mustangs | N/A | 100 | 20 | |||
| 8th AF | Escort, Area Support | 95 | 4 | 71 x P-47 (56th FG: 34), 24 x P-51 (353rd FG) | N/A | |||||
| 22 September, D+5 | ||||||||||
| Arnhem Sector | 8th AF | 79 | 0 | N/A | 0 | 0 | ||||
| Ooster-beek Area, NW of Arnhem | 2nd TAF | CAS | ? | ? | Typhoon, bombers | Enemy targets on south bank of Lower Rhine; 500 sorties NW of Arnhem (104 were armed recce) | ? | 10 | 0 | |
| 23 September, D+6 | ||||||||||
| ADGB | Transport Escort | 193 | 2 | N/A | 0 | 0 | ||||
| Nijmegen Sector | 8th AF | Transport Escort | 586 | 25 | 136 x P-47, 410 x P-51, 40 x P-38 | 10.4 | 185 | 27 | ||
| 2nd TAF | 24 | ? | Typhoon | Enemy targets around Oosterbeek | ||||||
| 24 September, D+7 | ||||||||||
| Arnhem | ADGB | Escort | 36 | 0 | Spitfire | For 21 Dakotas from 46 Group on supply op to Harten-stein pocket | N/A | ? | ? | |
| Goch and North of Arnhem areas | 2nd TAF | Escort, CAP | 58 | 3 | 36 x Spitfire, 22 x Typhoon (124 Wing) | N/A | 40 | 1 | ||
| 25 September, D+8 | ||||||||||
| Arnhem Sector (first full commit-ment in area) | 2nd TAF | CAP | 177 | 8 | 73 x Spitfire, 11 x Mosquito XIII, 21 x Mustang, 7 x Typhoon, 54 x Mitchell, 24 x Boston | In cloud and rain conditions, German movement from Renkum to Arnhem attacked | N/A | 90 | 17 | |
| ADGB | Escort, CAP | 96 | 2 | 60 x Spitfire, 36 x Mustang | Escort for 33 Dakotas | N/A | 4 | |||
| TOTALS | 1,633 | 5,744 | 140 | |||||||
| Unit | Type of support | Dispatched | Aircraft Types | Targets | Bomb (tons) | Enemy aircraft | Enemy A/C claimed destroyed | |||
| Bomber | Fighter | Lost | ||||||||
A/C: Aircraft; ADGB: Air Defence Great Britain; CAP: Combat Air Patrol; CAS: Close Air Support; Gps: Groups; RAF: Royal Air Force; Sqs: Squadrons
Sources: Allied Airborne Operations in Holland, September-October 1944, SHAEF, pgs. 3-4; Warren, USAF Historical Studies No 97, Air Operations in WWII; 21st Army Group Report; Chris Shores & Chris Thomas, 2nd Tactical Air Force Volume 2 (Classic, 2005), pgs. 293-308, Air Invasion of Holland, Annex 05, pgs. i-vi
The Red Devils
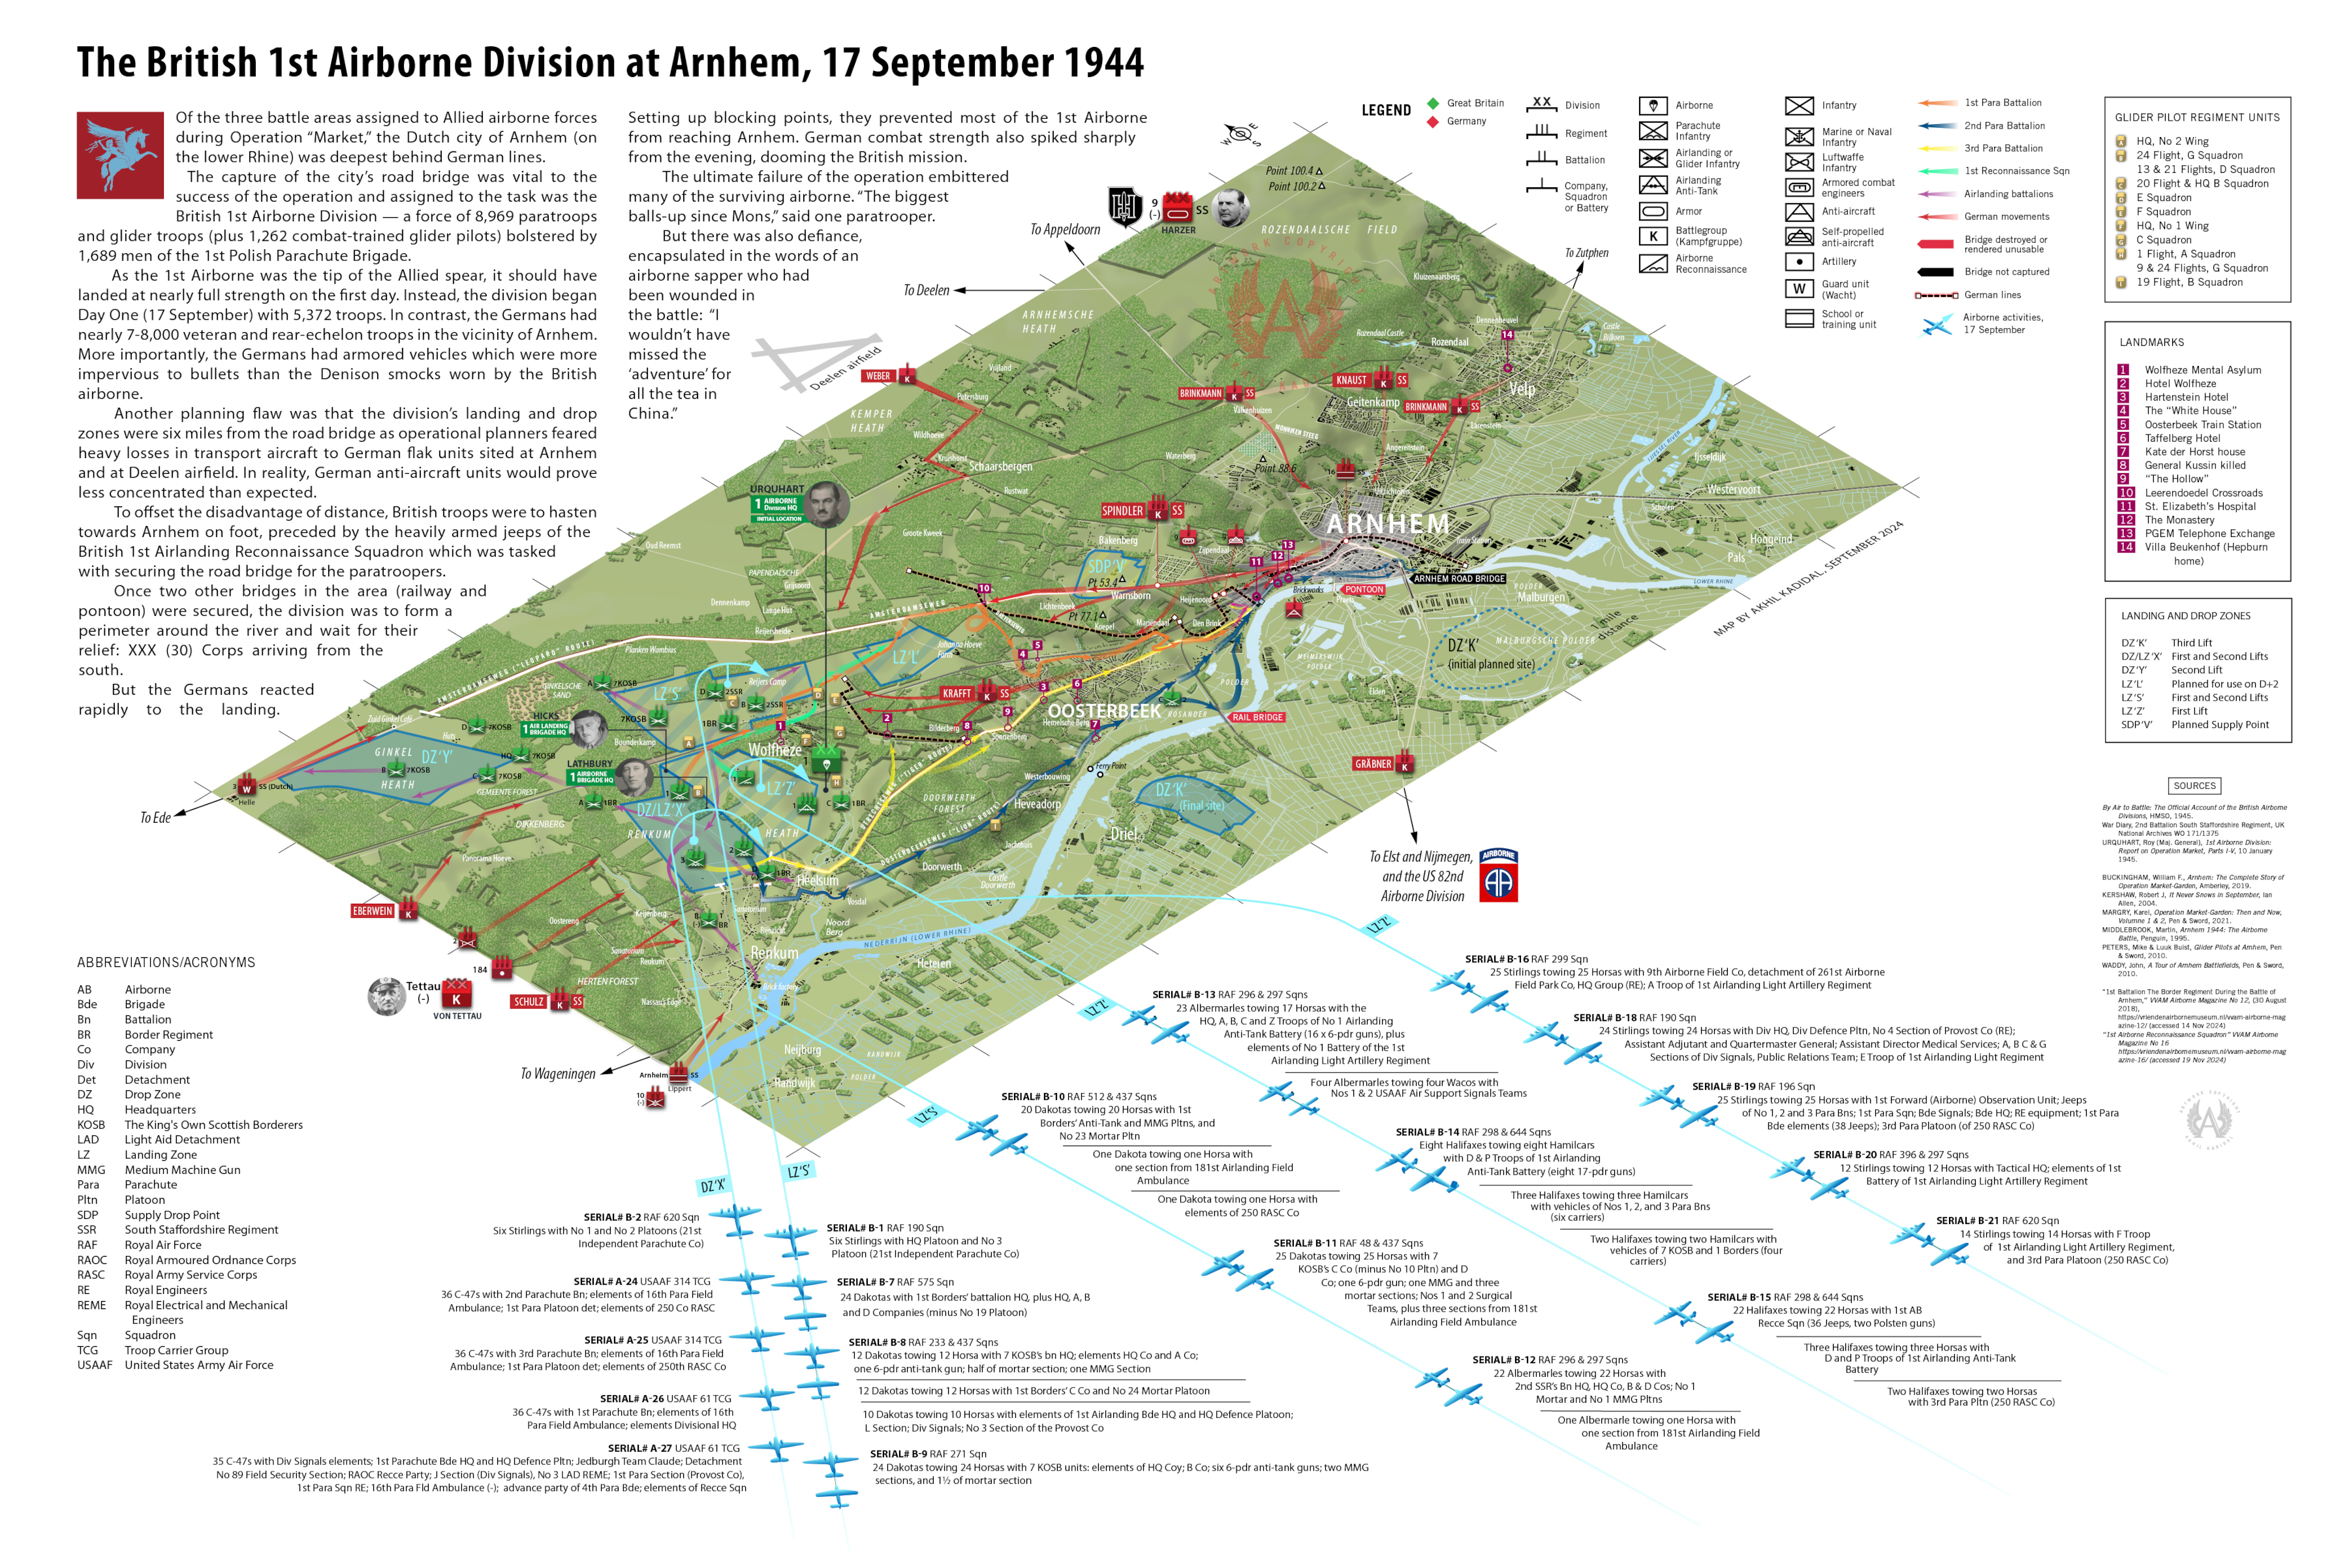
British success in Operation Market hinged on the capture of Arnhem and its road bridge. But the plan was fraught with problems.
After securing the road bridge and the nearby railway bridge, the British 1st Airborne Division was to hold the city and the western suburb of Oosterbeek until Horrocks’ XXX Corps arrived. A third bridge also existed at Arnhem (a pontoon bridge). But the Germans had removed the middle section of this bridge and towed it to the south bank.

Thanks to RAF planners, not a single Allied airborne unit was assigned to land on the south bank until the planned arrival of the Polish Brigade on D+2 (18 September).
The British 1st Airborne was also commanded by a neophyte to airborne warfare, Major General Roy Urquhart, who had last seen battle as an infantry brigade commander.13 Urquhart was no natural member of the airborne community. For one, he suffered from airsickness.
His inexperience in airborne or even divisional-level operations was compounded by the fact that the British 1st Airborne Division was not uniformly an elite formation as the US 82nd Airborne was, for example.14
The total war establishment (WE) strength of the1st Airborne Division in mid-1944 was between 12,148 and 12,215 personnel.15 However, curiously, only 8,969 divisional personnel would be deployed to fight during the Market. (Martin Middlebook, Arnhem 1944: The Airborne Battle (Penguin 1995) pg. 39 & By Air To Battle: The official Account of the British Airborne Divisions (HMSO, 1945), pg. 98)
Officially, the British Parachute Regiment had to recruit the best and brightest; men ready to undertake any mission. To this end, the paratroopers received better pay, greater pay and had bragging rights over glamour and adventure.16
The regiment even had an alluring nickname, “Red Devils,” thanks to German 1943 dispatches in North Africa, describing encounters with fearsome British paratroopers who wore red berets. (G G Norton, The Red Devils (Leon Cooper, 1971), pg. 55)
The reports also mentioned a crotch flap on the paras’ trademark Denison smocks, which during drops, was used to prevent air from riding up the smock. When unfastened on the ground, however, the flap hung down like a broad, beaver-like tail, leading to descriptions in local Arab accounts as “men with tails”.

The regiment’s aura was heightened by its quixotic emblem: Bellerophon mounted on the winged horse Pegasus, as created by the English artist, Edward Seago. Browning chose the emblem after he was appointed to raise the airborne forces in 1941.
Britain’s interest in expanding its airborne forces amid its chronic manpower shortages, prompted the conversion of some conventional infantry battalions to parachute battalions. All men within the converting unit had to officially “volunteer” to join the Parachute Regiment. (Buckley & Preston-Hough, Ch. 3, loc. 1610, 20%).
This was the case with the 10th Parachute Battalion (formed from the 2nd Battalion, Royal Sussex Regiment), which was a part of the British 1st Airborne. It can be argued that the wholesale recruitment somewhat diluted the original standards sought by the Parachute Regiment. In addition, not every “Red Devil” was a combat veteran. For instance, the 1st Airborne did not even participate in the Normandy campaign.

From left to right: Private Richards, Private Alfred Dann (KIA 4 October), Sergeant John Bermingham (KIA 19 September), medic Private R J Freeman (POW), Sergeant Eric Hall, Sergeant Fred Wain, Privates Frank Walton, Due Jeders, T Montgomery (a signaler, hence the different cap badge), and Frank Dobrozyski (KIA 19 September), and a member of the Royal Artillery, possibly Corporal Nobby Clarke. Kneeling is Lance-Corporal Walker Lewis (KIA 17 September). (Margry book)
Controversial Plan for Arnhem
The limited number of transport aircraft meant that Urquhart could only transport about 5,372 troops to the Arnhem zone on day one (17 September), to landing sites that were over six miles west of Arnhem road bridge, near the villages of Wolfheze and Renkum.
The distant landing sites meant that the British airborne would have to march for over two hours to reach the main road bridge at Arnhem, and therefore, had zero element of surprise.

When Brigadier General James Gavin, commander of the US 82nd Airborne, heard of this during a commander’s conference on 14 September at Browning’s Headquarters at Moor Park, he could scarcely believe that Urquhart had agreed to such an arrangement.
Turning to his G-3, Colonel John Norton, Gavin exclaimed: “My God, he can’t mean it.”
Norton responded: “He does, and he is going to try to do it.” (James Gavin, On to Berlin (Leo Cooper, 1979), pg. 150)
When Urquhart announced that he had planned three separate airlifts to transport the 1st Airborne and its attached Polish 1st Brigade to the Arnhem zone, another outburst emerged, this time from Major General Stanislaw Sosabowski (the Polish Parachute Brigade commander).
“But the Germans, General,” Sosabowski shouted. “How about the Germans? What about them?” (Gavin, ibid)
Sosabowski was a firebrand not known to mince words. He was also a man with major combat experience. He had fought the Germans in 1939, in his homeland before it was overrun by the Nazis and the Soviets. After escaping to England, he had, on the orders of the Polish government in exile, formed the Polish 1st Independent Parachute Brigade. The brigade had slowly grown to a strength of about 1,800 men who were not easily replaceable. Sosabowski had every intention of using them to help liberate his country from Nazi Germany when the time came.
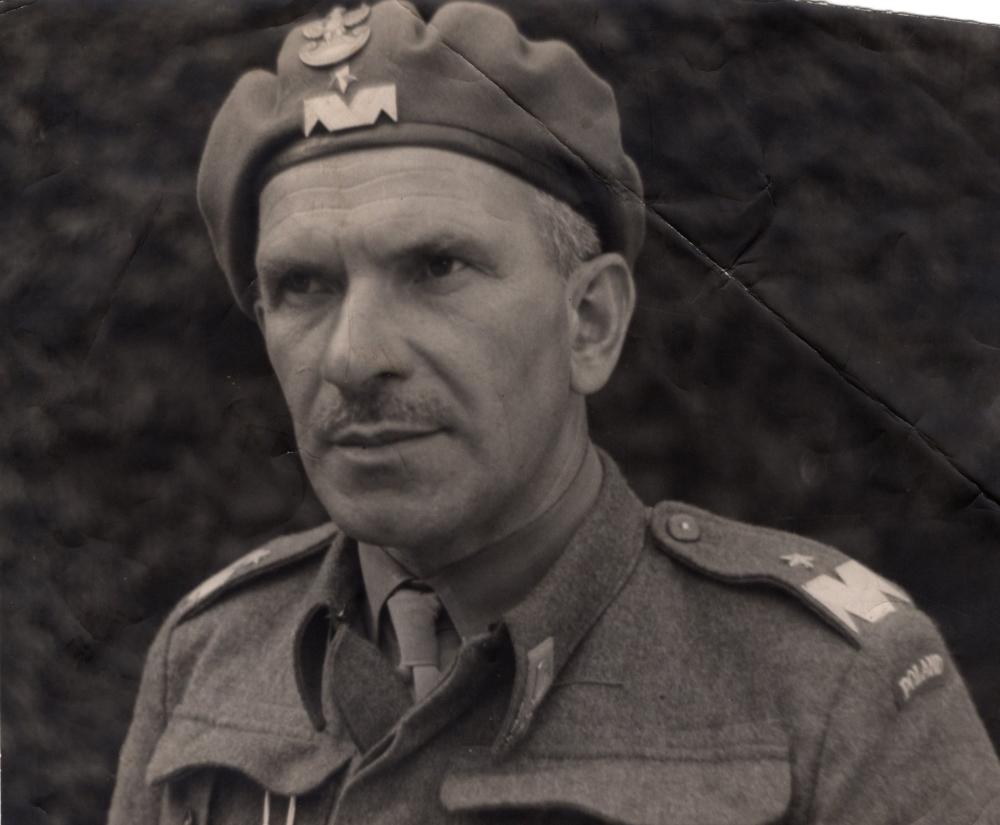
Unlike many American commanders, Sosabowski actually saw merit in Montgomery’s overall plan for Market-Garden. “I preferred Montgomery’s plan for a single thrust, by-passing the Siegfried Line and going straight through the Ruhr into the wide north German plain, where the tanks could have been used to the best advantage,” he said. (Stanislaw Sosabowski, Freely I served (Pen & Sword, 2013), pg. 268)
Sosabowski also knew that the alternative was grim, as it would require the Allies to blast through the Siegfried line, “pillbox by pillbox.” (Ibid). However, the Polish General was dismayed to find that most of the other British brigadiers were nonchalant about Urquhart’s operational plan for Arnhem.
To Sosabowski, the rest of the divisional officers seemed to assume that the Germans would simply let the “Red Devils” march to Arnhem undisturbed.17 (Gavin, pg. 150 & Sosabowski, pg. 204)

To his credit, Urquhart had asked for landing sites closer to the Arnhem bridge, backed by Colonel George Chatterton, the head of the British Glider Pilot Regiment. Air Vice-Marshal Hollinghurst of the RAF’s No 38 Group declined Urquhart’s request on the grounds that RAF planners had already forecast 40% losses in transport aircraft flying to the existing sites near Wolfheze-Renkum. (Buckingham, pg. 128)
Revising the drop zones closer to Arnhem could exponentially increase the aircraft loss rates, Hollinghurst claimed. He added that flying to Arnhem would also cause the aircraft to overfly Deelen airfield where concentrated flak units would take a further toll on the slow-moving transports. (Ibid., pg. 128)
Allied intelligence estimates conceived the presence of 44 heavy anti-aircraft (AA) guns around Arnhem, bolstered by 112 light AA guns. (Mike Peters & Luuk Buist, Glider Pilots at Arnhem (Pen & Sword, 2009), pg. 103)
British paratroopers would later be unable to understand why overwhelming Allied air power was not unleashed against the anti-aircraft positions. (see John Frost, One Drop Too Many (Pen & Sword, 2009), loc. 3184, 67%) The paratroopers did not know that because of the political infighting among the senior Allied air commanders, a concerted effort was not undertaken to destroy all local flak positions from the air.
On the first day, the US Army Air Force (USAAF) sent 550 fighter aircraft (including 397 from the US 8th Air Force) to support Market but attacks on flak batteries did not go well as the Germans camouflaged their guns and held their fire. The US pilots claimed the destruction of 107 flak positions on the first day. Thereafter, the claims plummeted. (Air Invasion of Holland, Annex No 5, pg. i-vi)
Nevertheless, Hollinghurst’s concerns about flak were somewhat fanciful. This was proven during the first airlift to the Arnhem sector when not a single transport was lost.
Major General Richard Gale, commander of the British 6th Airborne Division (which had fought in Normandy), thought that Urquhart should have insisted on closer drop zones “to the point of resignation.” (Margry, Ch. 2, 4%)
Urquhart’s follow-on proposal to land a small force of paratroopers or gliders south of the Arnhem bridge was also vetoed on the grounds that the polder land south of the bridge was unsuitable – Incredible, considering that the RAF had been prepared to land gliders on the same polder under the earlier Comet plan. (Frost, loc. 3191, 67%)
To compensate for the limitations imposed on him, Urquhart should have packed the first airlift with a maximum number of frontline combat troops. Instead the first airlift also contained sizable numbers of second-echelon personnel from ambulance/medical, electrical and mechanical workshops, supply men (including quartermasters), and public relations units.
A battery of light artillery was also included in the glider stream.
Tip of the Spear
The two primary British combat units in the first airlift was Brigadier Gerald Lathbury’s battle-hardened 1st Parachute (Para) Brigade which had the task of capturing Arnhem and securing the bridge.
The other was Brigadier Philip “Pip” Hick’s 1st Airlanding Brigade (with three battalions of glider-borne troops plus a field ambulance unit). This brigade which had to stay behind and guard the landing and drop zones for the arrival of Brigadier John “Shan” Hackett’s 4th Parachute Brigade during the second airlift, on the 18th.
As if in recompense for the unwieldy nature of this arrangement, the 1st Airlanding Reconnaissance Squadron (under Major Freddie Gough and equipped with 36 armored and heavily armed Jeeps) was to race to Arnhem and hold the main bridge until Lathbury’s 1st Parachute Brigade could arrive.
Urquhart should have made every effort to have also had Hackett’s 4th Parachute Brigade airlifted on day one. This would have given him nearly 2,180 additional men with which to secure Arnhem.
Between the US IX Troop Carrier Command (TCC) and the RAF’s No 38/46 Groups, some 169 aircraft were unused on the first day – which, if at least 70% were serviceable at the time, would have been sufficient to transport Hackett’s brigade.
| Unit | Aircraft | Available | Unused on 17 September |
|---|---|---|---|
| US IX TCC | C-47/C-53 | 1,274 | 101 |
| No 38 Group, RAF | Stirling | 191 | 15 |
| Halifax | 65 | 15 | |
| Albemarle | 65 | 4 | |
| No 46 Group, RAF | Dakota | 164 | 34 |
| Total | 1,759 | 169 |
The 4th Para’s drop zone (DZ) was at Ginkel Heath, located even further from Arnhem – at about seven miles. Initial elements of Sosabowski’s Polish Brigade would land with Hackett but the bulk of the Poles were scheduled to arrive on 19 September in the third airlift, and on the south bank.
Urquhart’s plans “seemed more like a peacetime exercise than war,” Gavin remarked. (Gavin, pg. 150)
Making for the Arnhem Bridge
Lathbury had three battalions of hard-bitten paratroopers in the 1st Para Brigade.
They were to advance to Arnhem via three separate routes: “Leopard” (allotted to Lt. Colonel David Dobie’s 1st Para Battalion), “Tiger” (Lt. Colonel John Fitch’s 3rd Para Battalion), and “Lion” (assigned to Lt. Colonel John Frost’s 2nd Para Battalion).
Not only did this arrangement disperse the three battalions from where they could not support each other, but they would also have to hasten blindly along the three routes without the benefit of forward reconnaissance.
Lathbury’s orders stipulated the capture of Arnhem and the bridge by the 2nd and 3rd Battalions. Dobie’s 1st Para had ludicrous orders to secure the high ground north of Arnhem, which potentially meant the isolation of the unit.
The paradrop and glider landings, however, were remarkably precise, with nearly 100% accuracy.
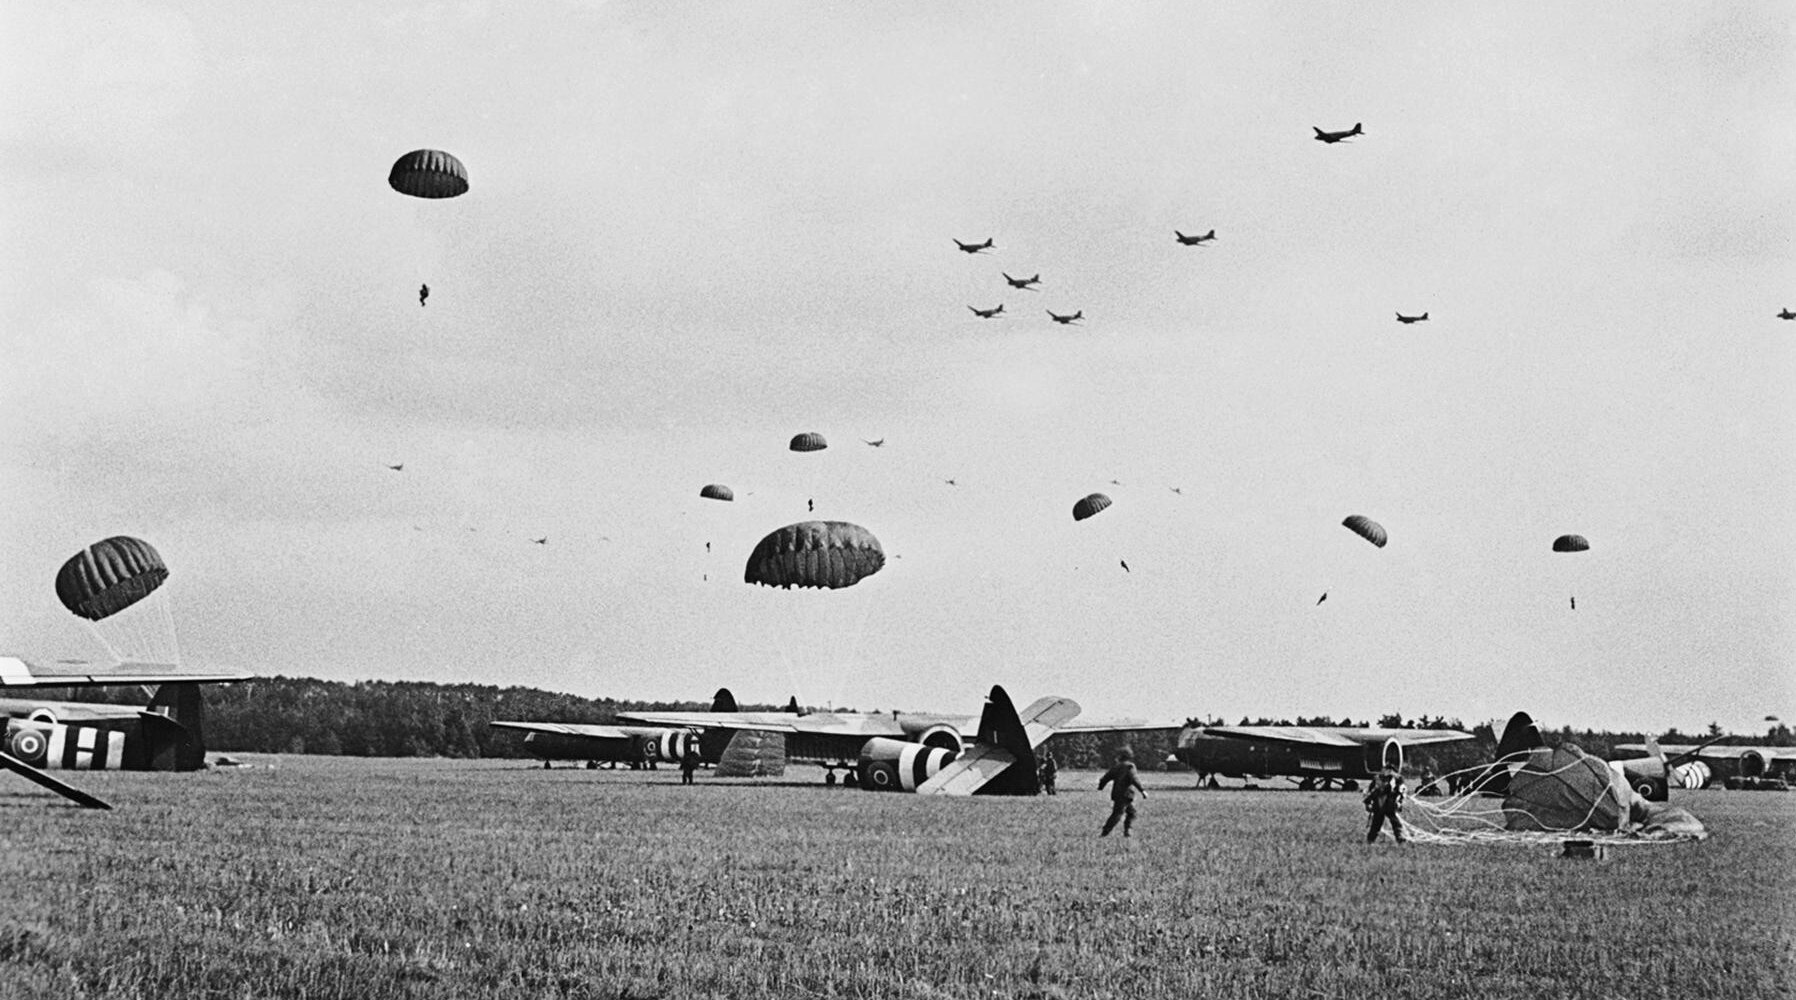

But the near total absence of initial German resistance gave the landing a relaxed quality. “A YMCA drop,” one participant said. (1st Airborne Division: Report on Operation Market, Parts 1-III (British Army, 10 January 1945), pg. 4 & Buckingham, pg. 264)
The assembly and rendezvous were lethargic. Although the 1st Para Brigade had completed its landing at the DZ by 1410 hrs, it took the brigade until 1445 hrs to report ready for action. Then followed another delay of 25 to 50 minutes before the para battalions were permitted to move towards Arnhem. (Buckingham, pgs. 264-265)
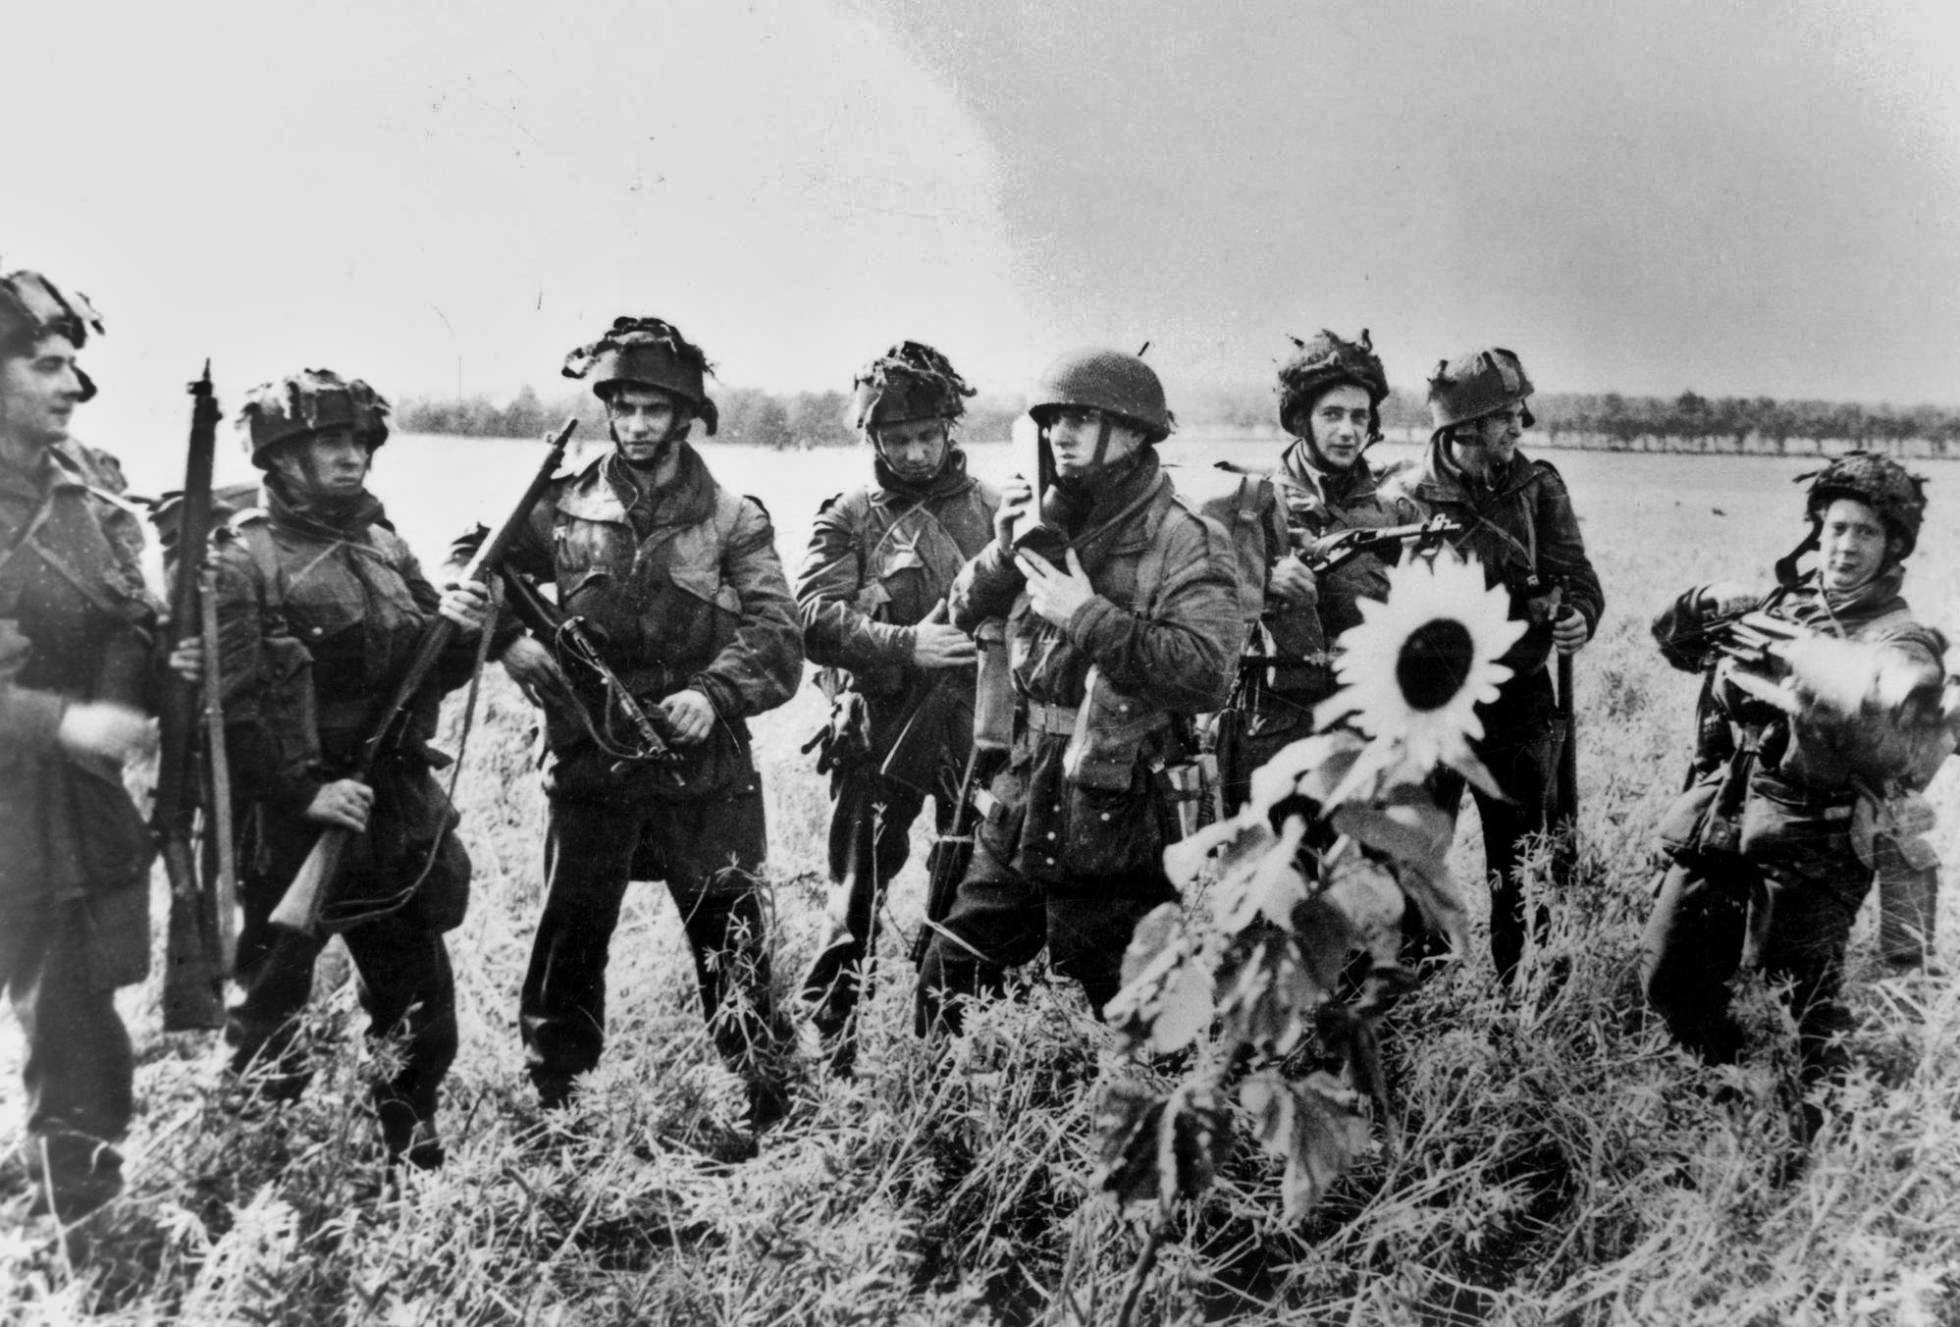
From left: Corporals D R Cansell and S Howett, Signalman Jimmy Foxon, Lance-Corporal George Elliot, Lance-Sergeant Ron Cole (with SCR-536 radio), and Signalmen J “Wog” Holloway, Jim McCulley, and J Nicoll. Nicoll is captured in a comical pose as he pulls a Bren light machinegun from its protective cover.
Rapid German Reaction
Unbeknownst to the British, the Germans were using this time to deploy along the western routes to Arnhem.
At the fore was the 16th SS Training and Replacement Battalion under SS Captain Sepp Krafft, with about 435 men. The battalion, soon known as Kampfgruppe Krafft, was setting up in the woods north of Sonnenberg. Another German battlegroup, Kampfgruppe Spindler, was arriving to set up a blocking position along the railway line, east of Oosterbeek, and along the Dreyenseweg (Dreyense road). (Kershaw, pgs. 69-73 & 102)
Commanded by SS Lt. Colonel Ludwig Spindler, leader of the 9th SS Division’s artillery regiment, Kampfgruppe Spindler had various quick-reaction companies composed of pioneers with some armored halftracks, artillerymen without guns, four depleted companies of SS panzergrenadiers (armored infantry), flak gunners with two AA pieces, and Dutch SS militia members – in all, at least 1,400 men.18

Spindler would be reinforced by other divisional elements cobbled into yet another battlegroup: Kampfgruppe Allwörden, with about 410 men consisting of panzerjäger (anti-tank), pioneer and supply companies, supplemented by naval personnel, all under SS Hauptsturmführer (Captain) Klaus Von Allwörden. This battlegroup also possibly operated the last three Panther Vs left in the division. But the British may have destroyed these early in the fighting. The battlegroup occupied positions along the Dreyenseweg. (Kershaw, pg. 103)
The Germans were not the only ones preparing for the British. Dutch civilians turned out wherever they could to greet the airborne. At lower Oosterbeek, Jan ter Horst (a prominent lawyer) and his wife, Kate, rushed from their garden and out onto the road upon hearing the British were arriving.
“Yes, there is the impossible, incredible truth,” Kate said later. “Our unknown British liberators, like a long green serpent, are approaching one by one, a couple of yards between each of them; the first gives us a jolly laugh from under his helmet….” (Matzen, 44%)
Meanwhile, four of Major Freddie Gough’s 1st Airlanding Reconnaissance (recce) Squadron jeeps had failed to arrive at the landing zone (LZ) and another four jeeps were damaged during the glider landings. This reduced the number of operational jeeps to 28.
When the recce squadron set off to capture Arnhem bridge, they were ambushed by Krafft’s 4th Kompanie. (Buckingham, pg. 272) Taking a beating, most of the recce pulled back.

However, two jeeps (including one carrying Major Gough) managed to get through and reached Arnhem bridge on the evening of 17/18 September. Krafft, Spindler and Allwörden effectively prevented 1st and 3rd Paras from reaching Arnhem. Frost and his 2nd Para, however, slipped into the city via the lower “Lion” route. But it had taken them four hours to do so, after landing at the drop zone. (A Historical Study of Some World War II Airborne Operations, WSEG Staff Study No 3 (US Department of Defense, 1951); pg. 79)
Crowds of jubilant Dutch civilians thrust bouquets of marigolds into the hands of Frost and his men, plus food, fruits, champagne and anything they give away.
2nd Para was without its C Company (Captain Victor Dover), which had been detached to seize the railway bridge west of Arnhem. The Germans blew up the rail bridge.

Meanwhile, Frost and his men set up a perimeter along the northern edge of the bridge as darkness fell. But it soon became apparent that they did not have the manpower to secure the southern bank, because of localized German resistance and a machinegun-armed bunker which spewed fire. Small groups of British airborne continued to filter into Arnhem as Frost consolidated his holdings.
By dawn on the 18th, Frost had about 743 British-Allied troops on the northern bank around the bridge, including five 6-pounder anti-tank guns, before Kampfgruppe Spindler cut his force off from the rest of the 1st Parachute Brigade.
Isolated, 2nd Para prepared for an engagement with superior German forces that would enter the realm of lore.
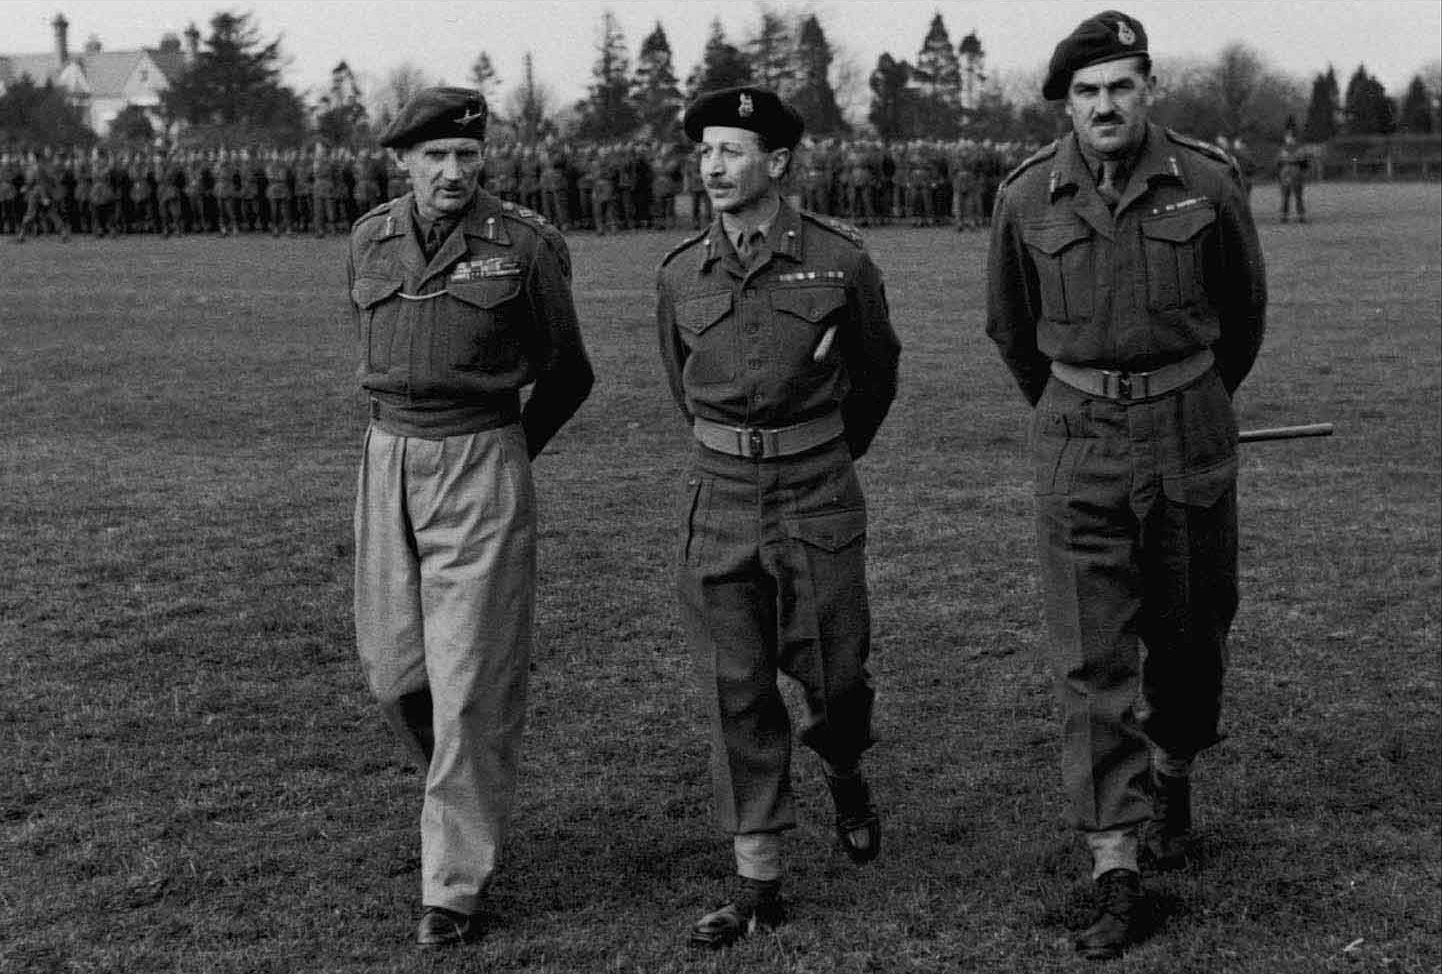
Urquhart Missing
Meanwhile, Urquhart compounded the division’s problem by trying to impart frontline leadership. Urquhart, a decent, considerate man, thought of himself as a soldier’s general – one not prepared to give any orders that he himself was not prepared to act upon.
This impulse to lead from the front led Urquhart to place himself and Lathbury in the line of enemy fire. Lathbury was severely wounded in the spine and leg, while Urqhuart was forced to hide in the attic of a Dutch family home with two of his officers, leading to his disappearance from the battle for 36 critical hours, during which the division was virtually leaderless.
In fact, senior British leadership from the likes of Montgomery, Horrocks, Browning, and even Urquhart was in shambles throughout the operation. This left the ordinary rank and file, and the mid-level officers, the Frosts and the Goughs, to pay the price for their commanders’ abdication of authority, if not their outright incompetence.
Another problem, extensively documented in history, was the division’s ineffective radio communications.
The 1st Airborne used two radio types, the vehicle-amounted or cart-transported Wireless Set No 22 (which had a radio frequency (RF) output power of 1 watt) and the man-portable Wireless Set No 68P, which had an RF output power of 0.25 watts.
On day one, only two of the 1st Parachute Brigade’s four jeeps, equipped with No 22 radios arrived. At least one of the No 22 radios malfunctioned, which placed a burden on the brigade’s lower-power No 68P radios, which themselves did not have the range to exercise control over the brigade over medium ranges.
The British also lost their ability to communicate with the Direct Air Support Communications Ground Network, their link to what little air support was made available to them.
An after-action report determined that the 1st Airborne was heard only once on this network during the operation (on day one) and never managed thereafter to establish communications with the rest of the network using the SCR-193 Radio sets allotted to air support parties. (Allied Airborne Operations in Holland: September-October 1944; Appendix G, pg. 1)

Hi thereYou write so brilliantly. Such clarity, such mastery of the language.Thanks for sharing.I had a friend, a Dutch – Indonesian woman, whose father took the family to Holland
Hi. I really appreciate your kind words. And thank you – for sharing about your friend!
Actually, my original message got truncated. So here is the remainder
My friend was about 10 when the War began and she spent the duration in Arnhem. She witnessed many horrible things, including people being shot in the street. And some of the fighting. The family suffered greatly from food shortages too.
The War left a lasting impression as you can well imagine, I am sure.
Best wishes
Steve (I’m the guy who sent you the books on WW2 in Burma)
Hi Steve, good to hear from you! I still have the books on my shelf.
I can only imagine the trauma she must have experienced. Did she record any of her experiences?
No, and she passef away years back. Her father was an engineer on the Dutch East Indies Railway in Java. Went to Europe with the family around the time of Chamberlain proclaiming “Peace in our time”
Bad mistake. At war’s close they returned to Java, but like a lot of Dutch and Indo-Dutch, fled to Irian when Indonesia won the war of Independence in 1949.
Lived in Irian until the “Act of Free Choice” in 1963, from memory. What a joke that was.
Then migrated to Australia to build a new life. Lovely woman who married a lovely Australian guy.
Cheers
Steve
That is so interesting. Thanks for sharing this information, Steve. Mighty grateful.
The civilian experience at Arnhem is understudied in English-language history. Documents indicate that 453 civilians died during the Arnhem battle. I can only imagine the plight of the civilian populace caught up in the battle.
She spent the War living in Arnhem. She was a young woman. She witnessed many horrors. It was an experience that coloured the rest of her life.
Wow Akhil!!! Need some time to digest this :). Great stuff I’m sure!!Marco Cillessen
Looking forward to hearing your thoughts, Marco.
For anyone interested, there is an episode from Thames Television Tv series U.K called “This is your life” filmed in the seventies (i think).One episode featured Major General John Frost CB DSO &Bar MC DL.Towards the end of the show a group of men who were with him came on as a suprise.This episode on YouTube.Also on there, is a tour of the bridge and a first hand account of the fighting in around it by Steve Morgan of 2 Para at the time, a lovely man.
Dear Akhil ,
First my compliments on a verry good website.
But the foto`s of the railway bridge in Oosterbeek are both not from the battle.
The first one is from after the war and the second on is from may 1940 and shows the damage done by the Dutch Army on the 10th of may when all the bridges in the surrounding of Arnhem and Nijmegen where Blown.
The book: The lost Company, by Marcel Anker (2017) will show howe the bridge looked before and after the battle
Kind Regards
Hans Wabeke
Thanks for this valuable information. I will delete the images.
The Horsa Glider could take the 6 pounder AT gun but NOT the 17 pounder AT these where flown in by the Hamilcar gliders.
You are absolutely right. Thanks for pointing this out.
The pictures of the railway bridge are NOT from the batlle in 1944, the first on is from after the war and the second shows the bridge in may 1940. Alle the bridges around Arnhem and Nijmegen where destroyed by the Dutch Army in the early morning of the 10th of may 1940.
Yes, this has been pointed out to me. There was brief imagery of the broken bridge from “Theirs is the Glory”. I need to see if I can find that footage.
The book “the lost company” by Marcel Anker (2017) contains pictures from the bridge before and after the battle
The book seems to be out of print, sadly. Let me check if I can source it somehow.
Try ‘Meijer&Siegers”Bookstore in Oosterbeek
Thanks.
“bolt-action .303-inch (7.7 mm) Lee-Enfield rifles (sheesh!)” Why “sheesh”? The standard firearm of the German army was also a bolt-action rifle; both rifles in the hands of a trained soldier are deadly. This piece comes across as very condescending towards the British, from the Generals right down to the firearms.
Hi,
Thank you for your comment. It is appreciated. What is your name, by the way?
In my view, the issuance of the bolt-action Lee-Enfield No. 4 to the airborne forces gave the paras/glider troops a weapon that was not only heavy but also cumbersome in close-quartered fighting, not to mention that it could not give airborne forces an adequate volume of fire to match that of the Germans. Sure, the Germans also had the Kar98K, but their airborne forces also had the automatic FJ42, the semi-automatic Gewehr G43, the StG44, not to mention the venerable MP40 and the MG42 which could produce a heavy volume of fire. By the way, I make mention later on in the monograph that some Paras at Arnhem demonstrated their adroitness with the Lee-Enfield through sheer shooting accuracy.
Also, in Urquhart’s book, a few negative things are said about the Sten Mk V and how it was a “temperamental weapon at best” – a comment I found dismaying. I also have some data in my files somewhere about how the US M1 Carbine found some favored use in the 1st Airborne Div.
Anyway, I reject the charge of condescension. Have you read my other pieces on this website? They are replete with tellings of British heroics and achievements, whether they be on Malta, in Burma with the Chindits, in Normandy (even during the stalled Epsom offensive) or in North Africa.
My name is Martin, I’m not sure where the “furry” so and so came from, the Chindits is an excellent piece indeed, as is most of your stuff, especially the liberation of Paris, sorry I shouldn’t moan, you do an excellent job, and I see where you are coming from, it took the British army far too long to get a semi automatic rifle into service, saving ammo on the generals minds no doubt, now I’m doing it lol.
Thank you, Martin. I am grateful for your candor! At the end of the day, I am happy to discuss/debate any queries about my research – and WWII in general- time permitting.
Thank you Akhil
“armed with the new Sten Mk V variant (a version that incorporated a wooden stock and foregrip, representing a major enhancement of an ugly wartime weapon made out of stamped sheet metal).”
The Sten Ugly? Remember, beauty is in the eye of the beholder. Now, I give you that the MKV might be improved, but it was a hell of an ugly improvement, to my eye anyway. 😀 Still, for me, the MKII Sten is the most beautiful submachine gun of WW2. Still, I am partial to brutalism, and the Sten cost tuppence ha’penny at a time when Britain needed a sub machine gun quickly and the Lanchester, while a lovely weapon, was too time-consuming and expensive.
Just a few thoughts, currently reading your Stalingrad, it is excellent, if I could just add here that I think one of the reasons the Germans liked the PPSH so much was it’s 50 round drum magazine.
The Sten Mk II is the iconic variant of the weapon and gave Britain a high-value frontline weapon at a fraction of the cost, I agree. But the Mk II is also hard on the eyes! The Sten Mk V is a more elegant-looking weapon (IMHO), and with its wooden stock, pistol grip, and foregrip, had improved handling.
The Stalingrad piece is old now; written years ago. Sadly, I lack the time to do a refresh.
I feel that the PPSh-41 was a formidable weapon. However, as you may know, most of these SMGs were hobbled by limited range (as per Ian Hogg, the effective range of the Thompson SMG was 50 m, that of the Sten Mk II was 40 m; the PPSh-41 and the German MP40 had better effectives ranges of 100 m). Stopping power is a separate matter. In any case, these SMGs were effective only as close-quartered weapons. Going back to Arnhem, it is arguable whether the 1st Airborne would have befitted from having more automatic weapons such as the Sten Mk V, Thompson or M1 Carbine (effective range: 180 m), when considering factors such as volume of fire versus ammunition availability.
Also, if I may add to my previous comment about the Lee-Enfield No 4 rifle: According to Lt. Col. H F Joslen’s, Orders of Battle, Second World War, 1939 -1945, the standard basic allowance for a British Airborne Division in 1944 included: 7,171 Lee-Enfield No 4s, 6,504 Sten Mk Vs, and 966 Bren LMGs (to mention a few weapon types). The actual number of weapons issued to the 1st Airborne would have varied slightly, but it is likely that the Lee-Enfield was the predominant small arm in the division in September 1944. The employment of the M1 Carbine during the Arnhem battle appears to have been limited to troops within the 1st AB HQ and the Glider Regiment. During my research, I didn’t pay much attention to the number of M1 carbines or other small arms issued, so I don’t have a number on how many M1s were used in the Arnhem sector. Perhaps a visitor to this site has the answer.
Pingback: Colors of the Caribbean