This page provides a brief history of the Normandy campaign through 19 maps. A viewing of the old film The Longest Day at the age of 12 or 13 first stoked my interest in the campaign. The battle for Normandy, in my febrile mind, represented a classic struggle of good versus evil, broadly speaking anyway. But if I grew up suitably enlivened to contribute something to the collective body of work on the campaign, it was tempered by the realization that most of what can be said has already been written or depicted.
Where the historical treatment of Normandy has lagged, however, is in maps. It is difficult to build a sense of location and understand the physical implications of strategic maneuvers without compelling maps. The history of Normandy is replete with insufficient maps. I wanted to try to address that.
The maps below were created in 2018, over the course of six or seven months. They represent my first serious effort at complex mapmaking. The project was also, to a degree, about self-education.
An Overall look at Operation Neptune

The prospect of returning militarily to France aroused feelings of anxiety within British Prime Minister Winston Churchill, haunted as he was by the specter of another Allied defeat in France followed by a Dunkirk-like evacuation of the survivors. For years, he had postponed a cross-channel invasion of western France by cajoling and manipulating his American allies into military expeditions in the Mediterranean. He had assured Washington DC that a strike through the soft underbelly of Italy could pierce Nazi Germany. By 1943, however, the United States was convinced that the Third Reich could only be defeated through a direct assault on Hitler’s “Atlantic Wall”, an incomplete line of coastal fortifications which threaded from southwestern France to Norway.
Allied planners, however, knew that coastal defenses, no matter how dense, offered little impediment to an amphibious assault. An Allied plan began to coalesce. Twelve Allied divisions (roughly 156,000 men) were nominated to pummel their way into German-occupied Normandy and hew an iron beachhead from which Allied troops could range deeper into Nazi-occupied Europe.
The invasion, D-Day, was launched on 6 June 1944.

Churchill spent much of 5/6 June in a state of angst, fearing that the invasion, codenamed Operation Neptune would fail, dealing the western alliance a critical setback that force them to marshal manpower for another invasion in late 1945 or 1946 — by which time Hitler could have used his western reserves to smash the Soviets on the eastern front.
Yet, the bulk of Germany’s forces along the Norman coast were tired, rear-echelon units with substandard equipment. The most combat-effective division in the area was the 12,734-strong German 352nd Infantry Division, which had almost no combat experience (50% of its officers were green while the rank and file was largely made up of teenagers from the Hannover area). Only the presence of a hardened cadre of veterans from the Eastern Front peaked the division’s fighting prowess to acceptable levels. Many of the infantry and static divisions in the area were inferior, with the exception of the 709th Infantry Division under the experienced Lt. General Karl-Wilhelm von Schlieben, also a veteran of the Russian front.
Von Schlieben’s command, however, was less than stellar, being largely composed of men regarded as unsuitable for frontline service. The average age of a soldier in the 709th was 36 and their training had been minimal. Russian defectors padded out the infantry even though their combat effectiveness was questionable. The unit’s left flank, however, was bolstered by the German 91st Airlanding Division. Although green, the 91st Division was motivated and willing to fight.
The Allied armada, which left England on June 5, would take 17 hours to cross the English Channel while Allied paratroopers flew out after dusk to secure the flanks of the invasion zone, west of the Norman capital Caen and on the Cotentin peninsula, in order to stem the flow of German reinforcements into the beachhead assault zone.
At midnight, 13,348 Allied paratroopers began to descend onto Normandy, confusing German high command and infusing chaos among scattered German garrisons. Just after dawn, at 6 am, the Allied invasion fleet hove into sight off the Norman coast.
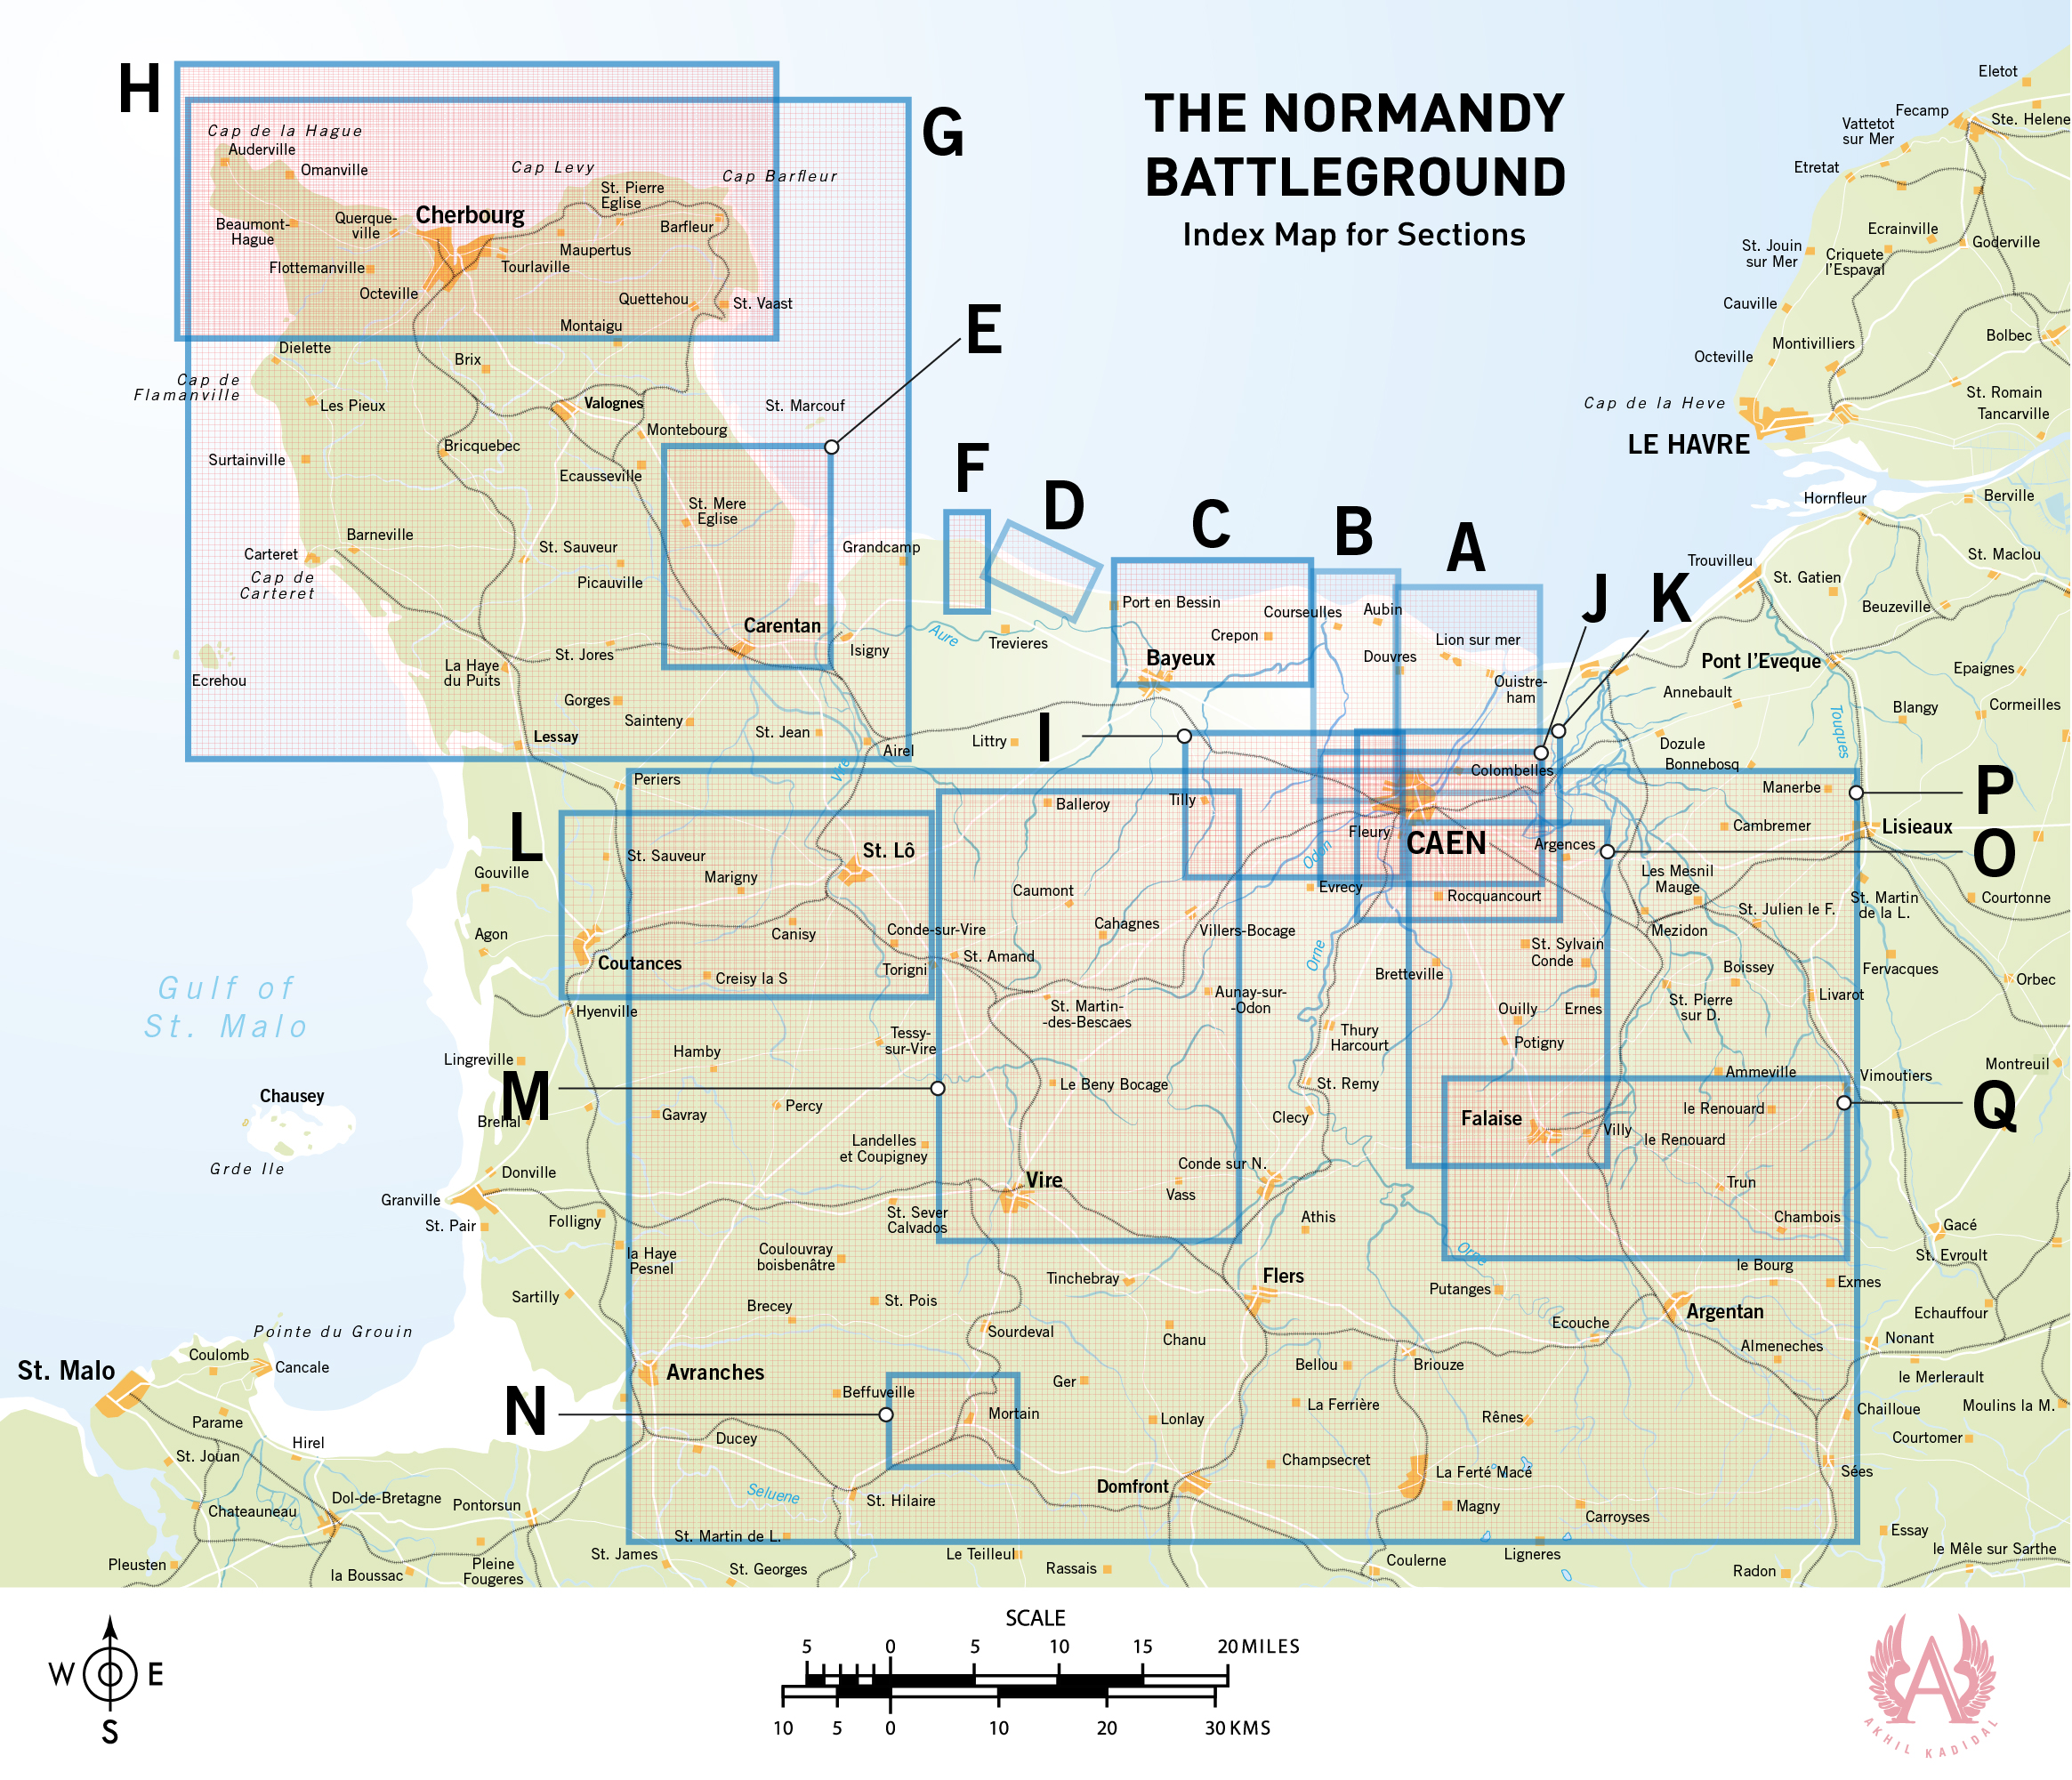
A. Sword Beach
B. Juno Beach
C. Gold Beach
D. Omaha Beach
E. Utah Beach
F. Pointe-du-Hoc
G. Advancing through the Cotentin Peninsula
H. Capturing Cherbourg
I. The British break the back of the German SS
J. The Allies capture half of Caen
K. A British Schwerpunkt Meets its Match
L. An American Cobra in Normandy
M. Operation Bluecoat
N. The Mortain Counterattack
O. The Big Push (Towards Falaise)
P. The Falaise Pocket
Q. Closing the Falaise Pocket
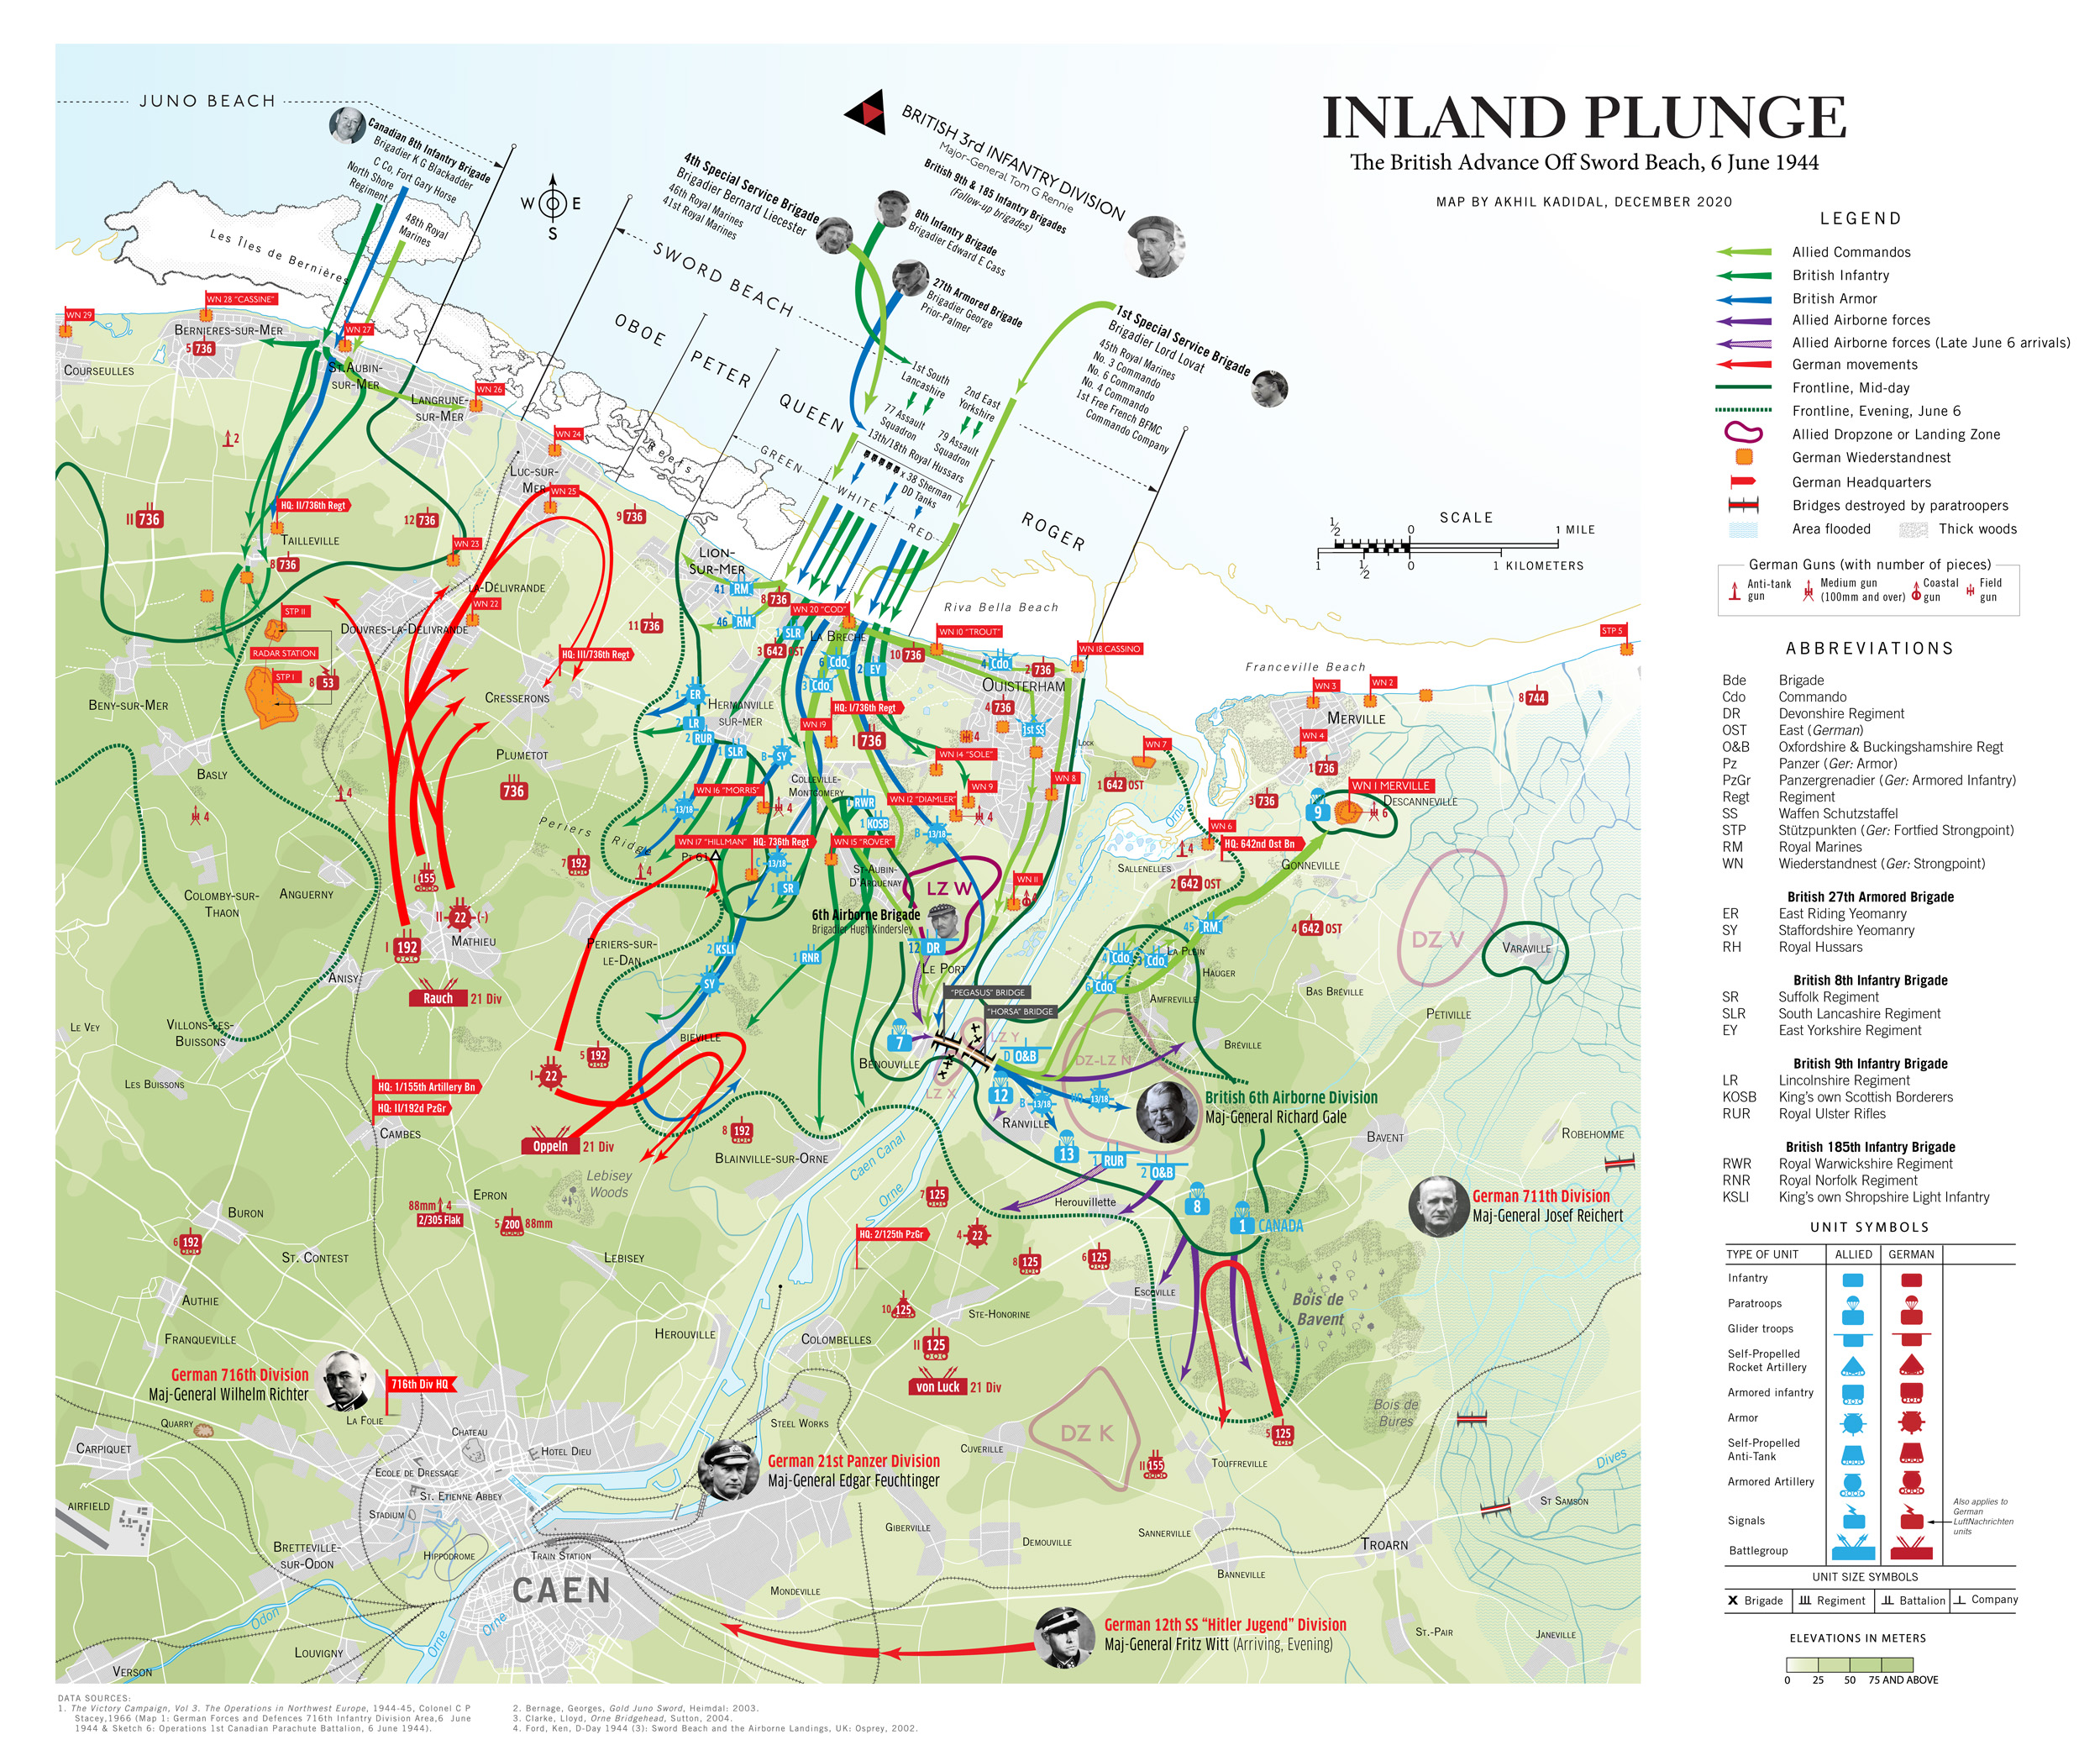
A | Sword Beach
I was an anglophile in my childhood and the actions of the British Army in the 20th century were an endless source of fascination. Great Britain and her military were exotic, replete with alluring organizational structures, practices, decorum, and traditions.
It was therefore predictable that my early interest in the Battle of Normandy hinged on the actions of the British Army, especially in the “Sword Beach” sector.
A crucially important sector, troops hitting “Sword Beach” were meant to roll up into the Norman capital, Caen (population 54,000 in 1944), whose great road hub would have facilitated an easy advance deep into Nazi-occupied France and to Paris, 149 miles away.
The unit handed the task was the British 3rd Infantry Division, the oldest command unit in the British Army with exploits ranging back to the Battle of Waterloo in the 19th Century. Bolstered by 4,000 commandos, plus an independent armored brigade with 212 tanks and the paratroopers of the 6th Airborne Division on their right flank, the 3rd Infantry Division pushed towards Caen on the morning of June 6, sweeping aside German resistance. Then, at midday, the sole German armored division in the area, the 21st Panzer, placed itself between the British and the city.
The 21st Panzer, once a fabled stalwart of the North African war two years ago was now a toothless tiger, replete with misfits and recruits — although 2,000 original members, having been hospitalized for wounds in North Africa, had returned to strengthen its ranks. Evidence of the 21st Panzer’s diminished standing was manifest by the fact that it had, until recently, been equipped with old, obsolete French tanks captured in 1940. By D-Day, it had been outfitted with the Panzer IV, a medium battle tank that was an even match for the Allied Sherman.
The German divisional commander, Major General Edgar Feuchtinger, behaved as though the running of his division was something of a chore, if not punishment. He spent more time lavishing attention on his mistress in Paris, than on working to get his division to full operational status.
In fact, Feuchtinger was once again philandering in Paris when the Allied invasion materialized, enraging his superior, Lt. General Hans Speidel, the Chief of Staff of Army Group B. As a chastened Feuchtinger raced back to Normandy on the afternoon of the 6th, the division activated itself and sent out patrols.
British tanks and Infantry streaming towards Caen began taking heavy fire as they reached the Periers Ridge, a stretch of high ground before the villages of Periers-sur-le-Dan and Bieville. Instead of smashing through, the infantry of the British 1st South Lancashire Regiment and the Shermans of the 13/18th Royal Hussars dug in. Aside from a smattering of German infantry and strung-out screens of antitank guns, there was virtually nothing between them and the city. They could have well been in Caen by mid-afternoon. But the commander of the British 8th Infantry Brigade, Brigadier Edward Cass, preferring to wait for reinforcements. It would prove a fateful decision.
Meantime, senior German officers were scrambling to deploy their armored reserves scattered around central and southern France.
At 9 am, nearly two hours after the beach landings, Field Marshal Gerd von Rundstedt, the head of OberKommando West, attempted to rush the 12th SS (Hitler-Jugend) Panzer Division and the elite Panzer Lehr Division into the invasion zone. He was stalled by Field Marshal Alfred Jodl, the German Chief of Operations Staff in Berlin, who argued that only Hitler had the authority to move these units. But Hitler, a habitual late riser, was still asleep and would not awake before noon. When he did, he flew into a rage at the news of the Allied invasion. By when the armored units finally began to move, it was 4 pm.
By this time, British thrusts towards Caen and Lion sur-Mer had stalled, prompting them to give up on their plan to link up with Canadian troops fighting in the neighboring “Juno Beach” sector. Rushing through this gap, tanks and infantry of the 21st Panzer reached the coast intact.
“The future of Germany may very well rest on your shoulders,” a senior officer had told their commander, Colonel von Oppeln-Bronikowski. “If you don’t push the British back, we’ve lost the war.”
But the 21st Panzer would find it difficult, if not impossible, to prevail. At 6 pm, von Oppeln-Bronikowski’s men were horrified to see a swarm of Allied transport aircraft tugging gliders headed in their direction at 6 pm. Afraid that his unit would be cut-off by gliders landing all around them, Oppeln-Bronikowski called a retreat. Caen, however, would remain in German hands for the next five weeks, becoming a thorn in the Allied side and costing the lives of thousands of troops.
The above map was arduous to make, in that it took nearly 10 hours to produce. Instead of separating the various component actions of June 6 into three entities — the airborne landings, the main beach assault and the push inland and the German counterattack — I sought to encompass every aspect of the eastern British sector into a single map. However, in comparison to my map of “Utah” Beach which can be found further below, this map was also frustrating to create because of a paucity of information.
For example, I did not have the luxury of detailed information about the drop patterns of British airborne units from official British sources — unlike the US military which liberally proffers information about the activities of the 82d and 101st Airborne Divisions on Normandy’s Cotentin Peninsula.
Movements of land forces were established through careful research and by consulting several books on Normandy, specifically Georges Bernage’s Gold Juno Sword (2007).
B | Juno Beach
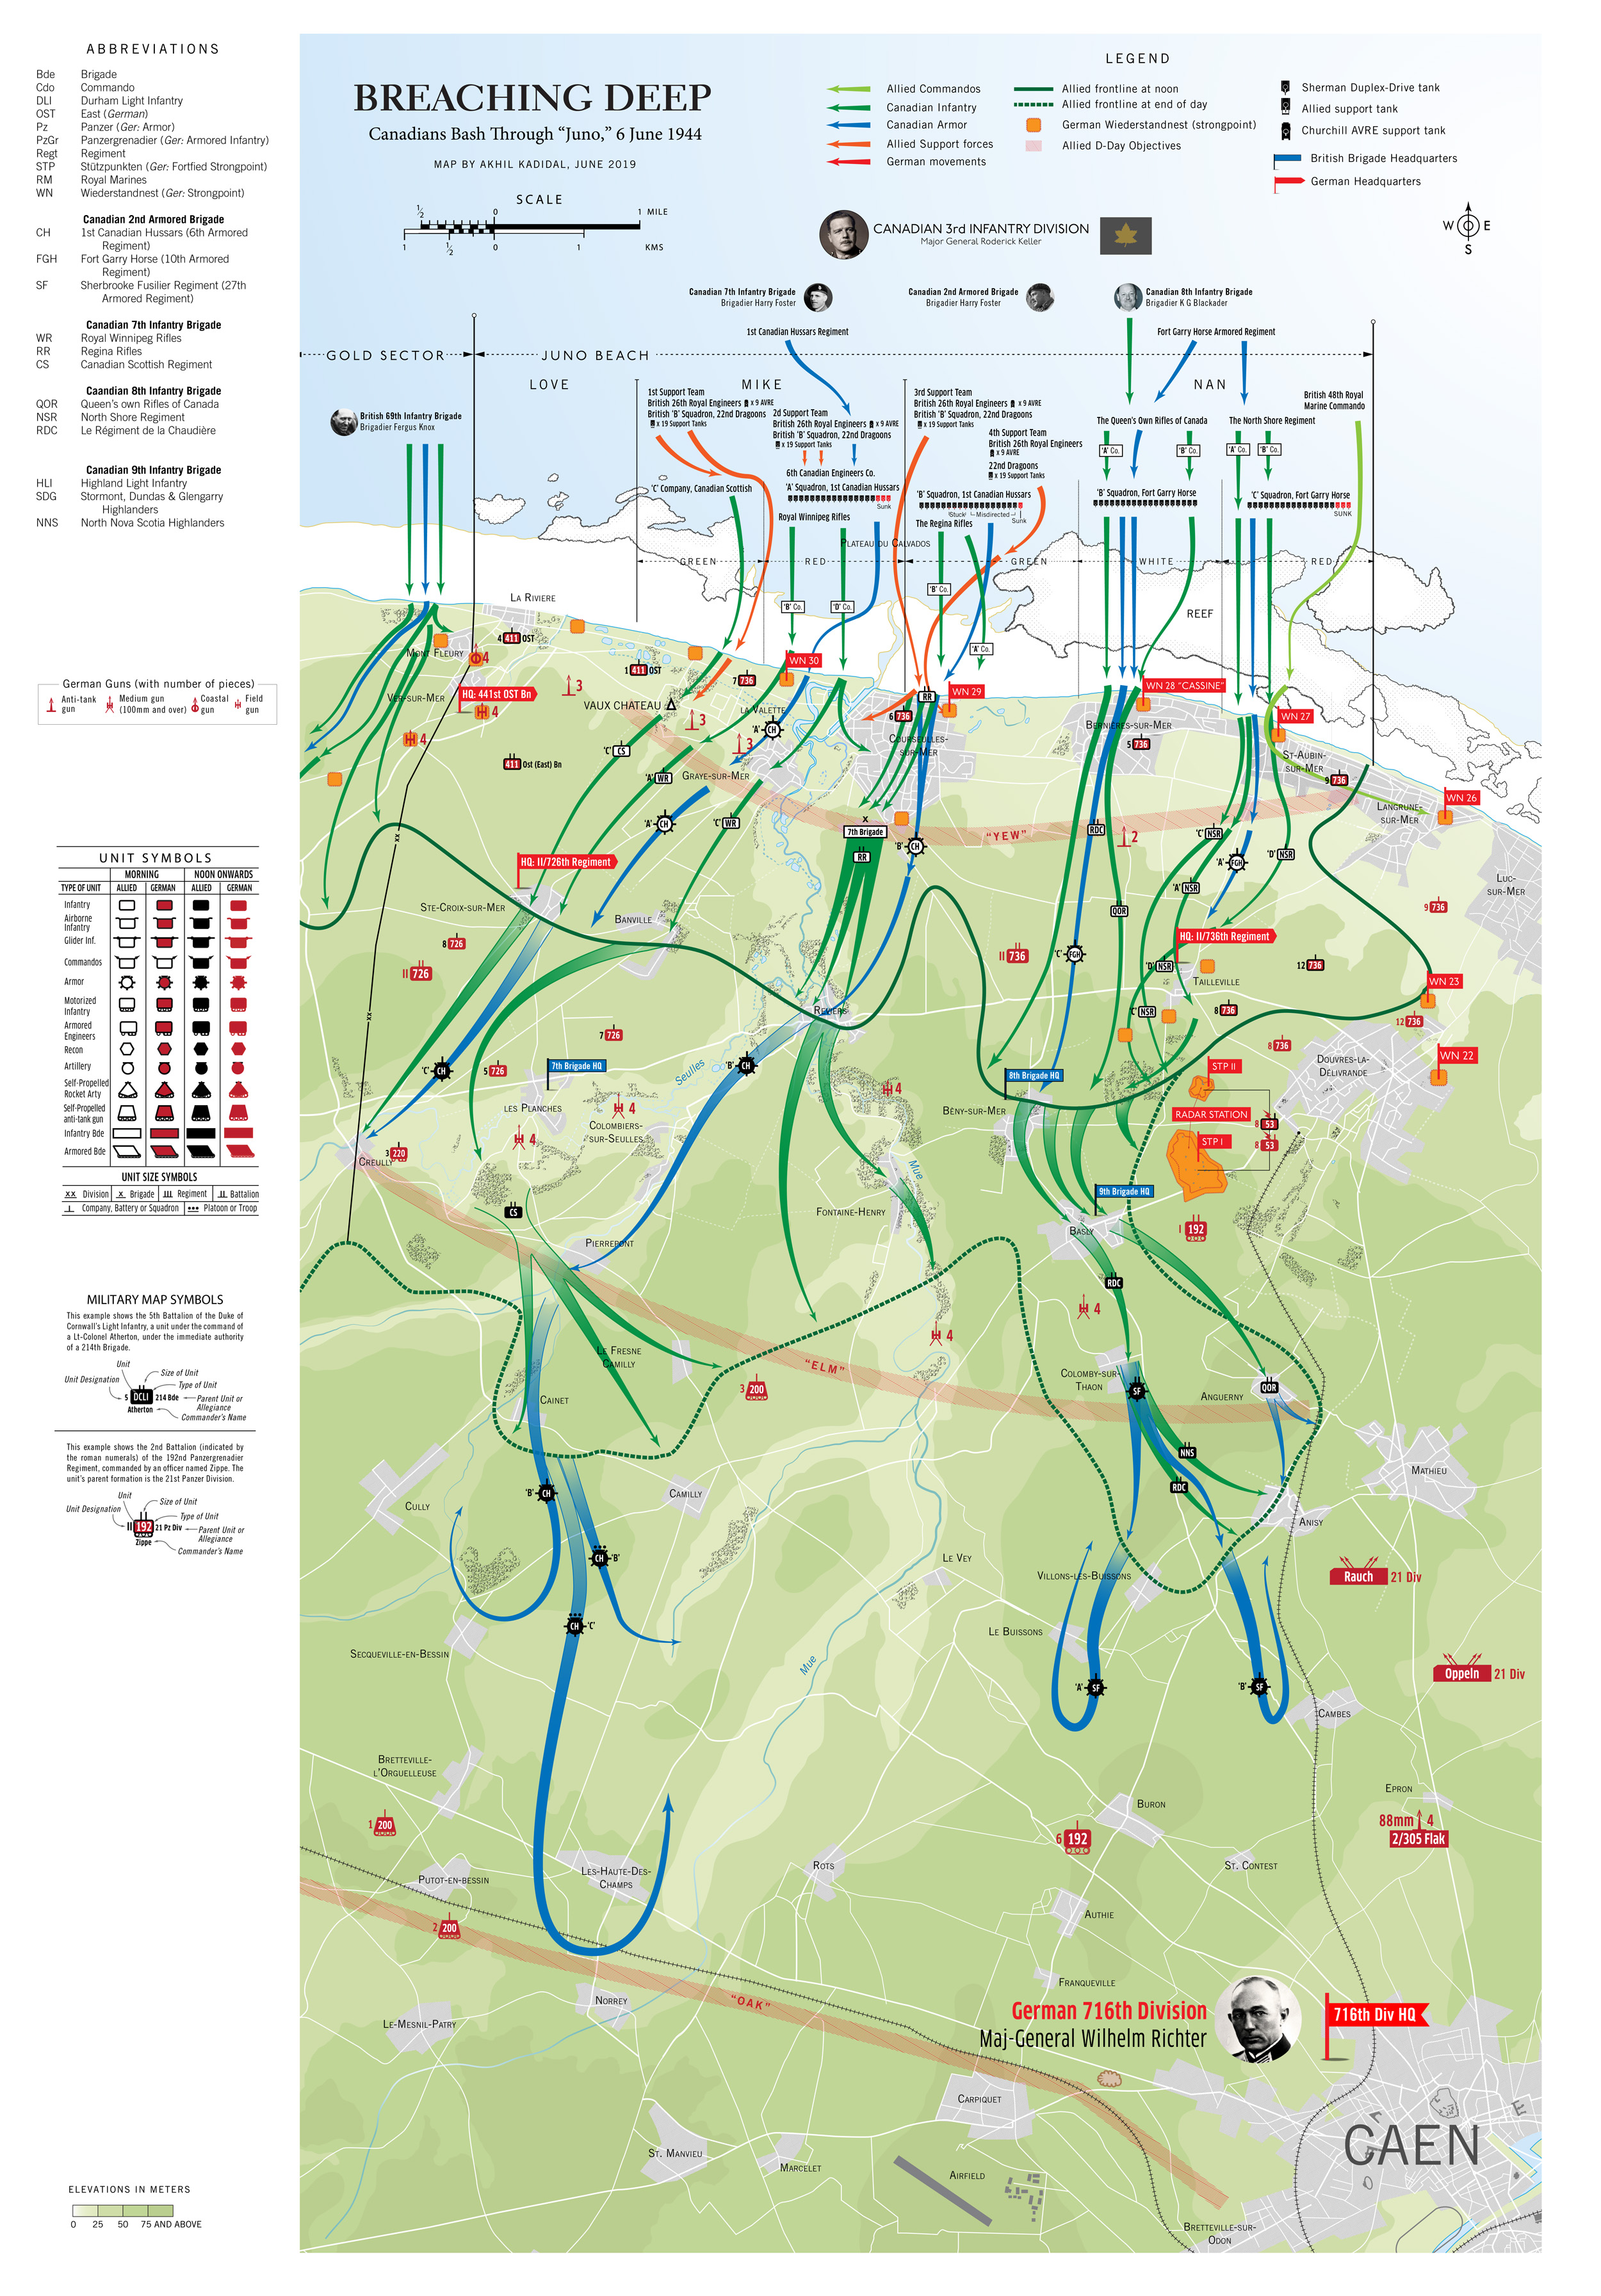
I have always had mixed feelings about the Canadian Army’s actions in the Second World War because their role was often restricted by the British-American alliance to a supporting role. Although the Canadians achieved consistent ground victories in Normandy and in northwest Europe, their feats are less well-known outside Canada.
Following their landings on “Juno Beach” on D-Day, the Canadians emerged as the only Allied ground force to reach the “Oak Line,” the final Allied objective for D-Day.
At “Juno,” elements of the Canadian 3rd Infantry Division under a pudgy Major General, Rodney Keller, faced six German wiederstandnests (strongpoints) set at one kilometer intervals, each protected by layers of mines, trenches, barbed wire, machine guns, antitank guns and mortars, with heavy artillery located behind the coast to pummel invading forces. Keller was popular with his men because of his penchant for plainspeak, but less so within Allied high command due to his drinking problems.
To the dismay of the Canadians, the preliminary Allied aerial bombardment had failed to knock out many of the strongpoints and artillery emplacements. On the flip side, many German troops in the area were little more than teenagers or Russian defectors (the latter mustered into the so-called Ostlegion (Eastern Legion) battalions).
Axis units in the sector lacked motorized transport. Soldiers had to walk to positions and heavy guns had to be moved using horses.
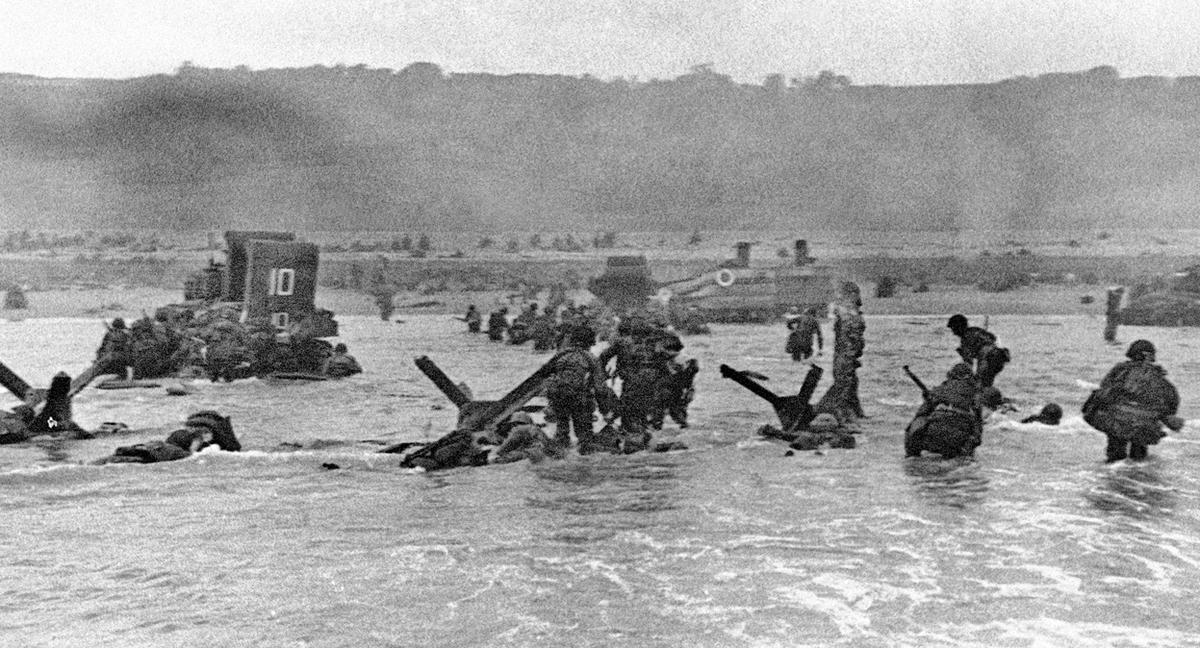
As the Canadians landed, heavy fighting erupted along the length of “Juno.” Under withering fire, one company (B Co., Queen’s Own Rifles of Canada) lost a third of its strength — 65 men — while sprinting across 100 yards of knee-high water from their landing crafts to the beach. The beaches soon began to pile up with bodies, burning Sherman tanks, bulldozers and landing craft. Other companies, however, made good progress.
By 2.30 pm, the Canadians were at the town of Cruelly, five miles from the coast, where they found only eight enemy defenders, five of whom were Russians and the other three Lithuanians. The German garrison of Cruelly was absent, having been sent to reinforce Caen.
Cruelly was intended to be the rendezvous point for the Canadians and other British forces landing in the neighboring “Gold Beach” sector. Yet, by late afternoon, no British had arrived and so the Canadians pressed on, seizing as much as six kilometers of territory inland – and in the process securing the greatest amount of territory of any of the invasion forces on D-day. The cost was 1,200 Canadian dead.
While all of this is rousing stuff, I found this map a little boring to make because of the large tracts of land where nothing happened. There was no massed German counterattack or a Clausewitzian masterstroke, just a series of small unit actions which led to the categorical defeat of the Germans.

C | Gold Beach

With nearly 2,500 beach obstacles strewn across the 10-mile width of “Gold” Beach, and facing a coastal landscape which alternated between marsh, flooded plains and boulders, troops of the British 50th (Northumbrian) Infantry Division struggled to advance off the beachhead, despite being aided by special support tanks (nicknamed Hobart’s Funnies) from the British 79th Armored Division.
The British finally secured the beachhead by mid-afternoon and linked up with the Canadians at Cruelly. Efforts to capture their primary objective, the Norman city of Bayeux, ran out of steam by dusk.
While making these maps, I began to wonder if any one of the 146,000 Allied troops in France who survived the bloodshed of that “longest day,” and once safe for the night, spared a thought for the future historians and map makers who would anguish over the deciphering and recording of their battle lines and unit movements.
This map of “Gold” took approximately 12-13 hours of work to complete, during which I had consult several sources (some which turned out to be dubious) in order to capture what I feel is an accurate lay of the land and the actions of the combatants.

D | Omaha Beach

Despite the legendary place it occupies in the pantheon of American history, a mythology heightened by Steven Spielberg’s bombastic, yet anti-war film, Saving Private Ryan (1996), the nature of events at “Omaha Beach” are disquieting.
On one hand, it is fascinating to chart how, despite the fact that the Canadians and the British largely managed to get their forces in on time and on target, the American beach assaults verged on the farcical, with units landing on every beach sector except that which they had been assigned. In fact, just one infantry company out of nine (‘A’ Company, 116th Regiment) landed at its appointed location.
Two company commanders in the 741st Tank Battalion, over the objections of the US naval officers, also demanded that their amphibious “swimming” Sherman tanks be launched nearly 5,000 yards from the shore, in heady waters. Twenty-seven of the launched tanks sank as a result, depriving American infantry of massed armor support at “Omaha” where the Germans had sited 12 strongpoints bristling with machine guns and antitank weapons. A saving grace was the arrival of US Navy LCTs in a subsequent wave which landed the battalion’s wading tanks and Sherman tank dozers on the beach. In all, the 741st Tank Battalion could muster only 16 out of its original 56 Shermans on the beach.
Tank operations were better on on the eastern side of “Omaha Beach,” where the navy LCTs set down units of the 743rd Tank Battalion on the beach. In total, the LCTs landed 43 out of their 48 Shermans in the eastern sector. Although the concentrated German defenses would knock out four US tanks in the eastern sector and 14 on the western sector, the tankers pummeled the Germans.
Nevertheless, the battle at Omaha resulted in the death, maiming or capture of 2,400 Americans. This large figure was five percent less than the final casualty rate that Allied planners had been prepared to accept.
Making this map was relatively easy because of its small scale size despite contradictions posed by other sources. A book by Osprey Publishing, for example, offered up the terrain of “Omaha” as one of a gentle incline, ignoring the fact that the beaches in this part of the coastline are overlooked by 100-foot tall bluffs from where German bunkers heaped death and destruction. Other maps are confused in their depiction of landing units and still others are largely unreadable because they used too similar colors, added sketchy information or did not add enough terrain relief.
In order to capture the trueness of the landscape, I had to turn to the original, once-secret “Bigot” maps used by Allied war planners. However, I was forced to omit the lines of hedgerows depicted in these maps because they added denseness to the subject matter.

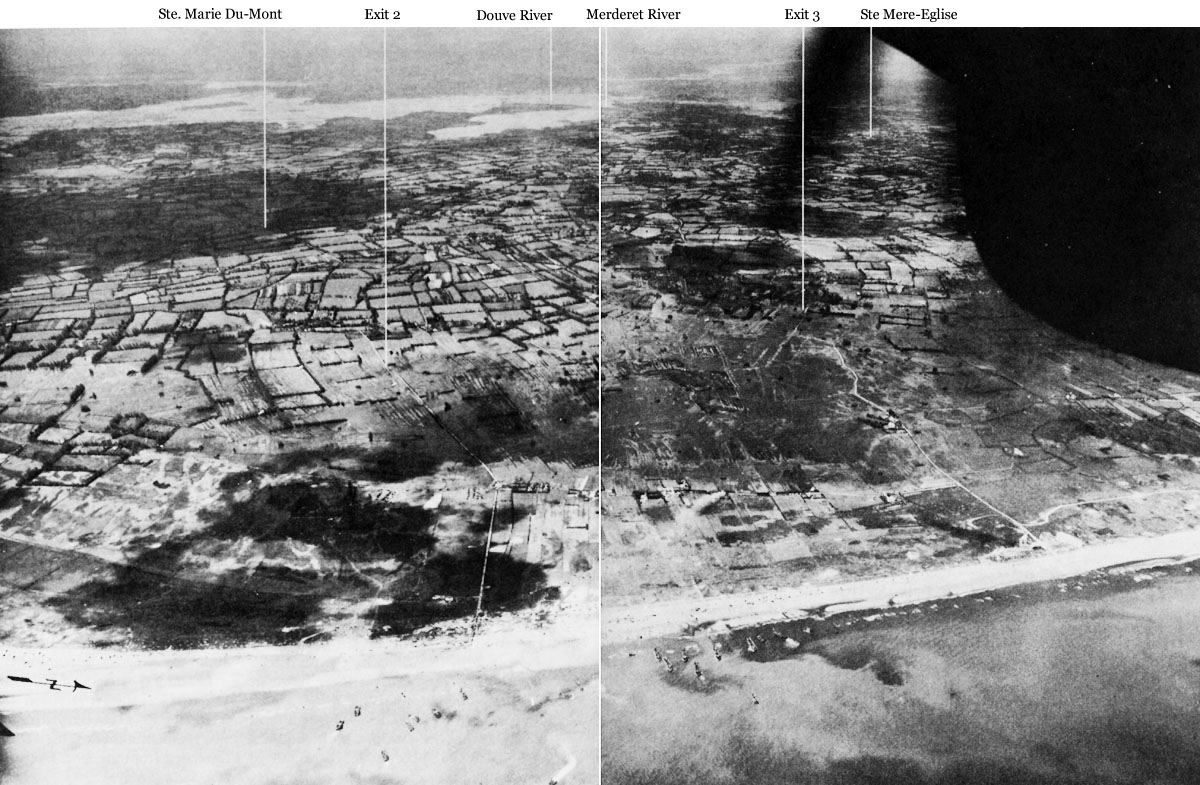
E | Utah Beach
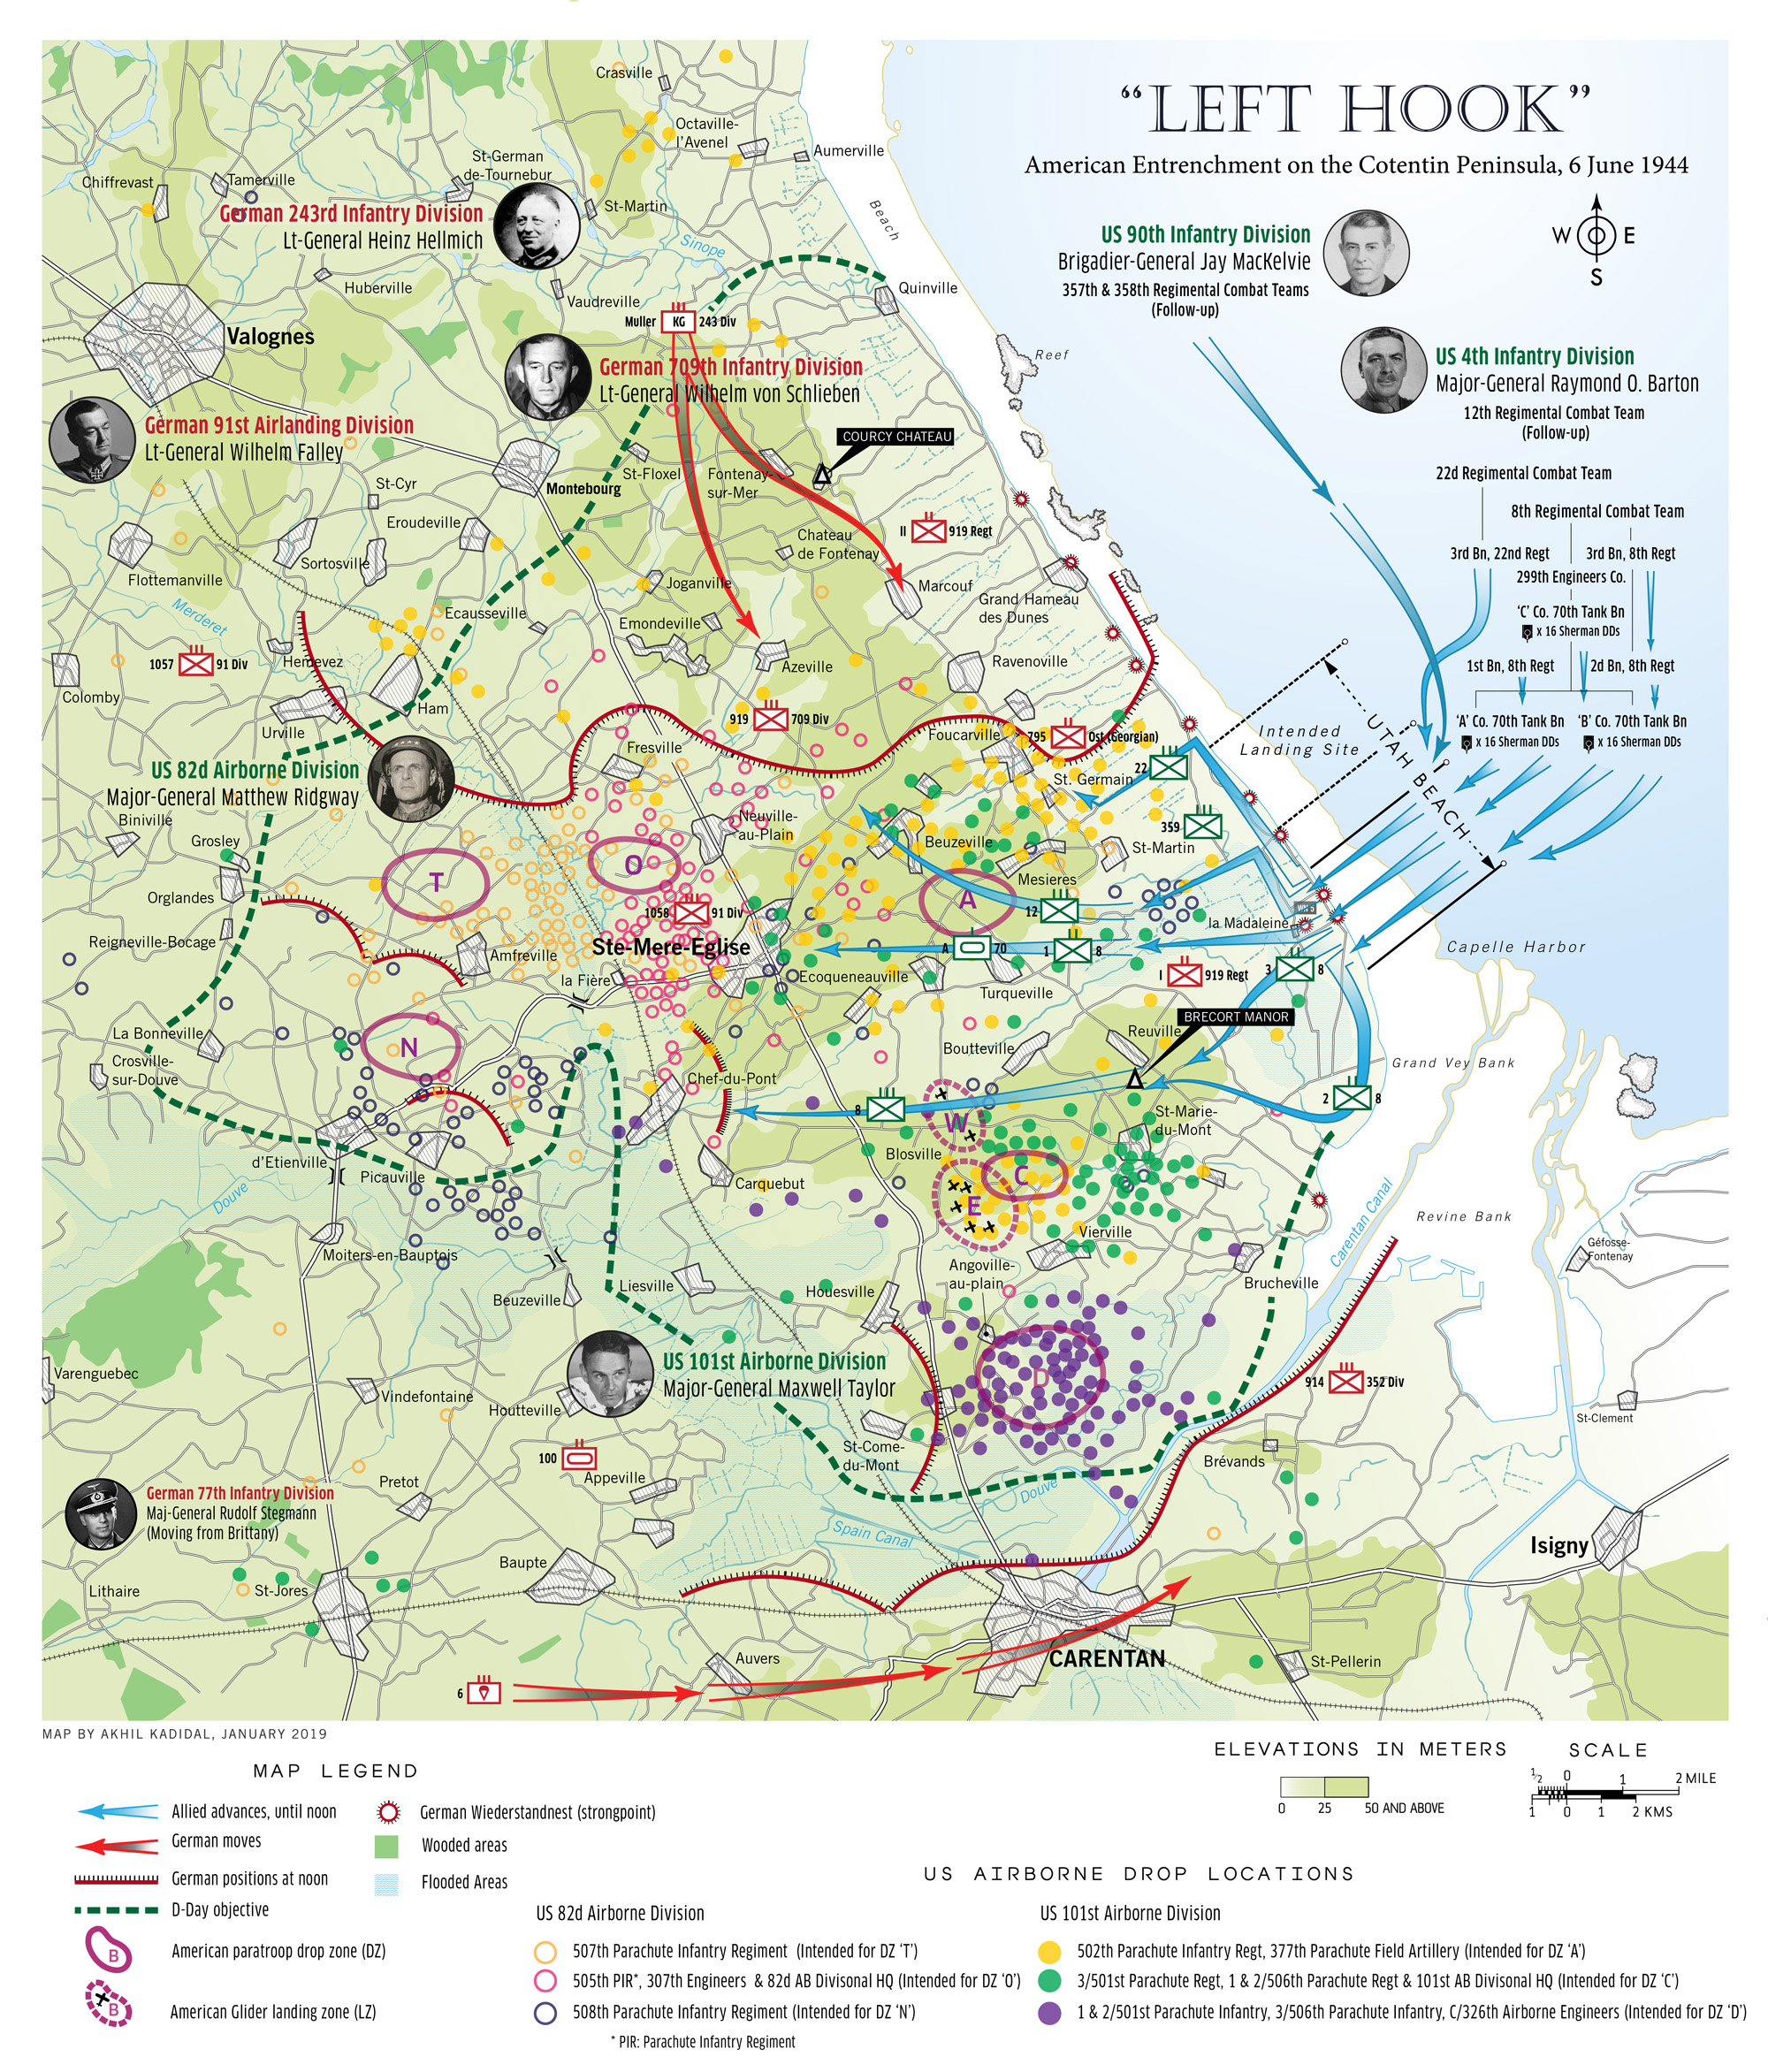
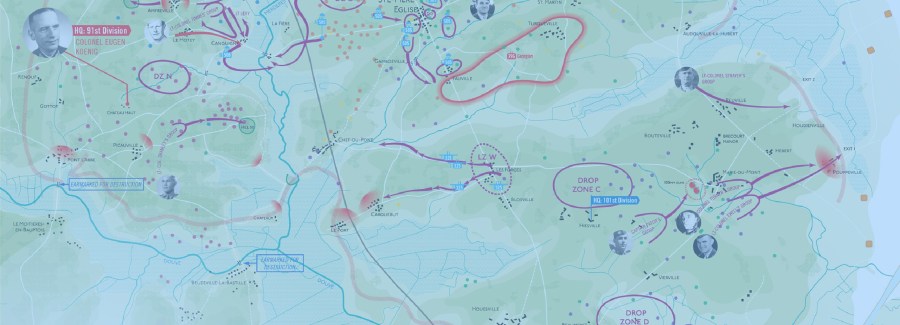
I personally favor this map not just because of the landscape it covers (which is now the stuff of western folklore with benevolent American paratroopers descending, scattered, out of the summer night to land amid sleepy Norman towns to eject German troops), but because of the information it conveys.
Armed with accurate American airborne drop patterns, I was able to translate that information into an overall map of the Cotentin Peninsula detailing not only the primary beach landings by the US Army and Navy but also the tepid German counter-reaction.
At 12.48 am on June 6, members of the US 82nd and 101st Airborne Divisions began to drop over the southeastern part of the Cotentin, in order to secure static locations intended to prevent German reinforcements from streaming into the beach assault zones. Unfortunately, for the Americans, bad weather and heavy German anti-aircraft fire severely disrupted the para drop, which for example, resulted in only 2,500 out of 6,600 paratroopers of the 101st Airborne assembled in their appointed areas.
The rest were strewn across the peninsula, many of whom came down in flooded areas after Field Marshal Erwin Rommel, the commander of the German Army Group B, ordered the opening of locks at the mouth of the Merderet River, which flooded parts of the countryside.
An estimated 680 paratroopers of the 507th Parachute Regiment (82d Airborne) came down in a swamp to the east of DZ ‘T’ where the water was over eight feet deep. At least 36 paratroopers drowned, some in less than three feet of water, weighed down by 130 pounds of kit.
Despite these setbacks, the American airborne divisions largely accomplished their objectives.
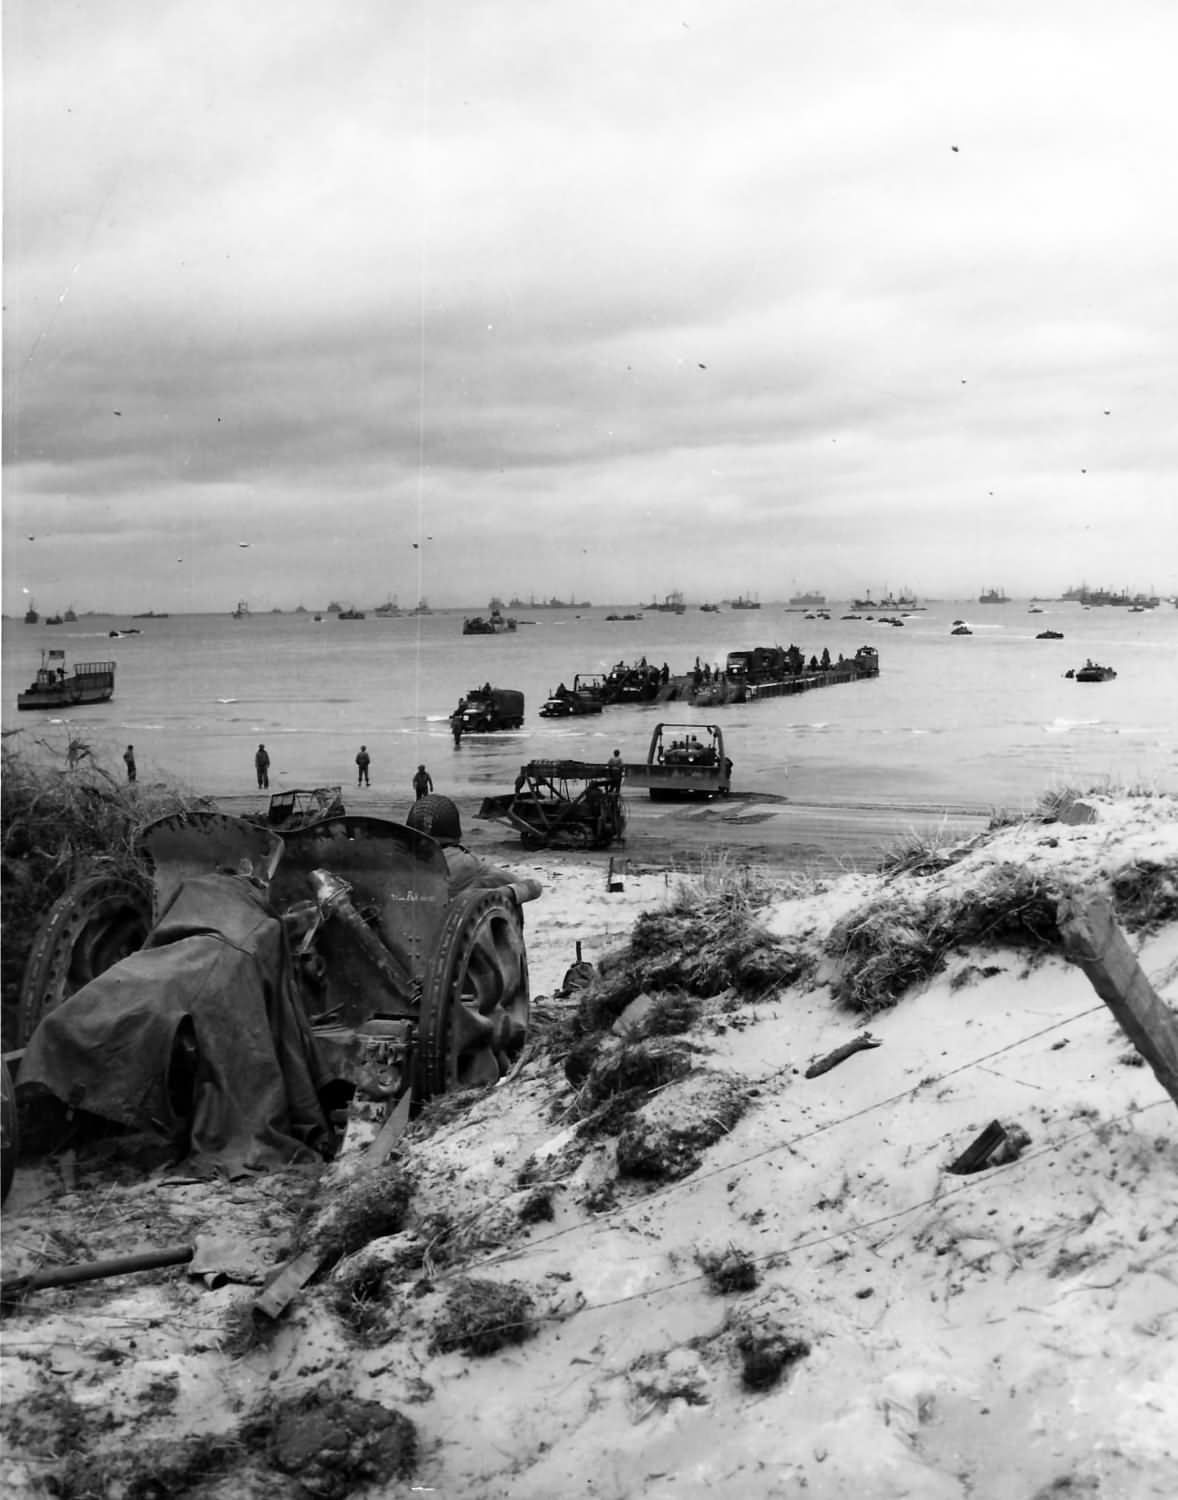
The main amphibious assault landings by the US 4th “Ivy” Infantry Division began at 6.30 am, preceded by a wave of 32 Sherman amphibious tanks. As at “Omaha,” the landings nearly devolved into a fiasco when the first wave landed on the wrong beach.
The assistant divisional commander, Brigadier-General Theodore Roosevelt III (son of former president Teddy Roosevelt and a cousin of President Franklin Delano Roosevelt), took immediate charge, saying: “We’ll start the war from right here.”
The US Army credited Roosevelt III with salvaging a potentially disastrous situation and rewarded him with a Medal of Honor. However, none of the American commanders at “Omaha” who had also adapted new plans of attack to compensate for landing errors, were similar recognized. Roosevelt’s family pedigree undoubtedly helped.
While the German defenders at “Utah” possessed 110 artillery pieces, in addition to a further 18 batteries of artillery (including massive 210 mm guns), they were unable to prevent the Americans from entrenching themselves on the peninsula. Adding to the general sense of rout was that much of the beachfront at “Utah” was tenuously held by an Ost battalion of Russian defectors and a unit from the 709th Infantry Division.
The Americans made swift progress off the beach, but the landscape of the Cotentin was bocage country with thick hedgerows which hindered US movement towards the port city of Cherbourg and south towards Carentan.
Studying this map and that of “Omaha,” one realizes the absurdity of the plot of Saving Private Ryan. First we have a company of US Army Rangers landing at “Dog One” (across from Exit D1) at “Omaha” and once the beach was secured, making their way across at least 50-60 kilometers of hostile landscape (teeming with German troops) to reach the Cotentin Peninsula. It would have been simpler for US forces in the movie to dispatch a search and rescue unit from the “Utah” beachhead. But had the writers created that construct, the spectacle of the “Omaha” landings would have been absent.
In the film, the rescue party and Private Ryan’s platoon decide on a last stand at a small bridge against German Tiger tanks and Waffen-SS panzergrenadiers — in a scene inspired by the real-life battle of Graignes (a village about four miles south of Carentan). In reality, US troops never encountered any of the 126-135 Tiger tanks that the Germans deployed in Normandy.
In Normandy, Tiger tanks belonged purely to the realm of the British-Canadian experience.
In fact, the sole German tank unit on the Cotentin during the early stages of the campaign was the 100th Panzer Battalion which was equipped with obsolete French tanks captured in 1940. German SS troops also did not arrive on the peninsula until 11 June.
F | Pointe-du-Hoc
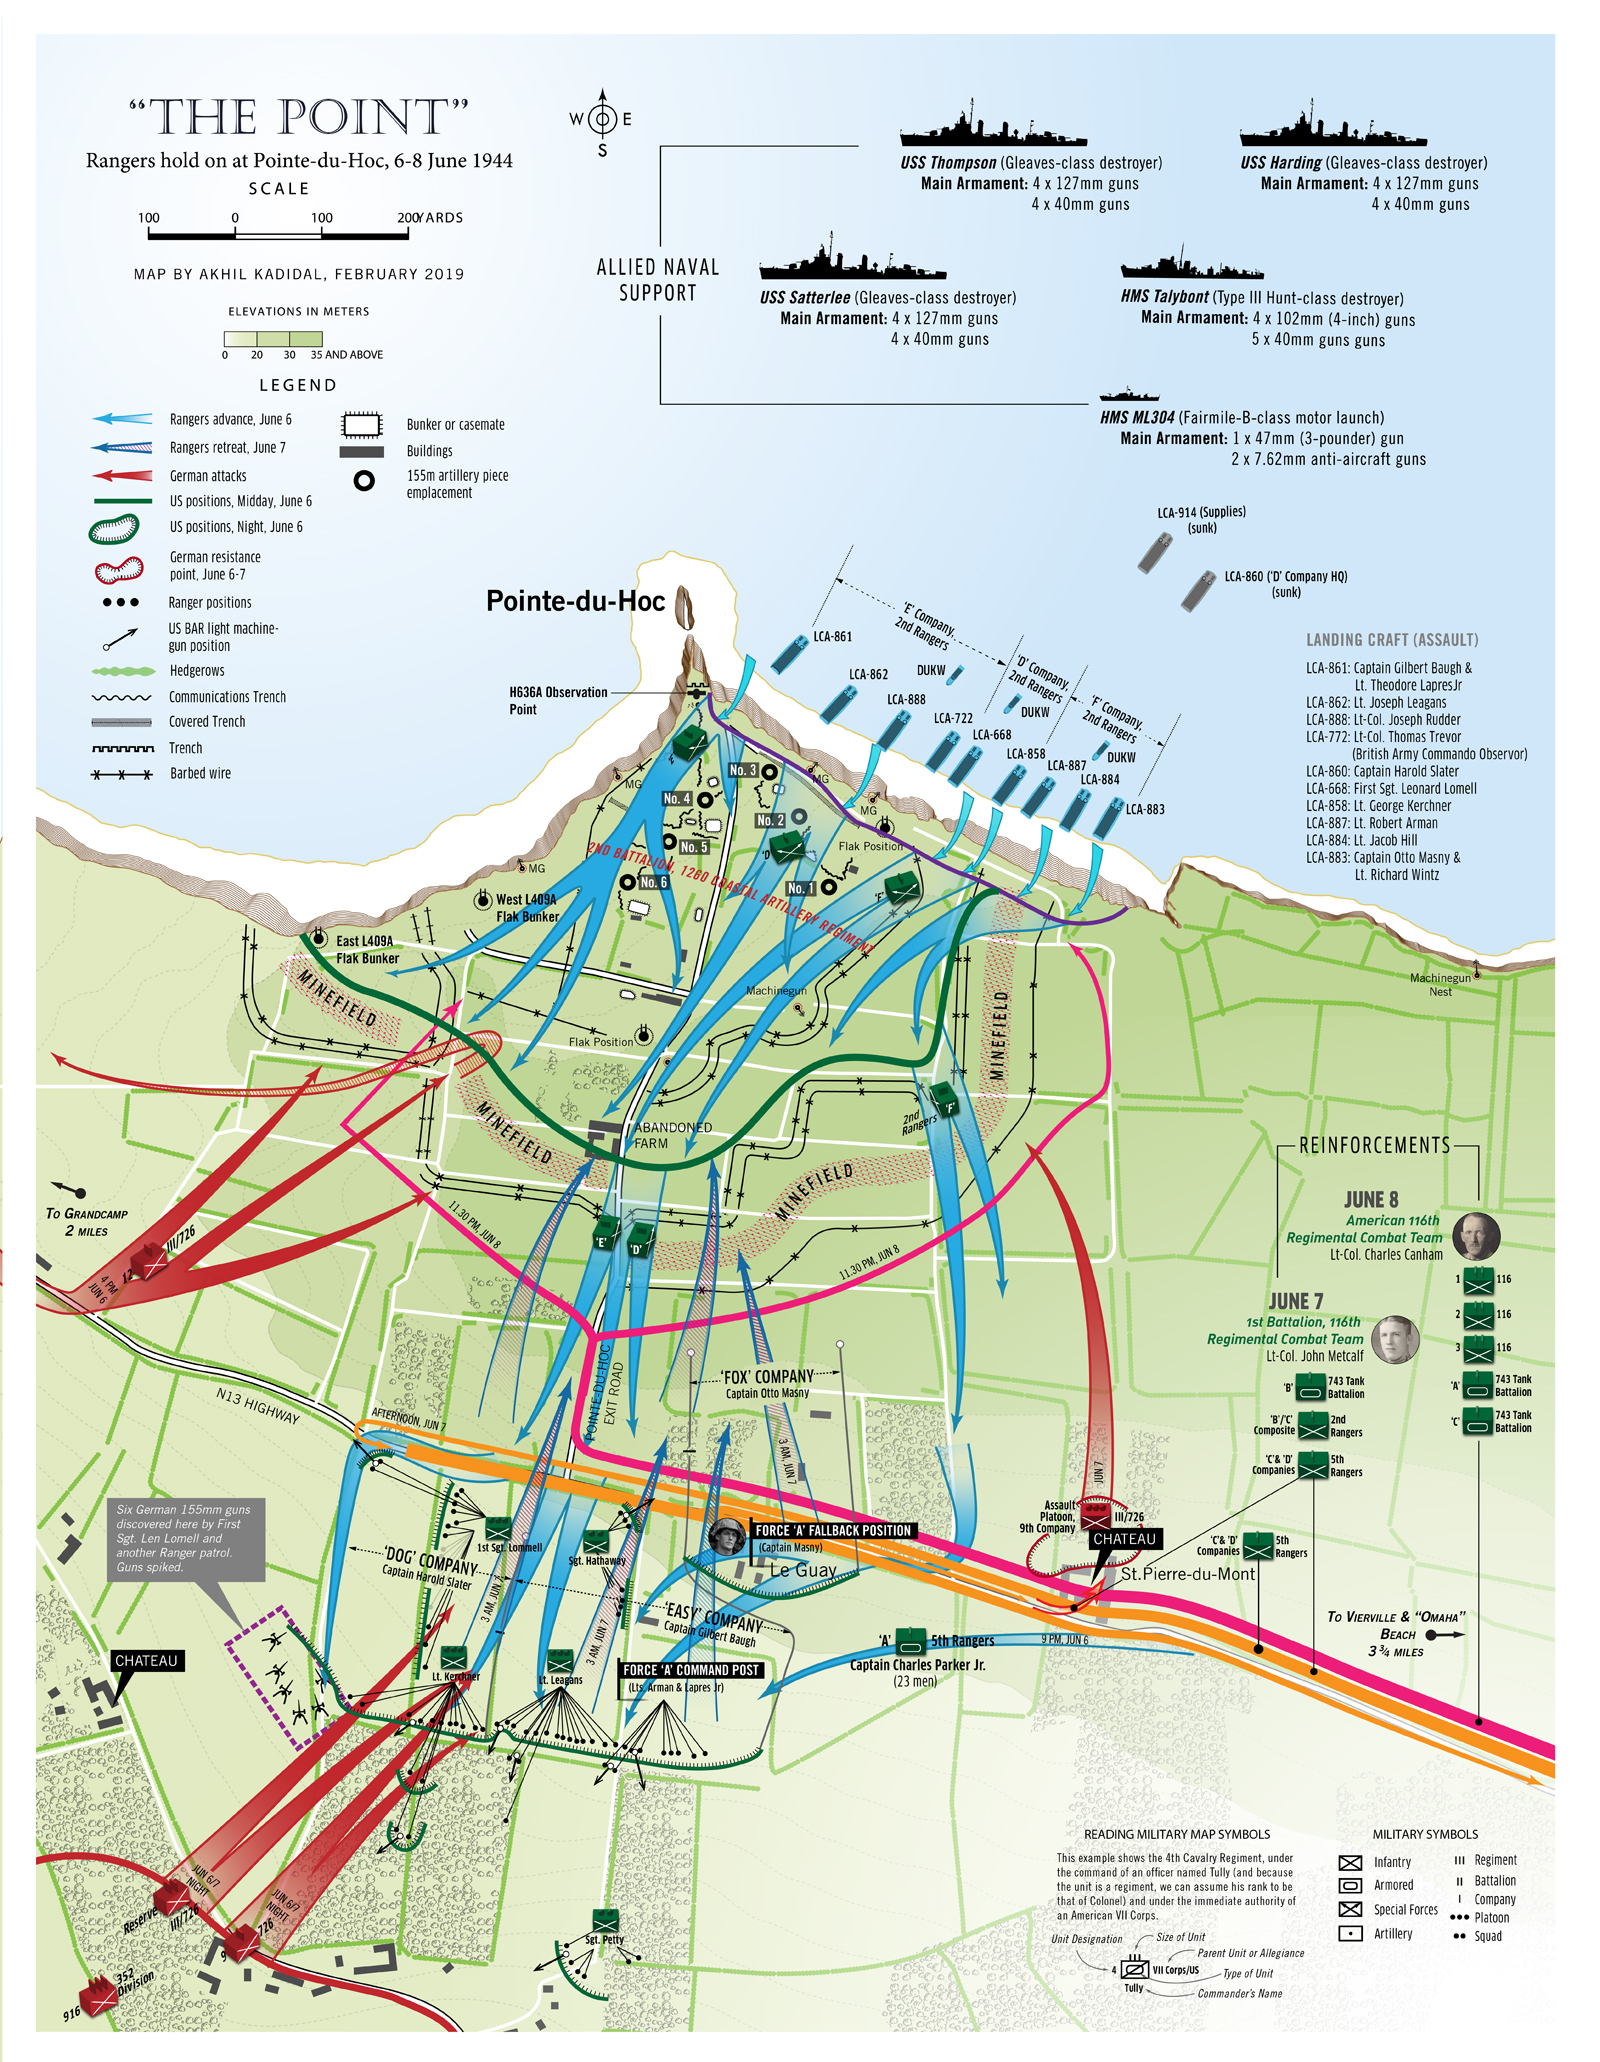
Despite my best intentions, I feel that this map is a complete failure and that the landscape and actions are better suited to a diorama. But several hours of work had already been sunk into it.
It is somewhat repetitive to talk about the action at Pointe-du-Hoc, a landform seven kilometers (four miles) east of “Omaha,” which was assaulted by men of the American 2nd Ranger Battalion, due to the large number of books written on the subject and because of the depth of detail available on the subject.
In short, Allied aerial reconnaissance had identified several large caliber gun emplacements and success of the entire landings was seen as related to the destruction of these fearsome weapons.
Scaling the almost 40 meter (130 ft) high cliff under intense fire and supported by heavy-fire from several offshore Allied destroyers, notable USS Satterlee and HMS Talybont, plus the British motorboat ML304, the Rangers fought their way to the casemates only to discover that the guns had never been installed.
The dismayed Rangers nevertheless pushed on and discovered the six 155 mm guns had been abandoned in transit half a kilometer (550 yards) down the road, guarded by a 100-strong force of Germans. Driving away the enemy, the Rangers then blew open the guns’ elevating and traversing mechanism using thermite grenades. They then returned to Pointe-du-Hoc, which they held for two days against fierce German counterattacks.
US reinforcements arrived on June 8, by which time the gallant battalion had suffered the loss of 77 men killed, 152 wounded and 38 missing. Only 75 men were fit for combat. In all, they were the first of the amphibious-landed Americans to attain their objectives on D-Day.
G | Advancing through the Cotentin Peninsula

There were arguably no greater aids to Allied fortunes than Hitler’s overblown ego and his penchant for petty symbolism. When his generals warned him that several divisions would be cut off in the Cotentin as the Americans swept across the peninsula, Hitler refused to authorize a withdrawal of the threatened units. Instead, he ordered them to make a last stand at the port city of Cherbourg.
Cherbourg had become particularly important for the Allies. A violent storm in the English Channel in the days after D-Day had damaged artificial harbors (codenamed “Mulberries”) that the allies had built to receive supplies.
Hitler’s orders were maniacal but only one senior officer, Major General Rudolf Stegmann of the 77th Division, chose to disobey. He withdrew his division south, before the US 9th Infantry Division cut across the peninsula, severing Cherbourg from the rest of the German army.
The cutoff German forces, lacking heavy weapons and tanks, hunkered down around Cherbourg and prepared to make a fight out of it. They hopes were buoyed somewhat by the slow progress of their American enemies, especially that of the US 90th Infantry Division. Composed of men from Texas and Oklahoma, the division prided itself as a collection of “tough ‘ombres.” In reality, it was one of the worst divisions in the US Army.
The 90th Division required several changes in leadership before it could become an effective fighting force.
H | Capturing Cherbourg

“When worst comes to worst it is your duty to defend the last bunker and leave to the enemy not a harbor but a field of ruins,” Hitler told Lt. General Karl-Wilhelm von Schlieben, commander of the 16,000-stong garrison at Cherbourg. Meantime, the task of capturing Cherbourg had fallen to US Lt. General Omar Bradley’s US First Army.
At 2 pm on June 22, preceded by a massive Allied bombardment by artillery and over a thousand planes, the American opened their attack against the three ridgelines which constituted Cherbourg’s first line of defense. The city’s defenses were originally intended to hold off invaders from the sea, and for this task, the port and coastline was populated with heavy coastal batteries, including a large 240mm gun battery codenamed “Hamburg.”
The Allied naval task force charged with neutralizing the batteries found the going tough. Shell after shell was lobbed at the batteries, seemingly without effect. One vessel, the British HMS Enterprise, lobbed 316 rounds of six-inch ammunition at a coastal emplacement codenamed “York”. The battery was apparently silenced, but return to life in the evening as the task force withdrew. Other vessels, namely the American battleships Texas and Arkansas, plus five destroyers, hurled 206 rounds of 14-inch ammunition, 58 rounds of 12-inch ammunition and 552 rounds of five-inch ammunition at “Hamburg.” They achieved nothing more than the destruction of a one gun out of four.
“It was like throwing stones at a bottle and always missing,” said one naval crewman later.
The German shelling against the ships was equally poor.
On terre ferme, the Germans fought fanatically for every yard of ground. Defensive posts had to be eliminated one by one. American infantrymen were given a terrifying refresher course in tactics, when they were forced to engage in two days of brutal house-to-house fighting on the road to Fort du Roule. The remnants of five German divisions held out in the besieged port and were intent on following Hitler’s orders till the end.
American infantry platoons improvised street-fighting techniques to cover a squad-by-squad advance. They also learned to pave their way forward with grenades and machinegun fire, rooting out enemy troops in close-combat fighting that was reminiscent of the Battle of Stalingrad on the Russian Front in 1942.
Slowly, the American ring around the city tightened until the Germans cracked on the 25th. On the following day, von Schlieben and 800 of his men surrendered when tanks began pounding the tunnel entrances above their bunker.
True to Hitler’s orders, the Germans had systematically destroyed the port facilities and the city. The Germans had laid mines, sunk blockships, and demolished buildings. It would be months before the port could return to operational status, by which time other ports would have fallen to the Allies, making the battle of Cherbourg little more than a hollow victory for the Allies.
Bradley was so furious with von Schlieben for having destroyed the port that he refused to meet with him as military protocol dictated.
In all, American troops had captured 39,042 Germans in the Cotentin since the beginning of D-Day for the loss of 1,800 dead and 15,000 other casualties.
I | The British break the back of the German SS
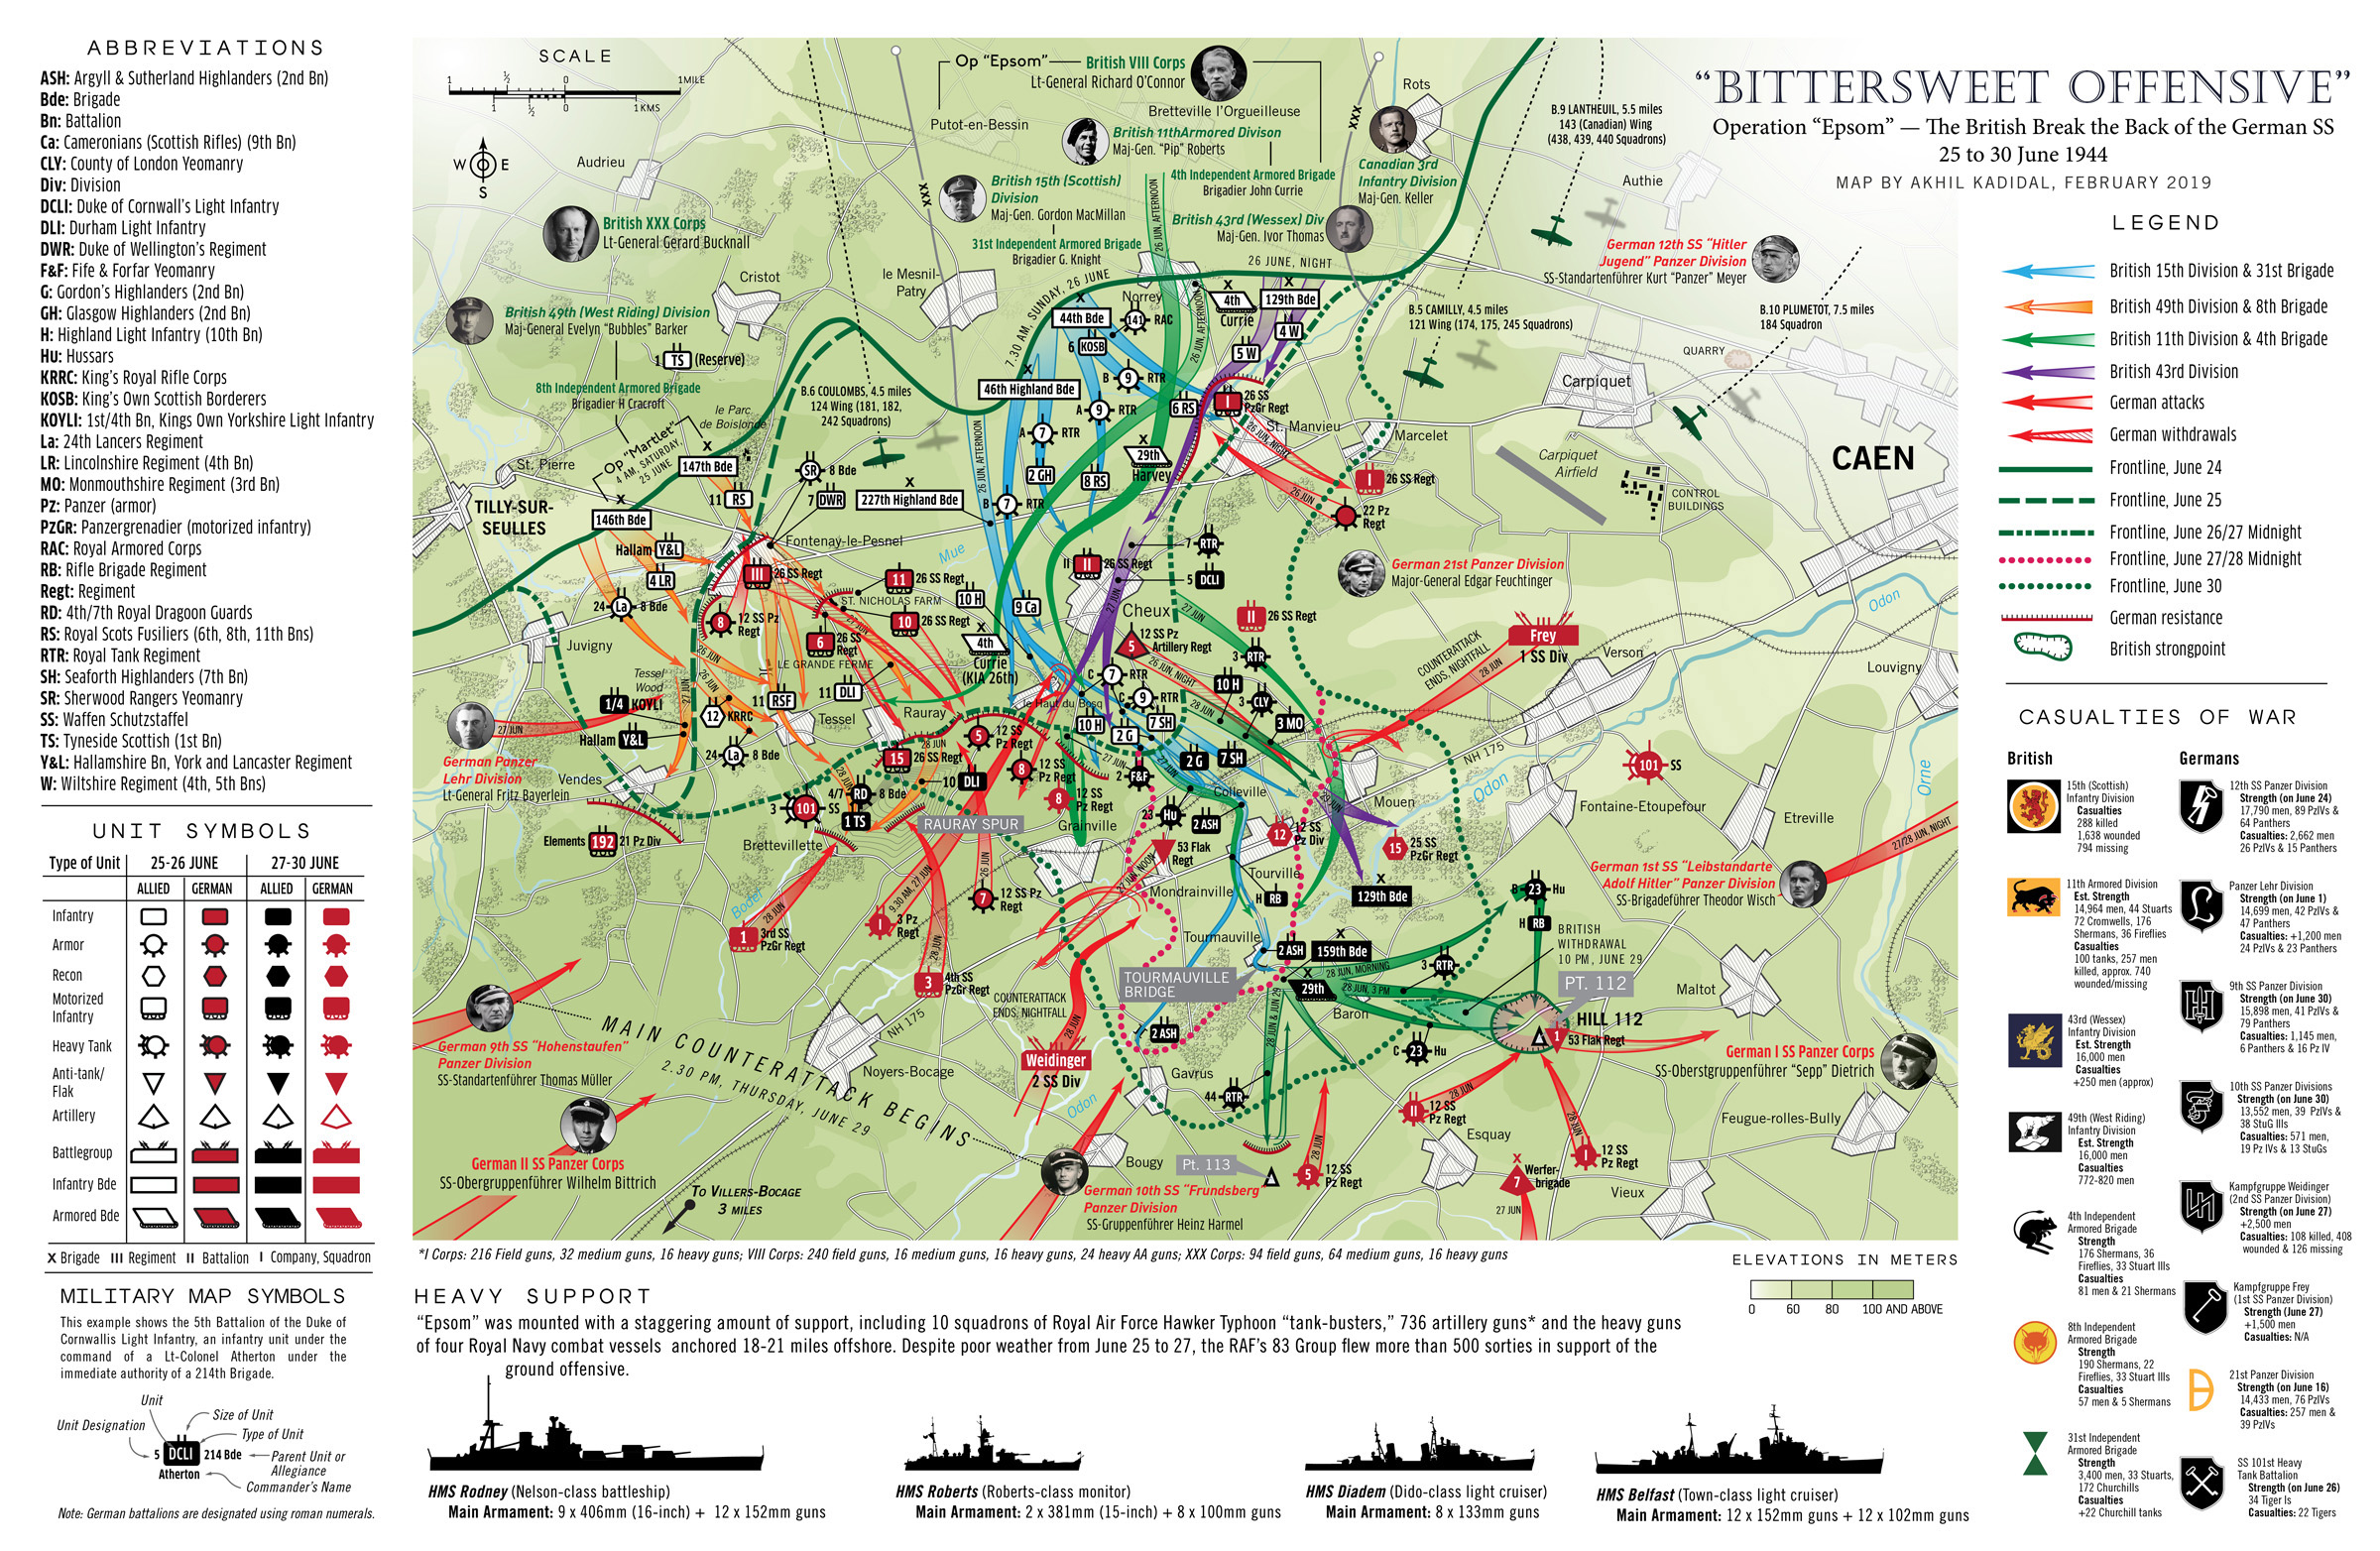
I was leery of tackling Operation “Epsom”, a titanic British struggle conducted in June 1944 to capture a knoll and parcel of high ground in Normandy which would enter the annals of history as Hill 112. The Germans regarded the hill as the “cornerstone” of their defense in Normandy. But because of a confused book on the subject I had read as a teenager, I had only a fragmented understanding of the battle.
The above map took me roughly three days to complete, following a close reading of three books: Antony Beevor’s D-Day, Tim Saunders’ unimaginatively titled Operation Epsom, and Kevin Baverstock’s Breaking the Panzers. The clarity of Saunders’ text made up for the conventionality of his book title and whose small details form the foundation of this map. I can joke that the end result is something akin to a Jackson Pollock painting.
“Epsom’s” importance lies in the fact that it drew the greatest assembly of German SS Panzer divisions in battle than had been assembled since the massive July 1943 tank battle at Kursk on the Russian front. The Waffen-SS’s opponents during “Epsom” were largely green. This was because Britain’s A-Team, the 7th Armoured, the 50st Northumbrian, and 51st Highland Divisions (veterans of the grand and earlier desert campaigns of North Africa), had already faltered trying to penetrate German lines (see my post on Villers-Bocage).
In fact, during “Epsom,” just two smaller British units, the 4th and 8th Independent Armoured Brigades, were battle proven. The remaining, including the 15th Scottish, the 11th Armoured and the 49th (West Reading) Divisions were rookies and their fighting prowess was regarded as questionable. What ensued, however, is fascinating from a sociological and military point of view.
These green divisions, envious of and intimidated by the reputations of their desert brethren, fought fiercely, emerging as the most capable fighting formations in the British Army in 1944. The advance of the 15th Scottish Division during “Epsom” displayed a remarkable level of skill and determination, with the division bashing its way towards Hill 112 in defiance of per-operational estimates.
By June 28, the British were poised to fold up the German lines and rumble towards Caen, only to be betrayed by the cautiousness of their commander, Field Marshal Bernard Montgomery, who pulled them from Hill 112 in the face of a German armored counterthrust.
As for the SS? With their units ravaged and demoralized by the Scots and the English, they would never again commit to a counteroffensive against the British Army.
J | The Allies capture half of Caen
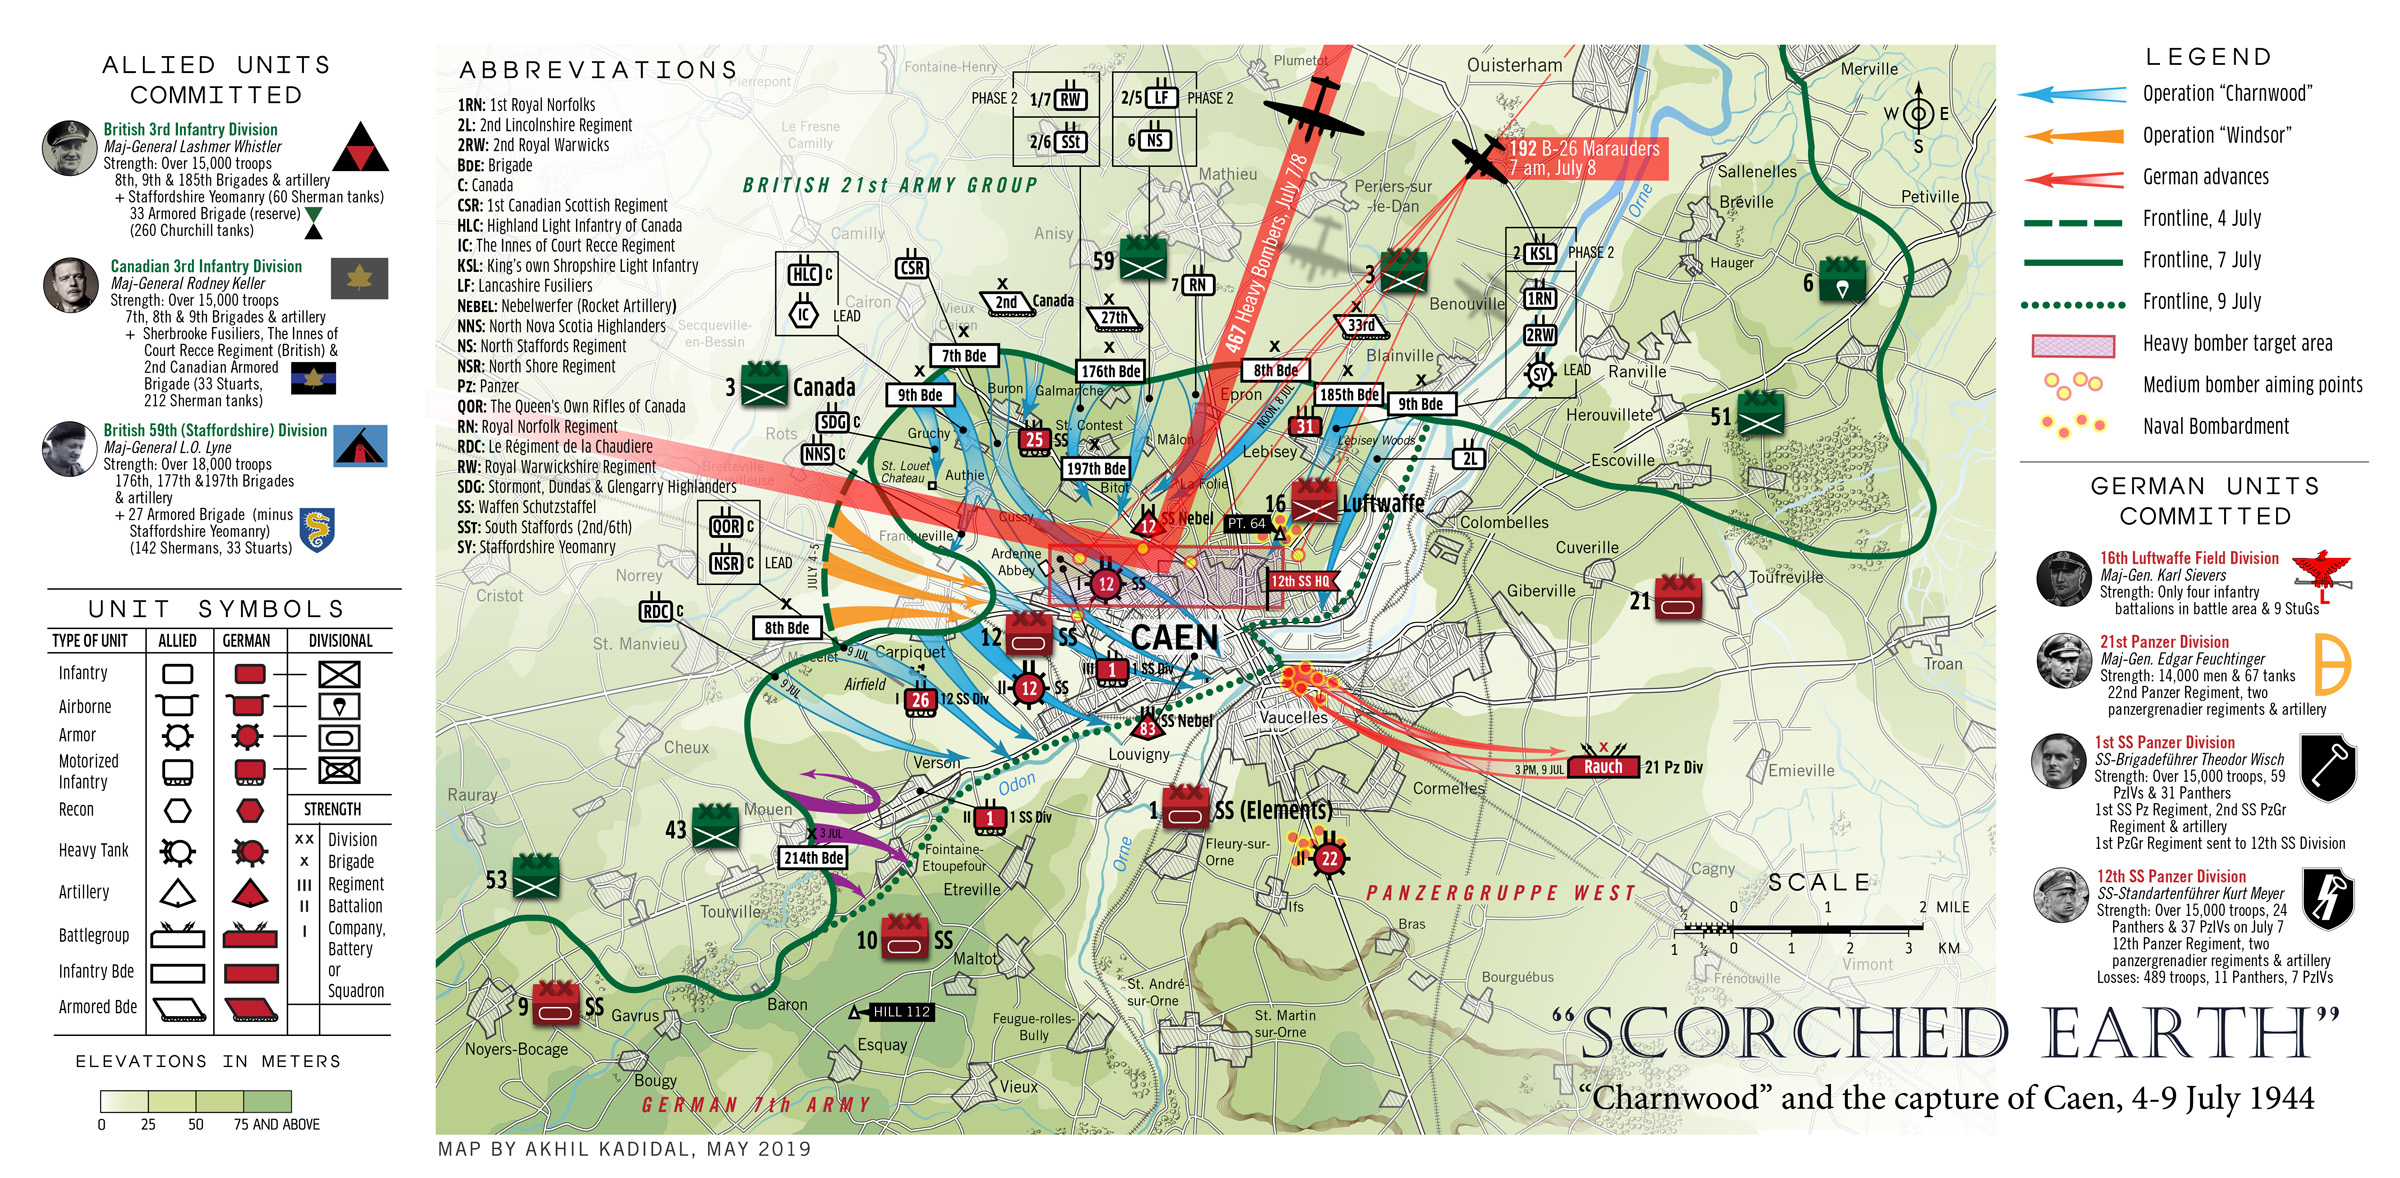
I initially had little interest in making a map about Operation “Charnwood,” a half-successful Allied attempt to secure Caen which was supposed to have been captured by Anglo-Canadian troops on D-Day, because it thought it would be superfluous, considering that it would be rehashing cartographic ground covered by some of my other maps.
After researching the battle, however, I recognized the need to create a map examining the battle.
“Charnwood” was borne out of Montgomery’s angst over his previous failed attempts to take the city. He had become so determined to seize the city without further delay that he was even prepared to accept it as a field of rubble. Consequently, on the later afternoon of July 7, British naval vessels, including the battleship HMS Rodney began to hurl heavy fire upon Point 64, a bit of high ground dominating a network of roads just north of Caen. Airstrikes by British Hawker Typhoon fighter-bombers followed before the “curtain raiser” began: an airstrike by 467 heavy British bombers at 9.50 pm.
By midnight, northern Caen was in smoldering ruin, devastated by 2,000 tons of bombs; 400 French civilians were dead. “Charnwood” and the land offensive began at 4.20 am on the 8th. It encountered troops from the German 12th SS “Hitler Youth” Panzer Division, who had been reinforced by elements of the 1st SS Panzer Division, hardened cutthroats from the Russian front.
Although troops from the newly arrived British 59th Infantry Division faltered in the face of German fire, Anglo-Canadian units from the twin “Thirds” — the British 3rd and Canadian 3rd Infantry Divisions — bashed on. By 4 pm, men of the 2nd King’s own Shropshire Light Infantry (KSLI) from the British 185th Brigade had wrested control of Point 64 from the Germans. It was a momentous occasion. This had been the brigade’s original objective on D-Day. It had taken them 32 days to fulfill their mission.
On the Canadian front, leapfrogging over other regiments such as the Queens Rifles of Canada and the Regiment of Chaudieres, men of the North Nova Scotia Regiment met fierce fire from the 12th SS Panzer Division.
Kurt “Panzer” Meyer, the divisional commander, who had been watching the Canadian advance from the tower of the Abbaye Ardenne, decided to counter-attack with two panzergrenadier battalions supported by tanks. The Novas were overrun at Authie after a vicious close-quartered battle. Buron was lost after a fierce tank battle. Following the loss of 21 tanks, 120 men killed, 192 wounded, and 120 captured, the commander of the Canadian of the 9th Brigade decided to withdraw the Novas and the Fusiliers to Les Buissons where other Canadian battalions were preparing a “fortress” position.
An incident then occurred which stiffened Canadian resolve. The SS executed 18 captured members of the Novas at Buron. Thirty-seven others were killed in Authie. For these war crimes, Meyer was sentenced to death in a trial after the war. Meyer may not have played an active part in the executions, and his sentence was later commuted.
Renewed fighting erupted, with the infuriated Canadians hammering German lines relentlessly until the lines broke. The cost had been stiff. Over the course of 48 hours before “Charnwood” petered out, some British and Canadian battalions lost 25 percent of their strength.
While Allied troops celebrated the capture of the northern half of Caen, the Germans still held the southern part of the city and the Collombelles steelworks to the northeast.
K | A British Schwerpunkt Meets its Match

Montgomery’s strategy of hitting the Germans on their flanks to break them was not working as planned, and consequently, his units suffered terribly for little gains. “The Normandy Slaughterhouse was swallowing up the infantry,” remarked one officer. London warned Montgomery, that at the current loss rate, replacements would run out by July 1944.
A shift in strategy was needed. It was decided to move the emphasis to the American sector, where the manpower rich US Army was confronted by weak German forces. As British and the Canadian forces were to duke it out with the bulk of German armor in a new offensive, American ground forces under Bradley were build up for an advance south of St. Lô.
The Anglo-Canadian offensive, codenamed Operation “Goodwood ” was an armored thrust south of Caen. Brigadier Charles Richardson, Montgomery’s Chief planner, hoped that the combined armored strength of the British 2nd Army, now outnumbering Germans panzers four to one, would breakout from the bridgehead east of the Orne river and strike out west towards Falaise, open country and the road to Paris.
If it was anything that the British Army had plenty of, then it was armor. The British-Canadian sector seemed incapable of holding all the tanks and armored vehicles in their possession. By the time of “Goodwood”, the British had three armored divisions in Normandy, in addition to seven Independent Armoured Brigades, each of which possessed 250 tanks (just 80 tanks less than a standard British armored division). Also present in Normandy were several Canadian armored units. A Free Polish armored division was scheduled to arrive several weeks later.
The Germans meanwhile, had around nine panzer divisions in Normandy, five of them SS. But these units had been substantially reduced in weeks of fighting and aerial bombardment. The Germans also had several independent tank battalions in the area, and four of them were heavy panzer battalions equipped with the formidable Tiger. But the Germans had erred. Instead of evenly dividing their forces between the two sectors, Field Marshal Günther Adolf Ferdinand von Kluge, the commander of appointed OB West (German Army in the West), chose to beef up his forces against the Anglo-Canadians.
In all, by the time of Goodwood, a total of seven panzer divisions and all four of the heavy tank battalions were concentrated against the British, while only one – the Panzer Lehr Division – confronted the Americans.
“Goodwood” launched on July 18. The three British armored divisions – the 7th, 11th and Guards Divisions – under VIII Corps broke out of the Orne bridgehead, and advance along a corridor blasted clear by aerial bombardment. The aim being to overrun the Germans when there were still reeling from the confusion and shock caused by the bombs, to seize Bourgebus Ridge – an important vantage point south of Caen. They were to then race across the great sweep of open country beyond.
The infantry of the II Canadian Corps under Lt General Simmonds would attack south from the center of Caen and secure the rest of the city. British I and XII Corps, meanwhile, would launch subsidiary infantry attacks on the flanks, with support from the independent armored brigades.
However, there was not enough infantry to support the VIII Cops tanks. General Eberbach of Panzer Group West had also created a formidable defense line of defense with five lines of tanks and anti-tank guns. Eberbach also ensured that stone-built villages in the area were turned into fortresses, and the ridges dominating the rolling countryside were host to numerous concealed 88 mm guns and infantry.
This ensured that the rolling country, which was described by Dempsey and Montgomery as “good tank country”, was in fact better for the Germans as they could now use the long-range superiority of the cannons on their panzers and in anti-tank batteries to good effect.
Despite a heavy Allied aerial and artillery bombardment on German positions, VIII Corps began to lose tanks. By the end of the day, the 11th Armoured Division had lost 126 tanks. The Guards Armoured Division had lost 60 tanks in what was its first battle.
Meanwhile, Operation “Atlantic,” the Canadian operation to take Caen had succeeded, albeit at a heavy cost – 1,965 casualties had been inflicted, with two infantry regiments bearing the brunt of these. The South Saskatchewans lost 215 men, while the Essex Scottish lost 244. Goodwood cost the Anglo-Canadians a total of 5,537 casualties and around 400 tanks – this figure accounting for nearly 36 percent of their armored strength in France.
London viewed “Goodwood” as a failure, although Montgomery insisted that the task of tying down the Germans had been achieved. In reality, the British were slightly better off after “Goodwood” because they had attained new positions from where they could break out to the south. Their forces were now based beyond the natural barrier of the Orne which had so delayed them in the past. Also, the German threat in Caen had been removed. By taking these factors into consideration, “Goodwood” had partly achieved its aims.
L | An American Cobra in Normandy
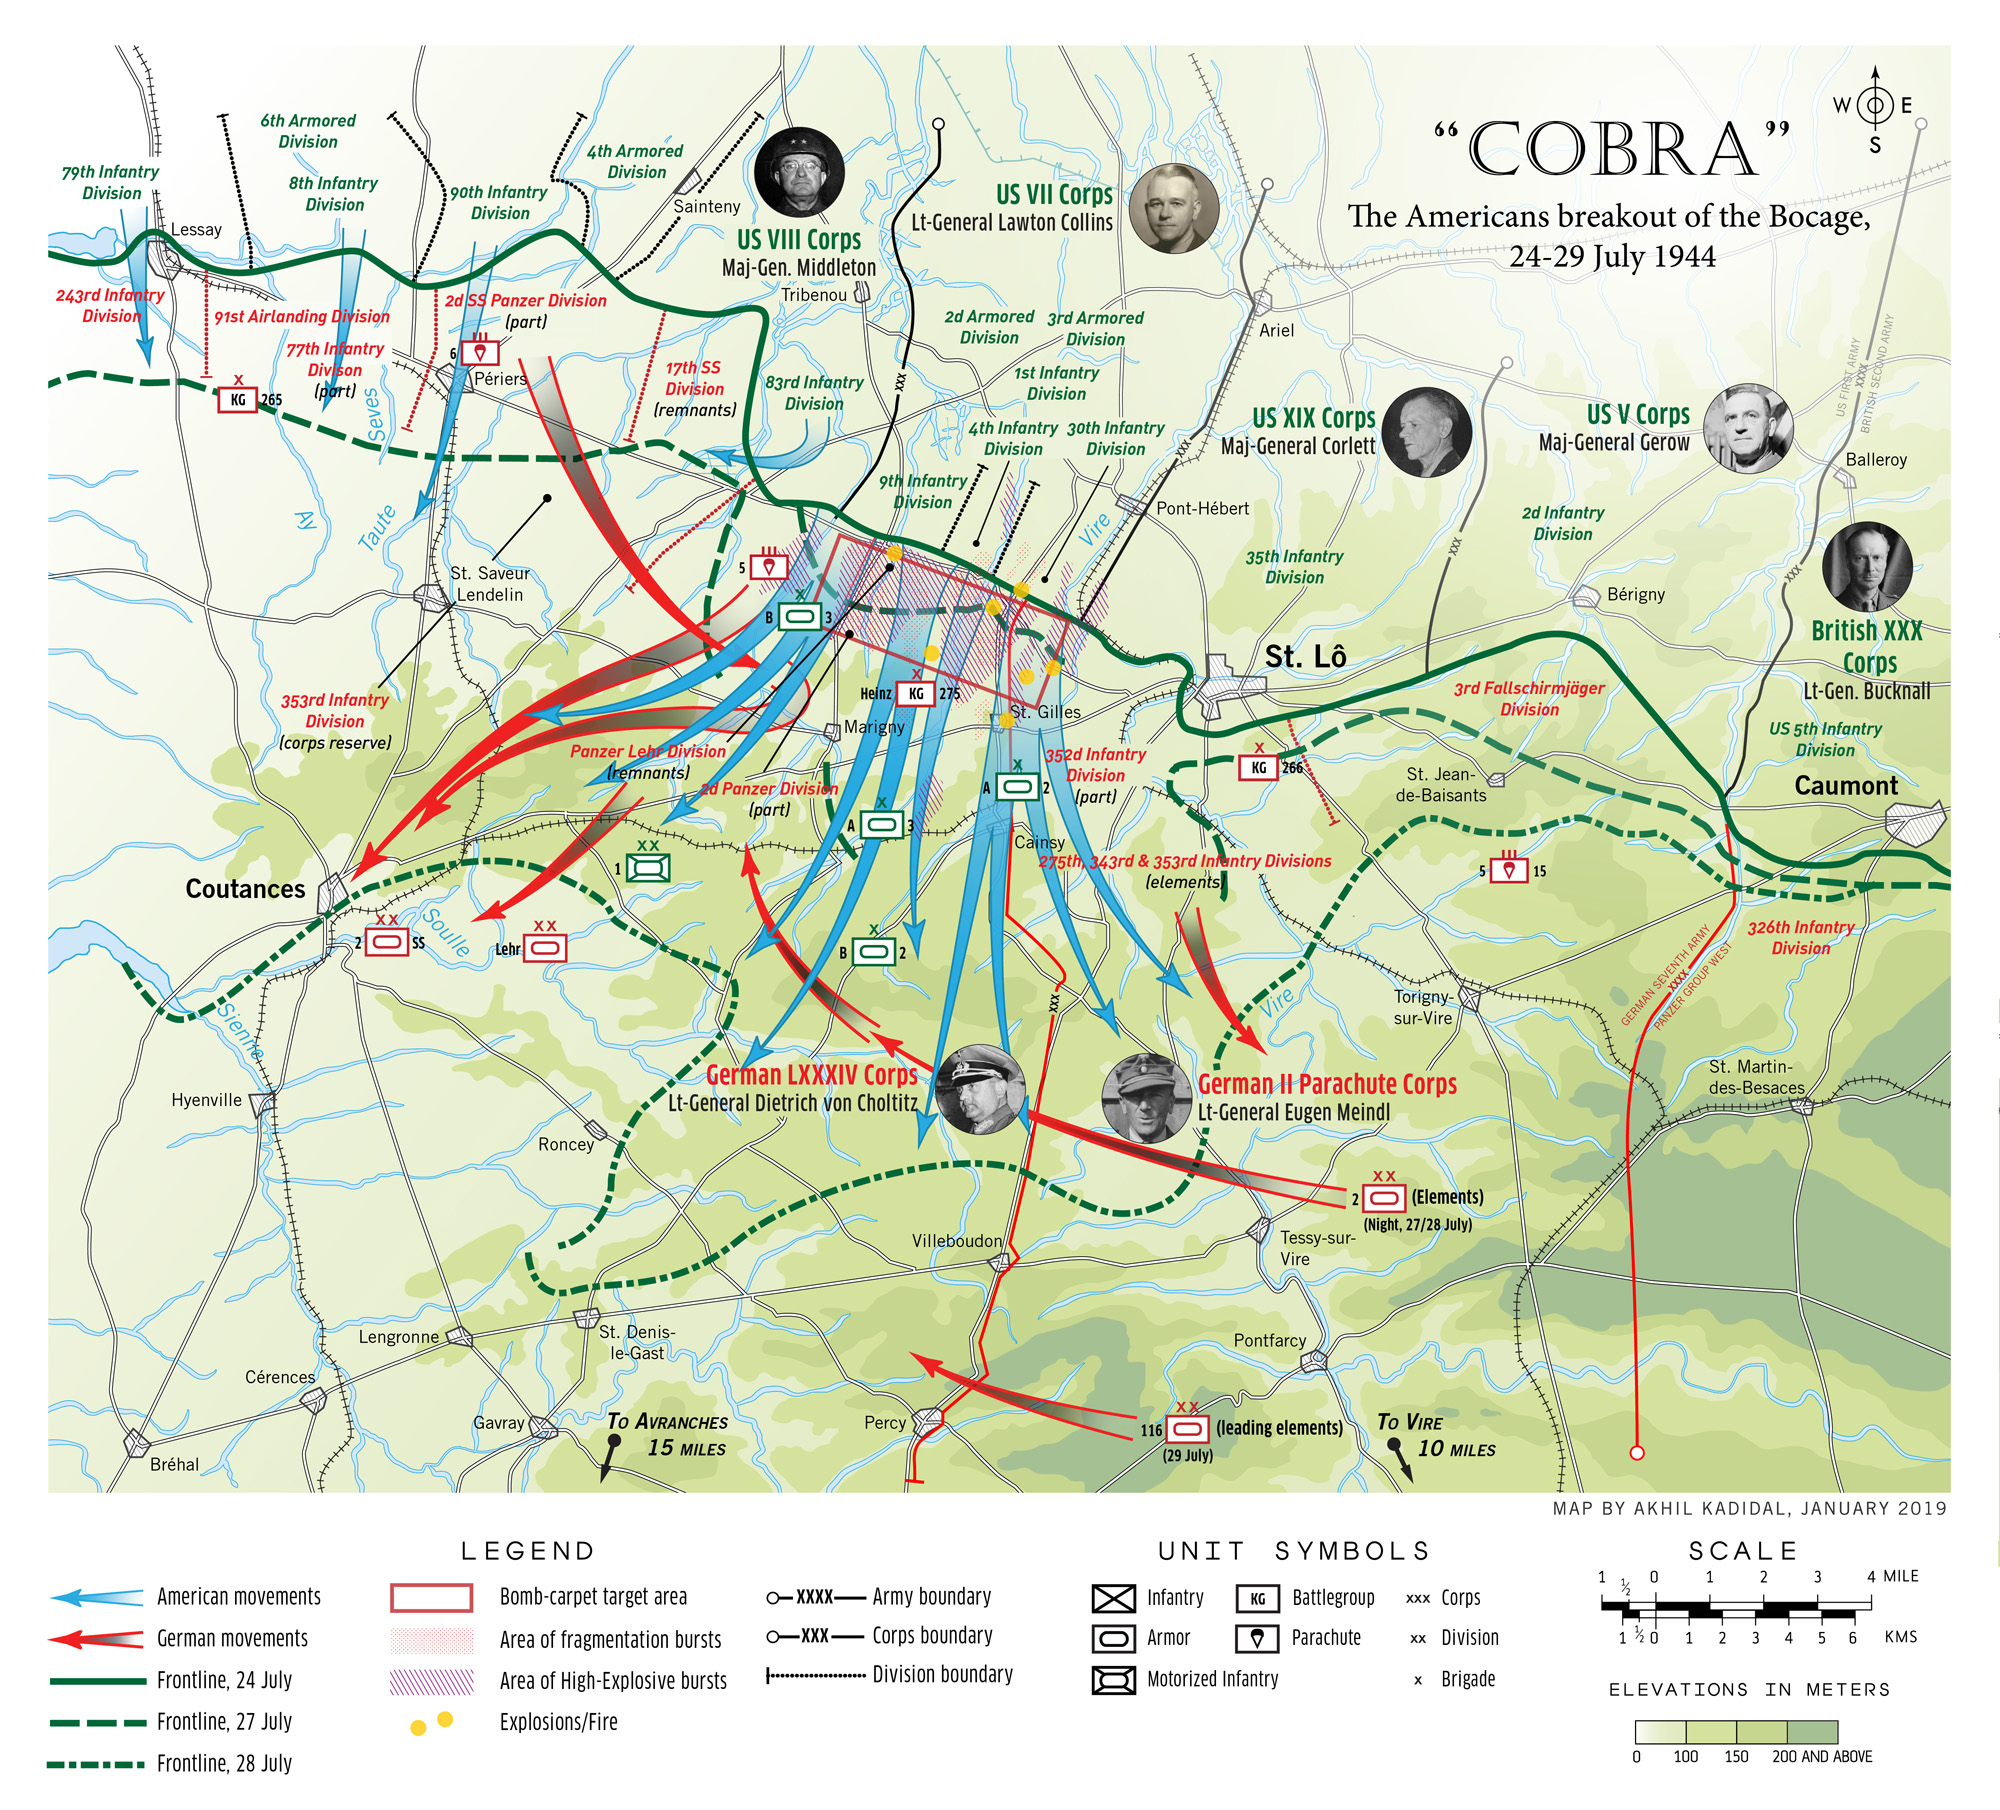
I’ve always felt that Operation “Cobra” was a somewhat depressing and boring American offensive. Nevertheless, the offensive allowed troops of US Lt. General Omar Bradley’s First Army a way out of the nightmare of the hedgerows, and onto the open fields beyond.
“Cobra” was scheduled for 23 July 1944, but eyeing heavily laden grey skies overhead, US ground commanders decided to postpone the attack. The message was passed on to Air Marshal Trafford Leigh-Mallory, commander-in-chief of the Allied Expeditionary Air Force (AEAF) for the Normandy invasion. Leigh-Mallory accordingly called off the attack. However, he failed to ensure that the message reached many of the American B-17 and B-24 bombers already airborne.
Approaching the front on a perpendicular trajectory, over 350 planes dropped nearly 700 tons of bombs through heavy cloud cover. Some of the bombs landed on the US 30th Infantry Division when a faulty release mechanism caused a bomber to drop its load prematurely. The resulting 150 casualties shocked and angered Bradley, but unwilling to give the alerted Germans time to respond, he approved an attack on the following day (24 July) with only a few changes to the attack plan. This time, six groups of fighter-bombers and three divisions of heavy bombers took off from bases in England in the morning . Disaster struck again.
The force of 1,500 heavy bombers, 380 medium bombers, and 550 fighter-bombers could barely see the Periers-St. Lô road due to dust. The bombardiers found it difficult to spot targets and judge their release points. The “short bombings” killed 111 American soldiers. Among the dead was the visiting chief of US Army Ground Forces, Lt. General Lesley J McNair, who had done so much to organize and train the army prior to its deployment overseas.
McNair would become the highest-ranking American to die in the northwest European campaign.
Stunned and demoralized by the short bombings, American troops made little initial headway. Bradley later commented that when news of the failures and the bombing filtered into his headquarters, dejection “settled over us like a wet fog.” But the airstrikes had even more of a debilitating effect on German forces. At the center of the penetration, the German Panzer Lehr Division had virtually ceased to exist as a fighting force. Gathering their wits, American tanks and infantry moved through the ravaged landscape and headed south.
M | Operation Bluecoat
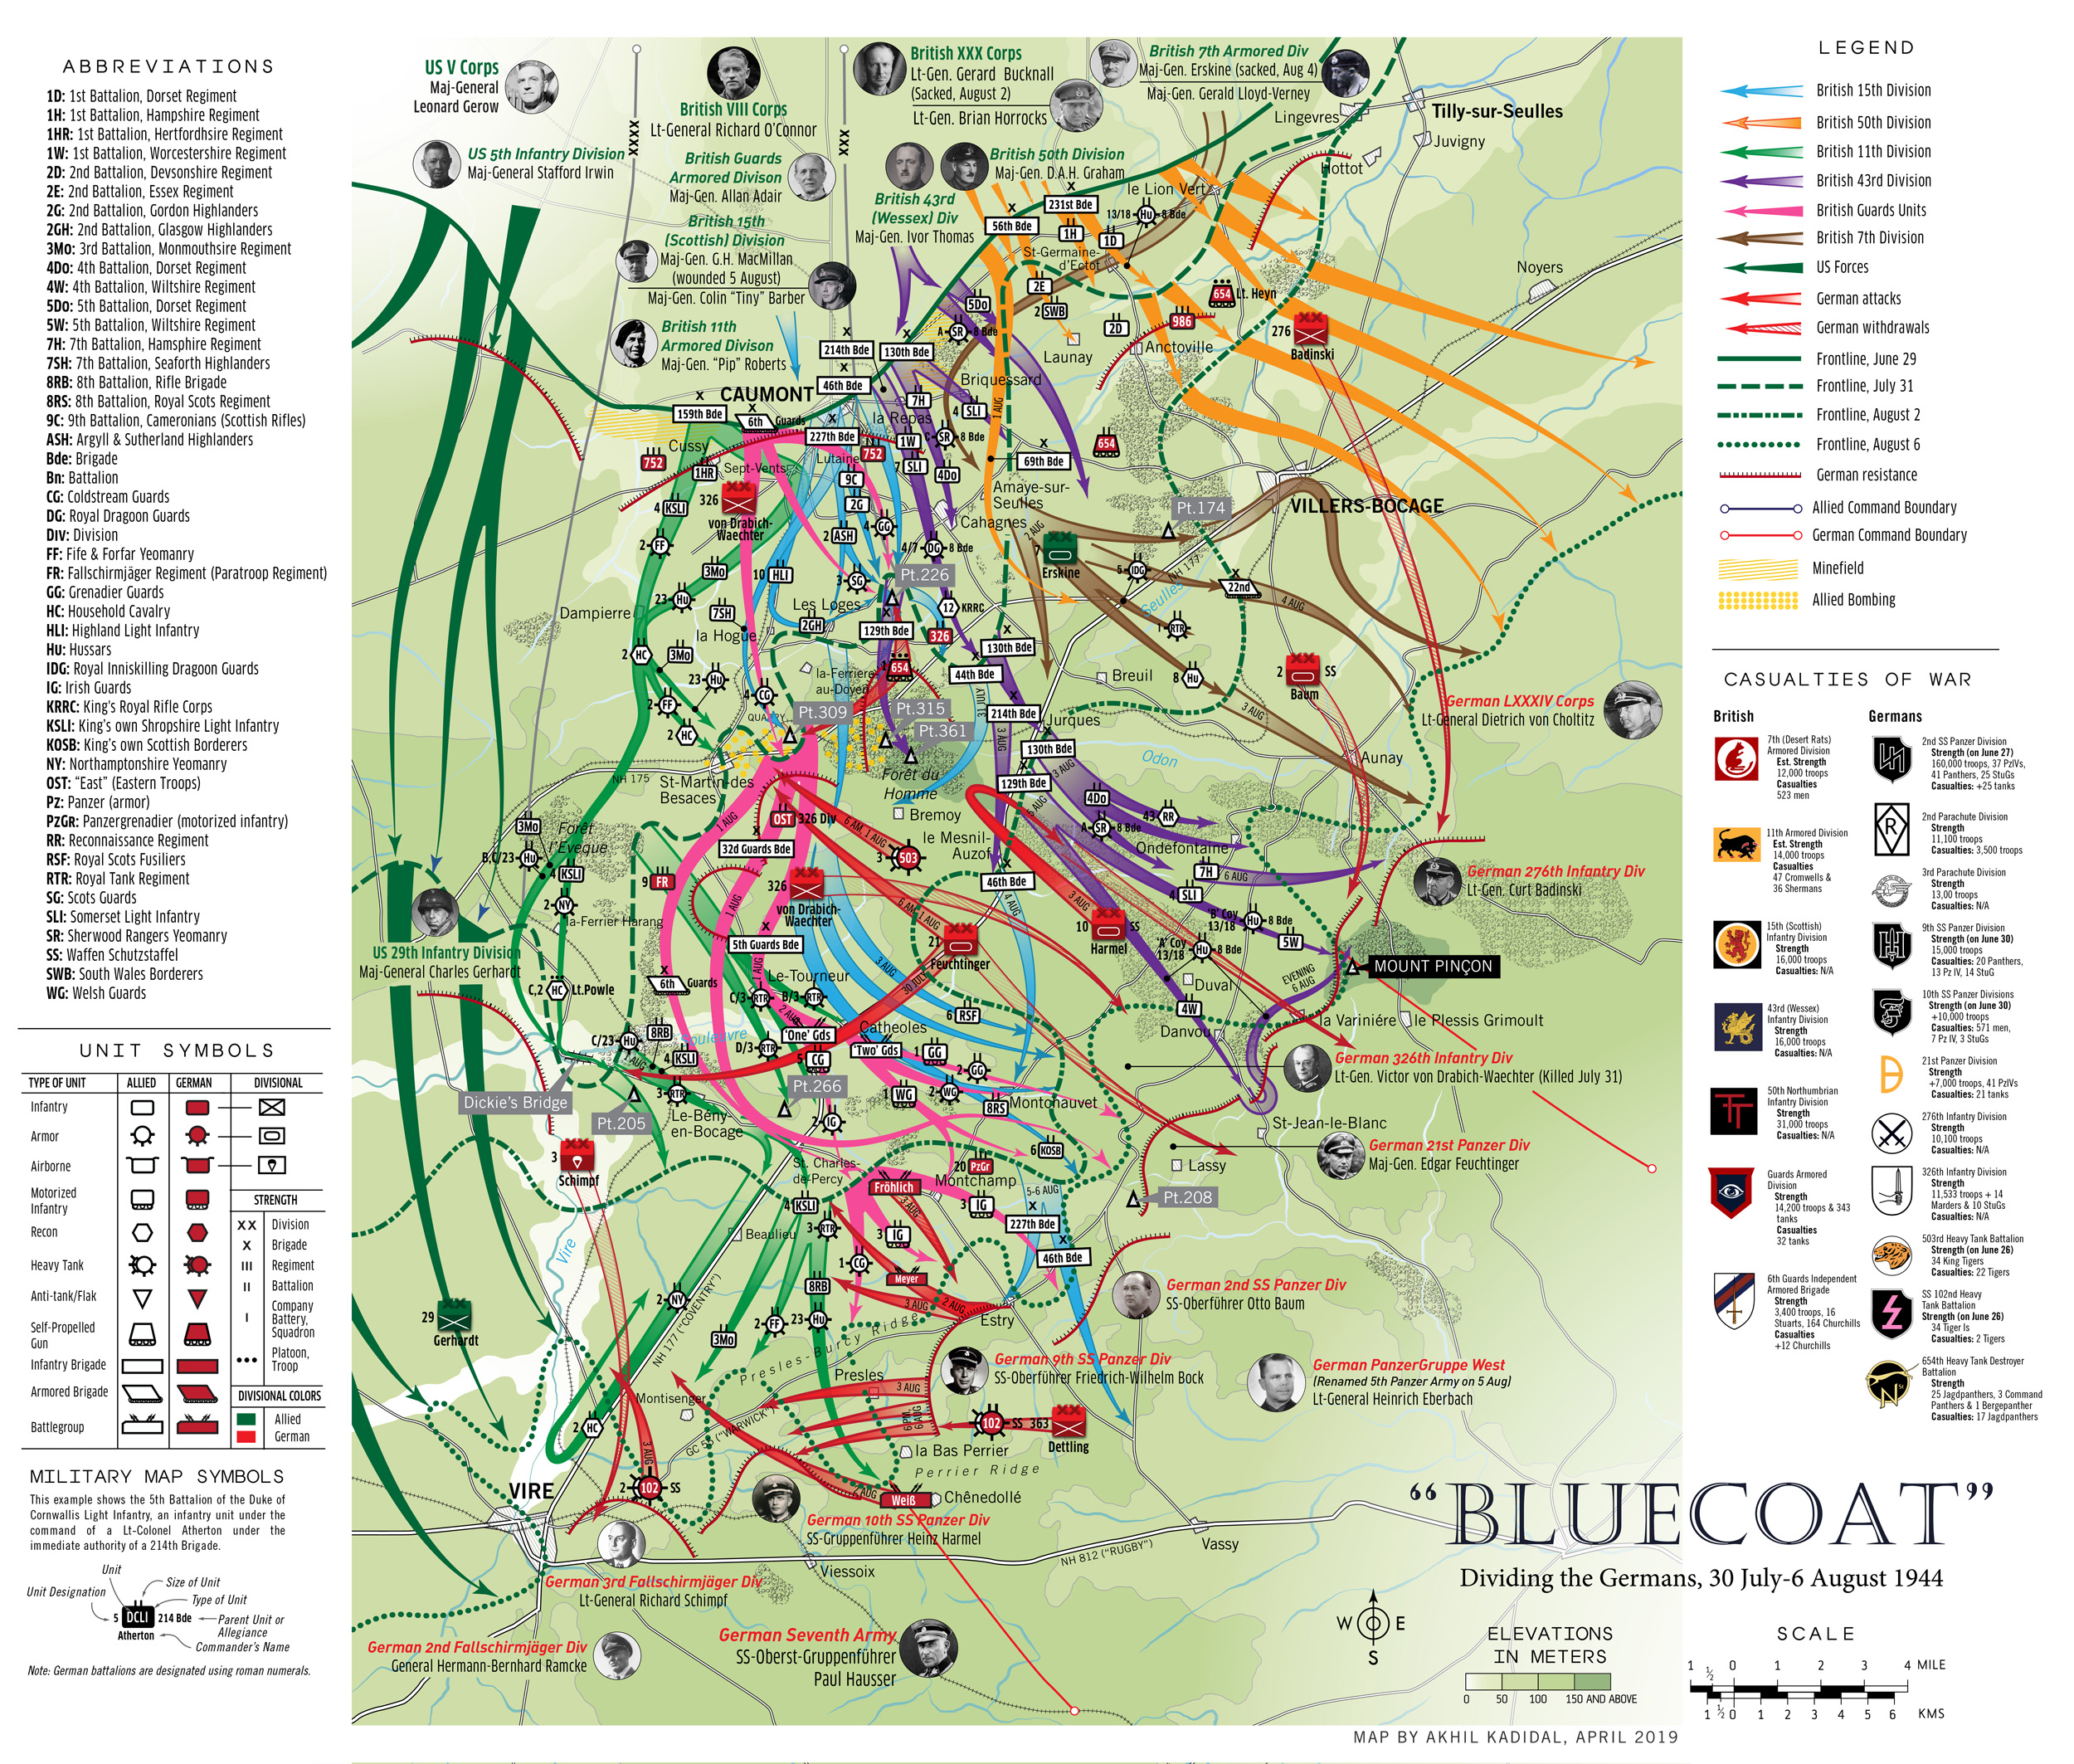
Operation “Bluecoat” is another underreported, if esoteric, British offensive whose details were largely lost to me until I took to creating this map.
Despite the Americans committing 15 of 22 divisions under General Omar Bradley’s US 12th Army Group to Operation “Cobra”, in order to breakout south, into Brittany, US Army gains were initially tepid until the Germans began to retreat at the tail of July.
To help the Americans, the British launched an offensive of their own down the “Suisse France” area of Normandy, so named because it resembled Switzerland with rolling hills, ridges and wooded plains. The British operation, codenamed “Bluecoat,” launched on 30 July diverted significant German forces from “Cobra.” By 31 July, the American offensive was over, with US troops having seized 40 miles of territory, which took them out of the confines of the bocage.
“Bluecoat” carried on into August 1944, with British troops securing Mont Pincon, the highest feature in Normandy.
In retrospect, this map was challenging to create because of the sheer range of forces involved. Information was sketchy in places and too detailed in others. My attempts to research accurate strengths and losses for the units which took part in this battle relied heavily on fragmented data and as a consequence, are largely approximates or estimates.
N | The Mortain Counterattack
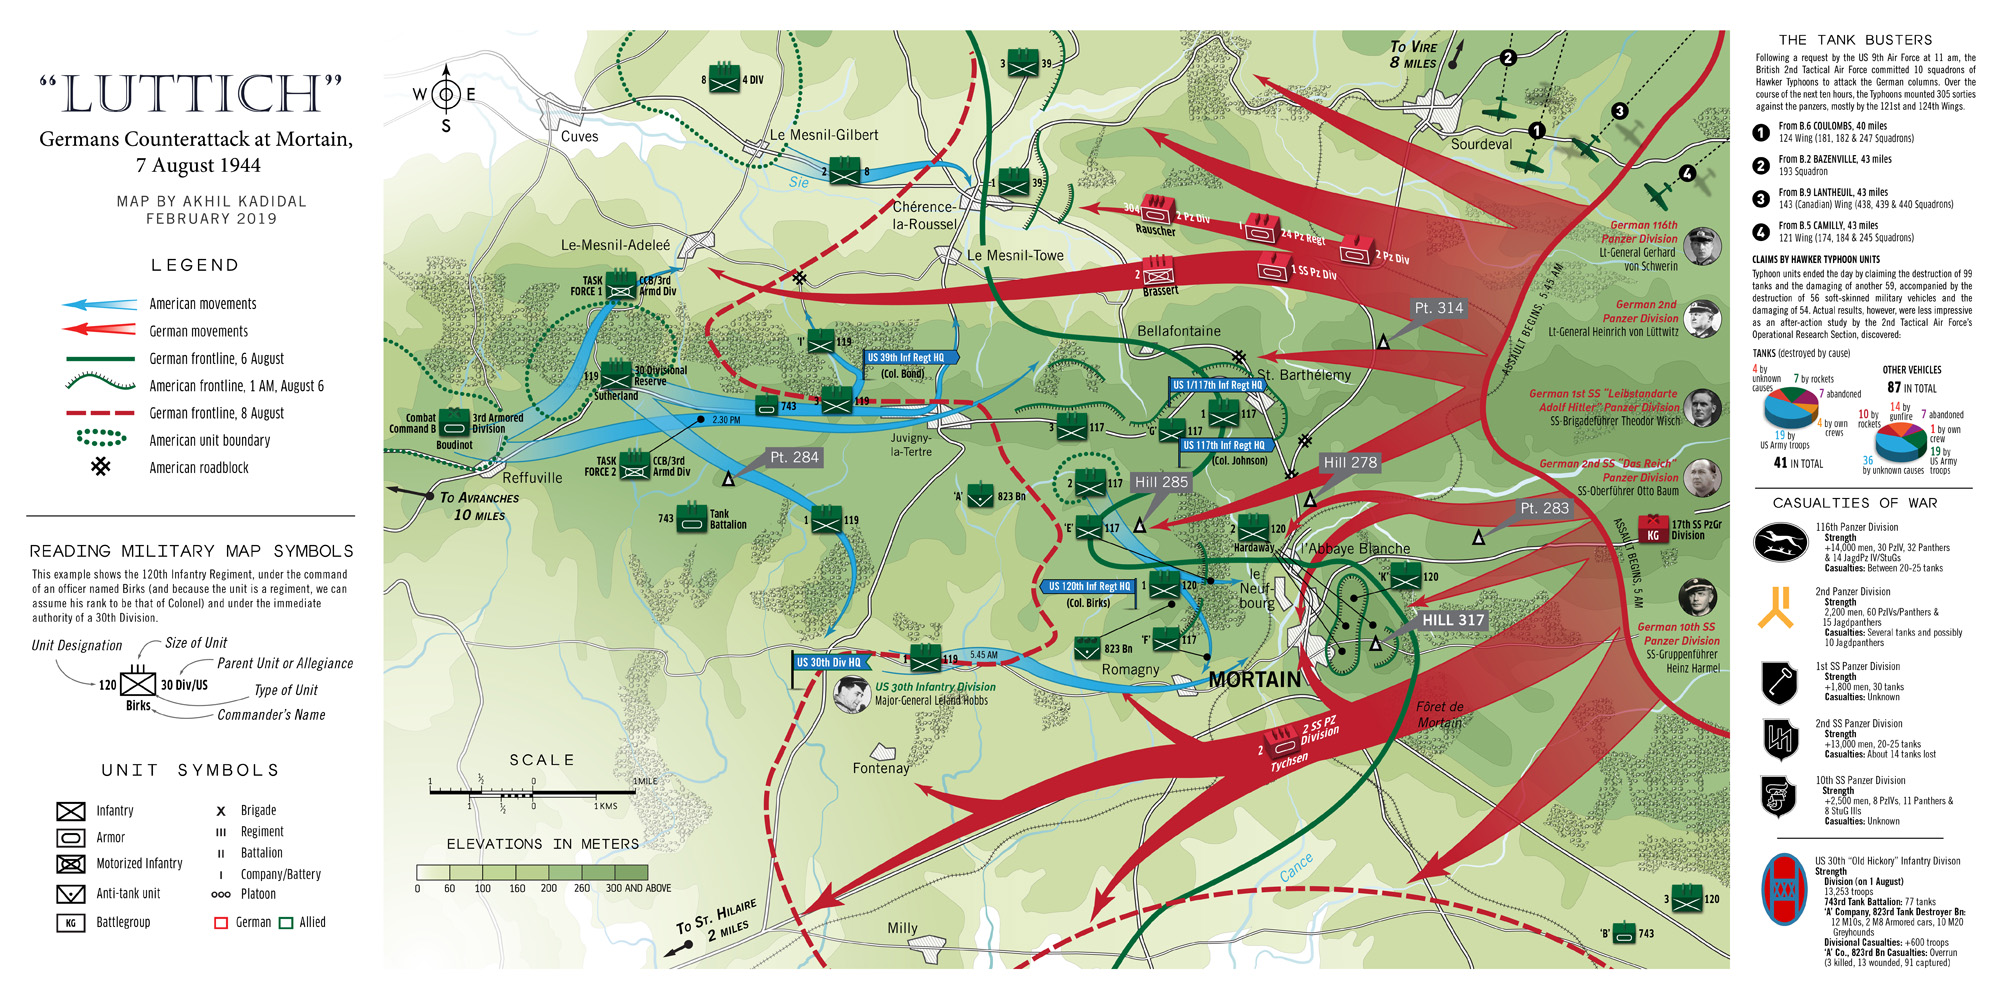
Since the “Mortain Counterattack” is described in some detail on Wikipedia, I’ll get to the more interesting aspects instead.
The counterattack was another in a long line of Hitlerian fantasies of driving his enemies into the “sea,” a vision realized in 1940 in spectacular fashion when he had driven the British to Dunkirk.
In August 1944, when US Lt. General George S Patton’s Third Army rushed south along Normandy’s western coast, following the American breakout out of the hedgerows during Operation “Cobra,” Hitler saw an opportunity to strike at Patton’s flanks and isolate the Third Army until it could be destroyed.
Hitler authorized five armored divisions (which had been badly wracked by losses in the proceeding weeks of combat) to cut across the American lines and reach the sea at Avranches. Unfortunately, three problems stood against Hitler’s miasmatic dreams of victory: overwhelming Allied fighting strength, superior Allied air power, and exasperated German generals.
One, Lt. General Helmut Detleff Graf von Schwerin, an officer of the Old Prussian school, was so convinced that the offensive would fail that he neglected to move his division to the appointing launch-off area. Von Schwerin’s reluctance was rooted in his hatred of the Nazis. In 1939, he had even traveled to England with another German anti-Nazi, Admiral Wilhelm Canaris (head of German Intelligence), to warn the British of Hitler’s plan to invade Poland.
Von Schwerin’s lethargy in moving his division into place against Mortain prompted his superior, General Hans von Funck, to lament that von Schwerin had made a “mess of things.” Unknown to von Funck and the Gestapo, von Schwerin was also complicit in the 20 July 1944 bomb plot against Hitler’s life.
Von Schwerin was sacked, and with his hatred of Hitler well-concealed, he escaped a possible firing squad after the intervention of senior Prussian officers, including the venerable Field Marshal Gerd von Rundstedt. By this time the Mortain counterattack had already failed, brought to a standstill by stiff American resistance and airstrikes by the British 2nd Tactical Air Force.
The battle offers an interesting parallel to the events of Operation “Epsom”. During both operations, Allied troops had held the strategic high ground. But unlike in “Epsom,” American troops at Mortain had not retreated despite being nearly overrun. Instead, supported by Allied aircraft which had achieved total air superiority over the battlefield, they had inflicted shattering losses on the Germans.
Had Montgomery allowed his troops to hold on to Hill 112 during “Epsom” while supported by massed Allied fighter-bombers, he could have inflicted heavy losses on several German SS divisions. The British subsequently could have used Hill 112 as a base to strike towards Caen at an earlier date.
O | The Big Push (Towards Falaise)

A complicated and fun map to make, this is really a “double map” describing two separate military offensives, Operation “Tractable” and Operation “Totalize.” It took nearly four days to complete, with its large “poster-sized” dimensions taxing the RAM on my laptop.
With American troops under Lt. General George S. Patton taking up position south of the German army concentrating in a valley in-between the French towns of Argentan and Falaise, the Anglo-Canadians were ordered to secure the area around Falaise to entrap the Germans in a “pocket.”
Their initial offensive, codenamed “Tractable,” however, petered out in the face of fierce German resistance, prompting the Canadians to launch a second offensive days later with fresh troops, who, although untested in battle, were nevertheless determined to prove themselves. Among them were the men of the Free Polish Armored Division who were driven by a fanatical hatred of the Nazi war machine that had subjugated their homeland four years before.
Falaise eventually fell, but a gap of 25 kilometers (15½ miles) still existed between the Anglo-Canadian-Poles and the Americans at Argentan, prompting an exasperated Patton to threaten to “drive the British into the sea for another Dunkirk.”
He was all set to order his own troops to advance out of Argentan and close the gap, but his superior, US Lt-General Omar Bradley — in a controversial decision — stopped him, arguing that it could lead to a clash between the Allied forces. He preferred, as he said: “a solid shoulder at Argentan to a broken neck at Falaise.” The “pocket” was eventually closed and the actions entailed are described in the first map of this post.
The Situation on 3 August 1944

This map shows the situation on 3 August 1944, by when Lt. General George Patton’s US Third Army started to break out of Normandy, unravelling the German army’s left flank in the process. The break out gave the Allies an opportunity to encircle the enemy. Moving quickly, they would snare the Germany 7th Army and Panzergruppe Eberbach in a pocket near the French town of Falaise.
P | The Falaise Pocket

The idea of German efficiency evokes a vision of the future, of Maglev trains, rockets and hyper-modern kitchens straight out of Popular Mechanics. Arguably, however, the reality of the Third Reich was diametrically opposed to this image, being a society sustained on bribery, cronyism and mismanagement. It seems inconceivable now that the Reich, had it won the war, would ever have been a bonafide superpower and capable, as some writers believe, of colonizing the solar system.
This inherent weakness, coupled with the efficiency of the Allied armies had left the Germany 7th Army and Panzergruppe Eberbach under siege by three Allied armies by August 1944. Having had their lines fractured by US Lt. General George S Patton’s Third Army, the Germans were unable to prevent Patton from arching down south to come up beneath them at the town of Argentan.
Unable to withdraw because of pressure maintained on them by the Anglo-Canadians fighting down from Caen, the Germans presented the Allies with an “opportunity that comes to a commander not more than once in a century,” as General Omar Bradley of the American 12th Army group told US Secretary of the Treasury, Henry Morgenthau Jr.
“We are about to destroy an entire German Army.”
Q | Closing the Falaise Pocket
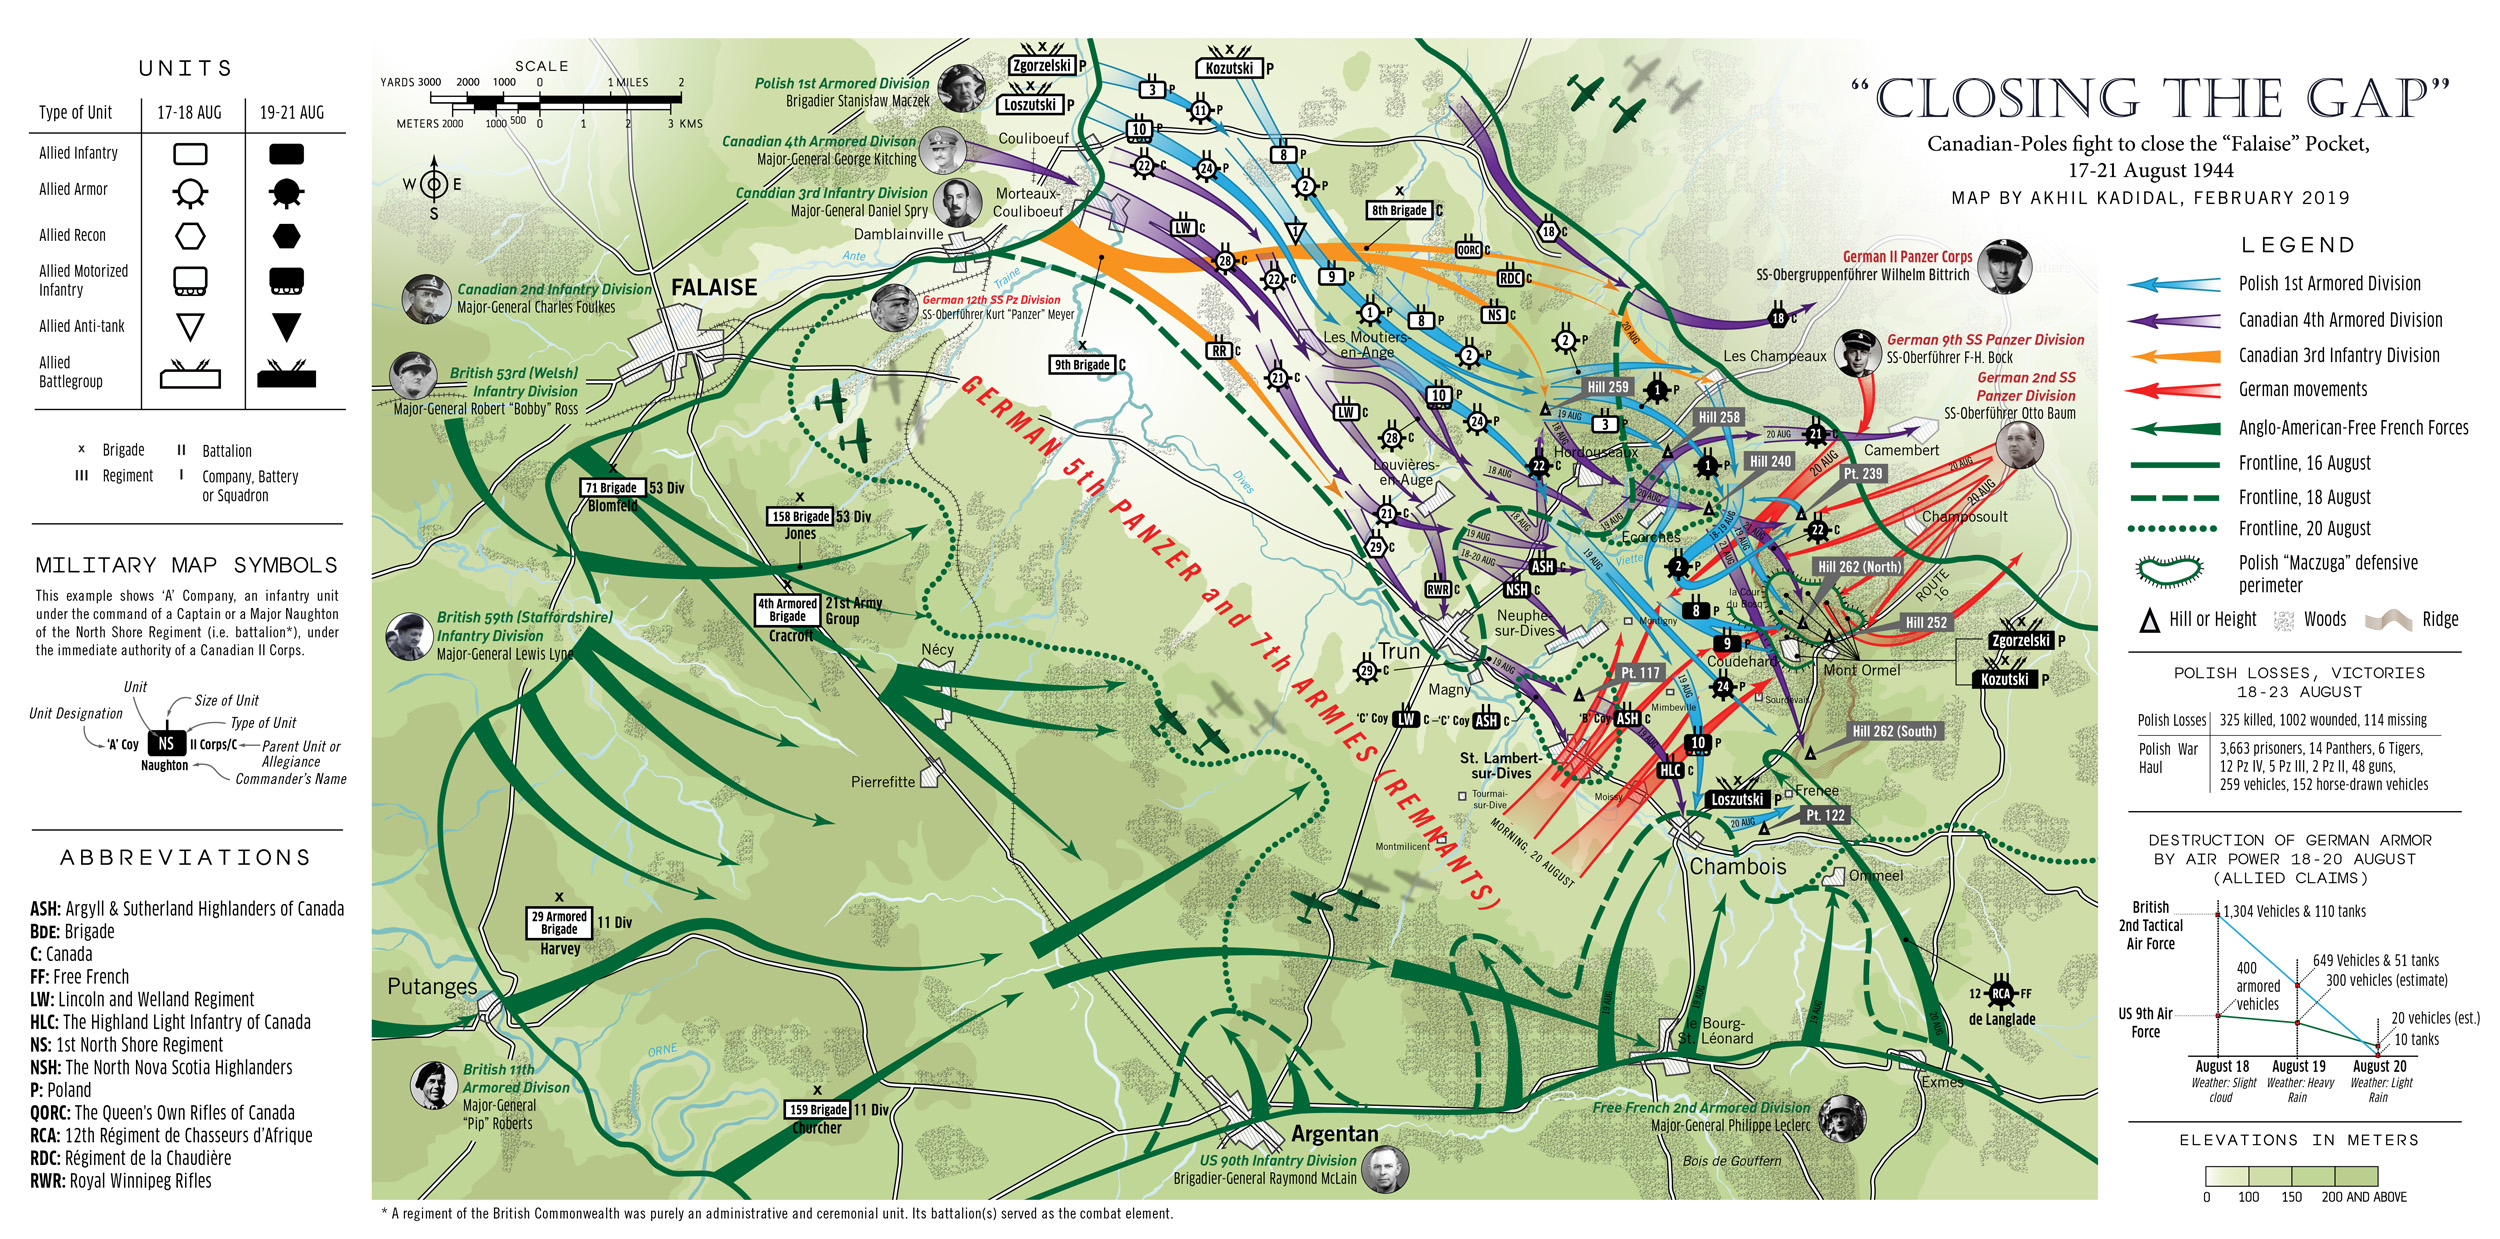
Building on the work of Major C C J Bond, late of the Canadian Army whose work was published in the official “The Victory Campaign,” Part III, the above map includes research from several sources, including Terry Copp’s Fields of Fire (2003). I was particularly interested in analyzing the travails of the Free Polish Division around the town of Falaise (depicted using blue arrows) whose contributions have been largely ignored by postwar historians.
The included figures of German motorized transport and tanks claimed as destroyed by the Allied air forces can be misleading because of overclaiming by pilots. In fact, the Germans lost 133 tanks (most of which were abandoned), 701 “soft-skinned” vehicles and 51 guns in the so-called “Falaise Pocket,” in contrast to claims by pilots that they had blown up 6,251 vehicles within the pocket.

Pinned in on all sides, with an eastern exit being relentlessly tightened by Canadians and the Free Polish, an estimated 80,000 Germans became entrapped in what was christened the “Falaise Pocket” by August 16.
Even as the Germans held on, Hitler issued fantastical orders calling on them to counterattack. By 21 August, the Canadians and the Poles had closed the pocket, trapping an estimated 60,000 Germans in an area measuring 32 x 15 miles. Carnage ensued. Attacked from all sides, about 10,000 Germans died before the rest surrendered.
The battle for Normandy was over.
Allied Airfields in Normandy


very impressive work and I really appreciate the amount of research and detail.
Thanks, Chris. Appreciate it!
Congrats!! I knew your work, but with this one you have reach the glory. Many famous writers about World War II should learnt of you or take your permission for use your impressive maps and graphics.
Cheers from Spain!!!
Ha. Thanks, Carlos. I was determined to get these maps as accurate as possible, primarily because I was annoyed that such maps on Normandy do not exist. Hopefully, the effort was worth it.
I’ve spent many a year studying this Battle and your maps are exceptionally clear and informative. The right balance of detail and clarity. Congratulations!
Thanks you. I’m glad that folks find them useful. Truth be told, making them helped me understand the campaign better.
Hi, these maps are absolutely awesome! Well done. Only downside is that the link to the Epsom one (to see in another window & therefore larger) isn’t working & generates a “Page not found” error
Thanks very much, Colin. I appreciate it! I’ll get the link to the “Epsom” map sorted out. I hadn’t realized that it was broken.
Dear Sir, I study Bluecoat since a while, having been on the terrain, and your map on this operation (and all others) is absolutely brilliant. Better looking than military maps, and easier to understand for non specialists. I have made done by a printer a poster size 100cm X 84cm copy out of it, and it is a fantastic educational tool, especially for children. It would be worth making a book out of all those fantastic maps ! Thank you very much ! I would like also like to study Totalize/Tractable, but the link doesn’t work(page not found). Is it possible to sort it out ? (Epsom now is OK) I imagine all this has been a considerable work, many thanks again !
Thanks, Jean-Marc. The intention is to publish all the maps in a book sometime this year or maybe next year. I’m glad that people are finding the set informative.
I didn’t realize that the link to the Totalize-Tractable map was also broken. Mighty strange. In any case, I am reworking that map and will post an improved version soon.
Just found your maps. Really helpful in my recent hobby of researching the death of Adolf Diekmann. He died on either the 29th or 30th of June 1944. He was killed outside his command bunker I suspect late at night on the 29th or early AM on the 30th. Your Epsom map shows his 4th SS Panzer Regiment just north of Noyers. Diekmann’s death card on file list his death just north of Noyers. I’m attempting the impossible it seems but trying to locate his command post on the 29th,30th. If you have any insight I would appreciate it. Thanks for publishing these maps.
Marty
Houston Texas
Hi Marty, this could be a tough one. But the information could be in one of the books that I have lying around which were used as references for these maps. I’d have check. It’ll take me a few days, however.
Thank you very much. I find it strange that Diekmann’s death is not discussed more given his role in the Oradour massacre and his possible court martial. Phillip Vickers in his book even made mention that Diekmann’s death may have been faked. One author raised that the Oradour massacre may have been about stolen gold that Diekmann was looking for in the village. Lots of questions.
I have always wondered that myself. I hadn’t heard the theory about his death being faked. I doubt it anyway. What objective would faking the death achieve? Deikmann was a bonafide Nazi, and the war machine of the Third Reich arguably gave him a sense of community. The gold theory also is new to me. It’s all pretty interesting. I’m curious as to what prompted your interest in Deikmann.
The only reasons that Diekmann may have faked his own death is pending court martial and being the fall guy for Oradour or knowing the likely outcome of the war and going back to the rear to retrieve the stolen gold. I’ve not seen enough solid information to adopt this theory (yet). One has to put together a number of pieces from various sources for that theory to make sense. It’s worth review if not just for the reason of (what if). Points to consider:
The attack on Oradour seems to have no justification in regard to the kidnapping of Major Kampfe or the kidnapping of Karl Gerlach. One could assume Karl Gerlach on orders of Stadler to look for billets was really out to hide the gold. When taken by the Resistance was the gold stolen by the Resistance and Gerlach thought the gold was taken to Oradour? Was that the basis for the search of Oradour and need to kill everyone in or near the village (cover up the real reason for being there). Remember on June 9th Stadler, Diekmann and Gerlach were at the battalion level. Did the Resistance really know that the gold was the reason Diekmann searched and killed everyone in Oradour but kept quiet to deflect some responsibility for the massacre? Robin Mackness has the gold theory in his book Oradour Massacre and Afterwards. In the mid to late 1960’s a suppose Resistance member was caught trying to move gold from Switzerland back to France and made a statement that he had found the gold near Oradour during an ambush and had buried it beside the road (I still have much research to do on this information). Was Karl Gerlach out looking for Kamphe (who may have had the gold)? Kamphe was kidnapped and killed by the Resistance. Why was Kamphe out riding in his car in known Resistance territory without support? Was it his car that the gold was found along with the driver and possibly others dead while Kamphe was taken away to be shot later? There is a conflict in testimony regarding the discovery of a burned out vehicle near Oradour from company commander Kahn (he was in Diekmann’s Battalion and it was his company that was at Oradour). It’s confusing to how much Stadler really knew about Diekmann’s real objective at Oradour. Stadler supposedly told Diekmann to bring back hostages, Diekmann did not. Phillip Vickers in his book Das Reich 2nd SS Panzer Division Das Reich Drive to Normandy brings up Deikmann’s death being problematic. Given the concern of the stain of the massacre, the fact that during a critical time in the battle it was necessary to have a Divisional Court to address Deikmann’s actions at Oradour highlights the spotlight on the event BUT Diekmann was not released of his command. His death one would think would have been a much bigger deal and more info on the matter would have surfaced in the post war trials in Bordeaux in 1953. Not a word. Prior to Oradour he was said to be the soul of the battalion.
If the Oradour massacre was really about stolen gold from the SS the Resistance would not want that information to surface as it would have caused French citizens to place some blame on the Resistance for the massacre. It could have been the perfect storm, a group of SS men where trying to hide the gold possibly for funds to flee if the war was lost, the Resistance stole it and to avoid blame of Oradour kept quiet about the gold as well. Crazy theory? Maybe.
Questions: Did Deikmann have a wife, kids? Would his staff help in faking his death so he could avoid court martial? So many of his unit died before the end of the war making it hard to know much about his death but there were survivors and they were not talking.
Marty, Thanks for your interesting post. I must confess that I’ve always found the Oradour-sur-Glane incident depressing and shocking, and consequently, I’ve always skirted over it. It’s pointless, brutal stuff. There is even a report by a USAAF crewman who was shot down in the area that the Germans had crucified a baby.
This business about gold being at the village is surreal. It almost has the makings of a good Alastair MacLean novel (remember him?). It may well be true. However, I can’t comment on that or on the works of Mackness and Vickers as I’ve never read them. But there is Occam’s Razor: the simplest explanation is usually the most plausible. I think that the Germans lost their collective minds at Oradour. There is, after all, precedent for this particularly SS brand of bloodlusting madness – in Russia, and in Czechoslovakia, after Hedyrich was assassinated. Antony Beevor has also written reams on pointless war crimes by the SS against Belgian civilians in his book on the Battle of the Bulge.
As for Deikmann, I remember vaguely that he had a wife and a child. Now, over 70 years old, his son visited Oradour a few years ago and stating that he loathed being the progeny of such a man (if I remember correctly). The question is would a man fake his death to extent of abandoning his family?
I’m not sold on the fake death. His company commander Kahn disappeared during the same time frame only to surface in the 60’s. If I recall he lost an arm just before he I assume went AWOL. I think most officers at that time knew the war was going to be lost.
Some think the Oradour was mistaken for another village that had known Resistance ties. Tragic luck for the citizens. It’s clear at the stage we may never know. One can go down a lot of bunny trails when researching the Der Fuher regiment. I’m guilty of straying off course. My main interest in locating the suppose location of Diekmann’s command post on June 29th. Somewhere north of Noyers.
Thank you for the opportunity to broadcast a lot of thoughts on the subject.
The matter of Oradour does need further study, no doubt about it.
I’ll let you know if I get the information about the HQ. Meantime, you’re always welcome to add to your thoughts here.
Absolutely beautiful maps! I greatly appreciate your attention to details, like spotting 4 88’s, but not having the maps appearing to be cluttered.
Thanks a lot. Appreciate it!
Tremendous achievemnet!! I hope some day You moght find the time to cover Operation Market Garden!!
Thanks for this. Wow! I wish I’d found this before we visited Normandy for the 80th Anniversary.
Hi, thanks for the comment. Appreciate it! I have additional maps on D-Day that will gradually go online as part of a narrative history. Two sections are currently online.
Thanks Akhil. Please check your yahoo inbox.
Thanks, Dennis.
Wow! Amazing map work! We visited Normandy for the 80th anniversary commemoration and I wish I’d come across your website before we visited. We stayed in a village that was liberated late on 6 June by the 2/Essex Regiment of the 50th British Division and there’s a road marker there that identifies the front line at that time. I’ve just started playing through the Multi-Man Publishing Sword, Juno and Gold Beach company level campaign game and these maps really let me check my progress against historical events.
Can I ask which village? It must have been near Sommervieu. I’m glad to hear that the maps are helpful.
We stayed at a gite in the village of Saint Sulpice just northwest of Sommervieu. My recollection is that there was a marker on the D-153 just west of Saint Sulpice indicating where the front line was on the evening of 6 June but I regrettably did not get a picture. Your Gold Beach map is accurate in that area. When I was wandering around the D-Day operational area for 4 days, I thought it would be a great idea if the French identified where the front line was on each of their roads during the course of the campaign.
About a month prior to our trip I discovered that I have a relative (possibly a cousin of my father?) who’s unit (2/KSLI/185th Infantry Brigade/3rd British Division) landed at the Queen Red sector of Sword Beach at around 1000 on 6 June. This unit was the lead British unit advancing on Caen that day but got held up by 21st Panzer at Lebisey. I spent several hours tracing this unit’s route from the beach to the Lebisey where there’s a marker highlighting the unit’s furthest advance. Regrettably my relative died on 3 August, 1944 during what I believe was Operation Bluecoat. He is buried in a British cemetery not too far from Villers-Bocage which we also visited. We finished up our trip wandering around the area where the Falaise Gap was closed.
This was the third time I’ve been to this area of Normandy and we plan to get back. We live in southern France.
Thanks for the detailed message. Sounds like it was a great trip. Saint Sulpice was indeed liberated by the Essex.
Can you send me (via email: akhil213@yahoo.com) a Google map marker of the furthest point reached by the 2nd KSLI on 6 June? I’d like to double check this location on my “Sword” map.
Yes, the August offensive would have mean Operation Bluecoat. But I’m not sure that the 2nd KSLI was involved in that offensive (I need to go back and check my data sources). The 4th KSLI was, however. I wonder if your relative was transferred to this battalion.
Are your map prints for sale? Possibly collected together in a book format? They are wonderfully detailed and clear.
Hi, thanks for your interest.
I am working towards the publication of a map history of Normandy, but estimate that at least 12-18 months are required to conclude my research on the campaign, and complete the remaining maps in the series.
Great maps, been reading some books on Bluecoat and its really helpful to get a sense of the battle.
I’d advise you though to read some other recent books about Montgomery’s strategy during the normandy campaign, like Stephen Hart, John Buckley, James Holland, Ian Daglish, etc,, to get another view on the topic (of Montgomery’s leadership). Just as an example, the idea that Montgomery “betrayed” the 15th infantry division in Epsom is pretty laughable and does a disservice to the quality of your maps,
I appreciate the feedback! Useful.
Love your site!
Thank you, Roger. I appreciate it!